Showing posts with label glitter. Show all posts

Wednesday, July 2, 2014

Christmas in July- Cousin 'Tis the Season Part 2


Hello dear.


This little deer is all blinged out, looking just like a Christmas ornament! For my second "Christmas in July" project I've made a holiday-themed pin using clay as my base. 


I took a ball of yellow clay (a little bigger than a quarter but thick) and rolled it in some gold glitter. I took Cousin's deer charm pack from the 'Tis the Season line and cut off the charm loops on either side. I pressed the deer in so that it formed a cabochon of sorts. I then took Cousin's rhinestone chain  and embedded it around the sides of the cabochon. Finally, I took headpins with pearls on them (cut to like .5") and stuck some at the top of the cabochon. To make the bottom dangle, I cut a 1" headpin and bent it into a horseshoe shape and embedded it in the bottom. 


I baked this for about 30 minutes in a toaster oven at 125 degrees. Times may vary based on what oven you are using and the size of the cabochon. Then, when cooled, I added dangles of Cousin pearls, Jewelry Basics crystals and one green statement pearl from their 'Tis the Season rose/pearl strand. I glued a pin backing to the back.


This technique could be used with all different kinds of pendant charms or even just cool things you find- have an interesting shell or sparkly rock or something? Embed them in the glittery clay and make them into pins. Add any color crystal dangles to match your theme. With Fourth of July coming, I could see a start pendant in red glittery clay with blue and crystal dangles!


This is what the new packaging looks like. Be sure to scout it out at your local craft stores!

All photos copyright Allison Beth Cooling. Do not use/post images without getting back. 

Friday, February 8, 2013

Cheap-o Pave Heart Necklaces- For Valentine's Day!


Want sparkle for Valentine's day, but don't have the cash?
No worries.
Make yourself a cheap-o diamond heart necklace out of clay and glitter.
Again, another fast and easy tutorial that doesn't take mad skills to complete.


Sparkles!!!
And you won't have to dish out $1000+ dollars for them.


Quick to make, these will become addictive. 
Maybe make them in other shapes if you are not into hearts (like me)....


Let's get started.


Step 1: Gather materials. Needed are pliers, glitter, clay, a headpin and a chain.
I used a box chain because I think it sometimes looks fancier than regular chain.


Step 2: Pick out your color of glitter; make sure it's superfine glitter, not chunky.
Take a marble of clay; color-match the clay to the same color of the glitter. 
Some tips: add in little bits of color at a time, to slowly work to the color.
To make a color duller, add in some of the contrasting color, not black.
Your clay doesn't have to match exactly, but make it as close as you can.


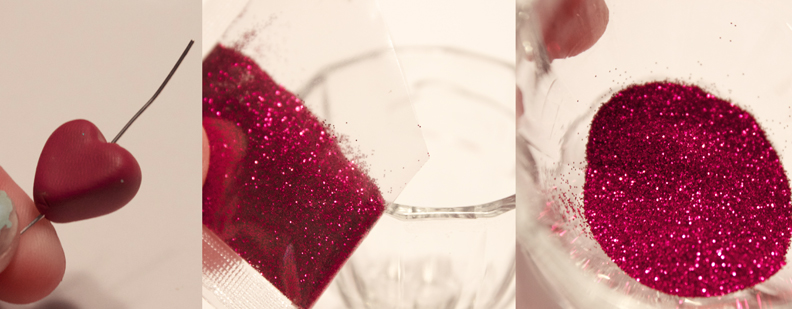
Step 3: Take your marble of clay, and shape it into a little heart. It helps to flatten out the marble, then take a toothpick and press it right in the top, to create the two rounded pieces at top. Push your headpin right through the center. 
Take your glitter, and pour into a small cup or little dish. Gently rub the glitter onto your bead, pressing down to adhere the glitter to the surface of the clay. Press firmly but don't disfigure the bead.
You will want all the glitter to cover the surface of the bead; this is where the clay color comes into play; if some of the clay shows through, it will be unnoticeable if the colors match. If they are off by a lot, then it will be very noticeable. 


Step 4: Once all the glitter is rubbed in and covering the surface, go and bake your charm. I usually do like 125 degrees or less for 15 minutes in my
 toaster oven.


Step 4: Once the bead is baked and cooled, place back on the headpin (you could have baked with the headpin in as well if you wanted), cut and loop the wire. Attach to the chain.
You can also seal the bead with clear lacquer after baking if you want, to make sure any glitter doesn't rub off. It's recommended.


Pretty! Not real diamonds, but very sparkly and festive.


Make some in different colors for each outfit.
I made a hot pink one as well. 
I won't be wearing any of them, I'll give 'em away.


The box chain sparkles and looks a lot richer to me than other types of chain!
You could also use gold findings and chain if you like yellow gold better.


All images and text copyright Allison Beth Cooling. If you share/use/post this tutorial, please link back to me. 
It is much appreciated!


Wednesday, November 7, 2012

Quilled Peacock Earrings


For this next project, I used a different inspiration than my normal
 designer pieces. Peacock feathers!
I wanted to capture both the colors and the elegance of these beauties, so I figured I'd try something new and make a quilled earring. For those who don't know, quilling is the art of rolling and shaping thin paper strips. I find it very pretty and versatile, and not used often in the world of art.


This is a very easy tutorial for quilling beginners; usually, you want to use a quilling tool (sort of a wand with a slot at the end to insert and roll the paper), but you can use an eye of a large sewing needle instead if you are new. It will be a little harder 
though, but it's still doable.
Adding gems and glitter to these earrings makes for very sparkly and eye-catching earrings, despite their size. A perfect party accessory when you want something just a little different, something that people haven't seen before. They will be surprised when they find out the majority of the earring is paper!
We seal these earrings with clear gloss so they are somewhat waterproof, but still be careful with these.


Use any color combination, my combo was obviously inspired by peacocks, but if you have a certain outfit to match please do. Make these in all different color schemes for different party outfits!


Let's get started.


Step 1: Gather materials. Needed are scissors, glue, a toothpick, glitter, clear gloss (not shown), flatback gems (like 3mm or so), two earring posts, a quilling tool, and quilling paper.

If you're new to quilling, I suggest you buy yourself a quilling set like this one, it's got all the basics you need and isn't expensive at all. That's what I did when starting out! You can get really creative with the art, and can even make things like Christmas ornaments. The possibilities are endless!


Step 2: Cut 6 4" pieces of quilling paper. Create coils out of each strip, winding, the paper around the quilling tool, and glue the end down to hold. The toothpick helps you with getting little bits of glue on the paper! Let these dry.


Step 3: Pinch both ends of your coils to form eye-shapes. Glue two of these shapes side to side, as seen in the middle pic. Glue the third eye right into the center, then the posts onto the arrangement, as seen in the picture. Let dry.


Step 4: Glue three gems onto each center of the three coils. Let dry. Take the gloss and paint the edges of your earring, and cover in glitter. Let dry.
Then, paint the whole earring with clear gloss (don't paint over the gems as this will make them glassy), and let dry. This will help seal and strengthen the earring. Let dry.


Very elegant and dainty, plus tons of sparkle!

Little, but pack a punch of sparkle!


All photos and instructions copyright Allison Cooling. Do not repost this or use my photos unless linking back to me.

Saturday, August 25, 2012

Baroque Gem Earrings


The look for fall is opulence; the trends of over-the-top embellishment, gold accents, and baroque-inspired patterns are here to stay. Ornamental frills and lots of gems characterize the look, as well as the chic combo of black and gold. 
The Fashion Police majority even said it's a trend to keep, and I agree. 
You just have to be careful not to go overboard with the look into ornamentation overload. This DIY below adds the perfect touch of this trend to any outfit.


It's all about richness; or, the illusion of it.
Yeah, I don't have the money (or intentions) of buying a totally real Balmain or Cavalli silk dress, but I will make a knock-off pair of earrings.
That's just what I do.
And so can you.


Let's use our crafty scraps and make a totally eye-catching pair of dangles; old felt, plastic gems, some glitter. They look like you spent the big bucks.
How envious will people be when they find out they're handmade?


Let's get started.


Step 1: Gather materials. Needed are felt scraps (black and yellow felt), glue, a paintbrush, fine gold loose glitter, scissors, plastic gems, fish hooks and jump rings, gold acrylic paint and clear lacquer.


Step 2: Cut out a teardrop shape of black felt (you can make it any size you want). Paint the edges with clear lacquer to stop fraying. Repeat for next earring. If there are any flyaway frizzies, cut them off with scissors to trim.
Now, cut a smaller teardrop of the yellow. Repeat for next earring.
Take your gold paint and paint the top of the yellow teardrops. Make sure to blot them with a tissue so that they are not totally soggy (they won't dry very fast if they are). 
Once the gold is dry, paint a coat of clear lacquer, and pour glitter on top. Give it a couple of minutes to dry, then fish out the teardrop and tap off any excess glitter. Repeat with other gold teardrop.


Step 3: Take a glittery teardrop, paint the back with glue, and press onto the center of a black teardrop.
Repeat with other teardrop sets.


Step 4: Embellish. Take your gems and glue them in whatever pattern/motif you want to your earrings.
When the glue has dried, poke a hole right at top of the gold teardrop with a needle; put your jump ring through this hole and affix the fishhook to the jump ring.
Repeat for other earring.


All photos and instructions copyright Allison Cooling for Quiet Lion Creations.
If you share/use/post this tutorial, please link back to me. It is much appreciated!


Wednesday, August 1, 2012

Disco Ball Nails


Sparkles!
I love them. I decided they'd be even better on nails than this Alice and Olivia dress.
The technique is really easy, all that's needed is some thick-cut glitter and clear nail polish.


Let's begin.


Step 1: Gather materials. Needed are clear coat, white nailpolish, and thicker cut glitter (not the fine stuff).


Step 2: Paint your nails with a coat of white. Let dry, then place a coat of clear on the nail. Dip immediately into the glitter. 


Step 3: When clear coat is still sort of wet, push glitter down on to nail. Flick off any of the fuzzy glitter and push down so only one layer of the glitter is on the nails. See the difference in the bottom row of pics? (first two before cleaning, last two after). On the top pic, my pinkie and ring finger haven't been cleaned, while the middle and first finger have. Make sure you take off any glitter that's sticking out so it's a nice flat, clean layer. Repeat with other nails.
Coat every nail with top coat to hold glitter on.


Nails sparkle like disco balls! Feel free to use multicolored glitter for a fun effect!


All photos and instructions copyright Allison Cooling for Quiet Lion Creations.
If you share/use/post this tutorial, please link back to me. It is much appreciated!