Showing posts with label tutorial. Show all posts

Monday, July 21, 2014

"Daintyfied" Project 2- Infinity Wrap Bracelet


To infinity and beyond! 


This wrap was made from products within Cousin Corporation's new line, "Daintyfied". The line includes charms, chains, and components that can be mixed and matched to create lightweight, delicate jewelry that can be worn everyday! This collection hits Michaels craft stores August 15th, so look out for it! Also, it will be available on Prima Bead.
I used the Infinity charm seen on the far right.


I also used Cousin Jewelry Basics round crystals, gold jump rings, Cousin beaded chain and a gemstone 4mm round bead.


You know my obsession with stacking bracelets. Pair this rosary-style wrap with a chunky bangle and other bright neon beads for a cohesive look!


To make this wrap, simply take Cousin's Beaded Link Chain in a length 3X the size of your wrist, adding 6mm crystals in even spots along your length of chain. You will have to cut the beaded links and add your own link with this chain, then reconnect. 
For help on creating linked beaded chains, view my Crystal Amulet Necklace tutorial.


With the unfinished ends of chain, simply attach a clasp to one side and the Infinity charm to the other. Add a couple of charms to the other end of the infinity (I used one 6mm crystal, one 4mm gemstone and a blue bead from my linked chain). To wear, simply wrap and clasp at the jumpring!


All photos copyright Allison Beth Cooling. Do not post tutorial or pics without linking and crediting me!

Monday, September 16, 2013

Color Pop Bobby Pins


Fall fashion is in full swing! One of my favorite shows was the Ralph Lauren show at NY fashion week. It started off with an achromatic black and white scheme in simple silhouettes. Then, at the end, it was a huge surprise when a bright green sheath dress walked down the runway, followed by a rainbow of other colors! Totally unexpected, I knew this would be a great inspiration for a tutorial.


My Color Pop Bobby Pins are made from....can you guess....??? Legos! Flat legos work extremely well at creating a cool, minimalistic accessory but with a pop of rainbow, sparkly color! Just like the RL show!  


These are a really cool accessory that people will keep asking about; they would never guess that Legos are used as the base!


The little notches on the Legos are great places for gems to sit, and remind me of models in their dresses strutting down the catwalk! Also, all you really need to know how to do for this tutorial is glue; no hard work here!
Let's get started!


Step 1: Gather materials. Needed are bobby pins, white nail polish, flat legos (about 1.75" long), flatback gems (5 or 4mm), and E-6000 glue. 


Step 2: Use the white nail polish to paint the edges of the lego, all the way around. Make sure to not get any on the top of the lego, just the edges!


Step 3: Get out your flat backs; the order that I used is green, yellow, orange, red, blue, then green again. It's the same order as the actual runway show!


Use a dab of your E-6000 glue and put a dab on top of each lego notch. Add on your gems in the correct order! 


Let all the glue dry.


Step 4: Glue on your bobby pin to the back. I used E-6000 glue because it's a better hold than hot glue. If you want to use hot glue, which is easier, that is fine, but keep in mind the glue may pop off the lego if handled roughly. Let the glue dry.


Instructions and photos (excluding runway photos) copyright Allison Beth Cooling. Do not use without permission and do not claim as your own!


Friday, August 23, 2013

Official Cousin Corp. August Assignment: Florida-Inspired Hand and Body Chain


Alternative jewelry is grabbing the world by storm; and I am totally joining the bandwagon. As a jewelry designer, I love innovations in how to wear and design jewelry. These hand chains and body chains are a merge of distinct jewelry styles: the hand chain, a bracelet/ring hybrid, and the body chain, a sort of necklace/belt/harness mix! Just like with the Midi Ring craze, I am so stoked, and needed to make a tutorial.
And, as I am an official Ambassador for Cousin Corporation, this entire project (hand + body chain), is made exclusively from Cousin products! Just shows you that you don't have to shell out a ton of cash to make these pieces, and you can make them from materials you can get at any major craft store (i.e. Michaels, JoAnn, Hobby Lobby...)


I will show you my sketches for this project. I usually don't do sketches, because I like to create things as I go. But, I had a strong idea for this project and thought I'd make it more "official"!


I did stray a little from these sketches, by adding a few small tweaks. But, I thought I did pretty good sticking to my original idea here!


These are all views of my "Moodboard"; I usually always create a "Moodboard" when I start any sort of more involved project. I do this for my graphic design as well; I would recommend any other artist to do so: collect images you love from magazines, different pieces you have collected from your travels (here I included a seagull feather and shells I found while in Miami and Florida), and any other unique pieces or ephemera you need to create a certain "mood", or inspiration. This will help guide your project and can offer color palettes, imagery, or even in designers' cases typography, pattern and shape. I included images from photoshoots and advertisements from both fashion magazines and interior design magazines; don't limit yourself. You may find some imagery useful in any kind of magazine! You can see my final projects on the left. I wanted to capture the colors of the Floridian beaches (greens, blues, and silvers of the water and sky) and merge them with the cool, hip vibe of Miami.


Are we finally ready??? Let's get started!


Step 1: Gather materials. There is a longer list than I usually have! Ready?
*Beading wire (Cousin Cord Basics in White)
*An assortment of beads:
-Crystals (I used Crystazzi Crystal 6mm Erinite Bicones and 4mm Confetti Mix)
-Lampworked beads (Cousin Glass Swirl Beads). I used a mix of those two strands of beads and that card with the swirled beads on them.
-Plastic Faux Stone beads (Cousin Blue Crackle). These are those big blue beads you see.
-Plastic metal beads (From the Cousin Class in a Box kit). These are 6mm.
*Chain:
-White 3mm chain (Cousin White Chain)
-Silver 4mm Chain (From Cousin Class in a Box Kit)
-Green 5mm Chain (Cousin Green Oval Chain)
*Elastic Cord (From Cousin Class in a Box Kit)
*Jumprings, Clasp, and Crimps (all from Cousin)


*BODYCHAIN* 
Step 1: Lay out a bead mat (mine from Cousin) or a piece of fabric to keep your beads from rolling away, it helps! Set up a panel of beads that are about 3.5" long. I chose to use a mix of crystal, lampwork and faux stone for a lot of texture. The colors all are blues and greens, to speak to the beach theme! Cut a 5" piece of your beading wire.


Add a crimp and jumpring to one end, and thread the wire back through the jumpring and crimp shut. Add on all your beads in the correct order. Finish off the other side by threading on a crimp, then a jumpring, then thread back through the crimp...And crimp shut, trim the wire flush.


Step 2: Get out your small 3mm chain. Cut a length that is large enough to go over your head comfortably, and that stops below your collarbone. Mine was about 24". Add a jumpring to the top side of your bead panel, and connect this ring to the center of your 3mm chain (at 12" for me). 


Step 3: You should have two loose ends of chain. We will make a small mini-panel, just like we did in step 1, but this time, only make it about 1.5" long or so. Use crimps here and jumprings to finish off the panel, just like in Step 1. Be sure to stick with your bead theme here, colors and textures.


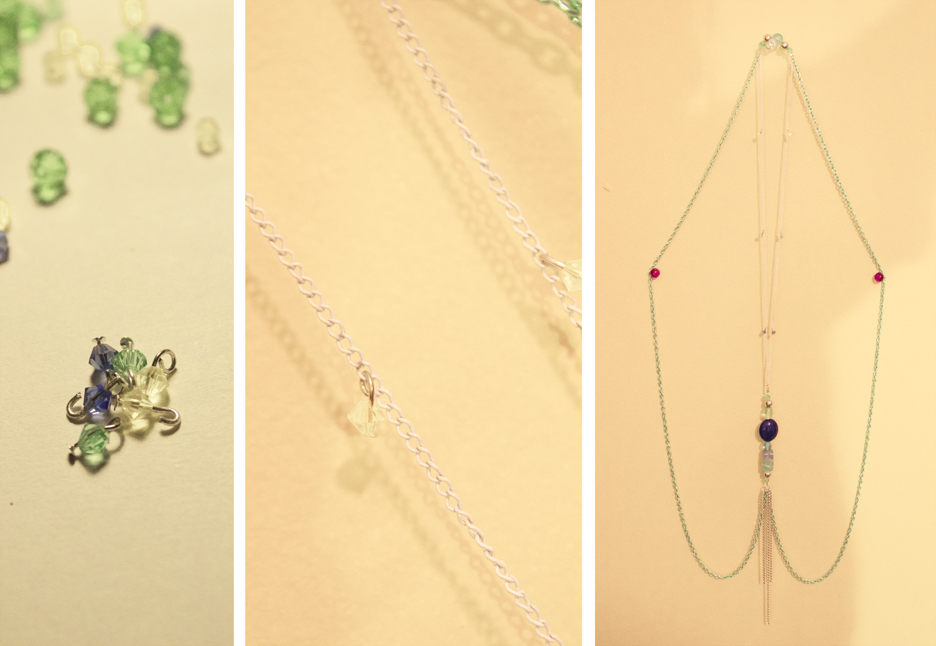
Attach each free end of 3mm chain to the jump rings; you will finish and have something that looks like my rightmost picture. Think of it as a really long necklace!


Step 5: With your larger 5mm chain, cut two 28" lengths (measurements may differ slightly, make sure it can go around your arms). Attach one end of each length to the bottom of the large bead panel (the OPPOSITE end of where your 3mm chain is attached!) and the other end to the corresponding side of the mini bead panel. 


This is what you should have now! The long necklace just gained armholes! 


Step 5: Now, with your silver 4mm chain, cut two 4" pieces and one 6" piece. Attach these to the bottom jumpring of your large bead panel, making sure the 4" pieces are on the outside of the green chain, and the 6" piece lies right in the middle. 


Step 6: To finish, add some glitz! Take your Crystazzi crystals (6 of them) and put them on headpins; cut about 1cm from the bead, and loop to close. Attach each of these in even lengths on your 3mm chain, as seen in the picture.
Your bodychain is officially finished!!! To wear, put the 3mm chain "long necklace" over your head, with the bead panel laying on your chest; stick your arms through the 5mm green chain, like a harness. It should sit comfortably and you should be able to move freely without getting caught!


*HANDCHAIN*
Step 1: With your elastic, thread on about 11 or so (enough to go around your middle finger comfortably) 6mm metal beads. Add on a crimp, and crimp shut. Cut the extra elastic.


Step 2: Take your 4mm chain and measure a length that goes from the base of the middle finger to the top of your wrist. Mine was about 3.5" long. ( I just used this chain as a measuring system because it layed flat. I will NOT be using this chain in making the hand chain). With this measured, cut a 5" piece of beading wire. Attach a jumpring to one end, and crimp on with a crimp.  Attach this jumpring to the center of your bead ring (the opposite side of your crimp so when you wear the crimp faces underneath and you don't see it). Add your beads to create that 3.5" panel; use a crimp and jumpring on the other side to finish off. 


Step 3: Measure your wrist; mine was about 6". You want this to not be very loose, so measure as close as possible. Cut this length of your 5mm chain, and add a clasp to the ends. Right in the center of this chain, add the jumpring from the other side of your bead panel. Now, add one more jumpring in between the beads, about 2" down your bead panel. Cut two lengths of 3" 3mm chain (again, you may need to alter your measurements depending on how big your hand is. A good thing about unsoldered chain is that you can keep adjusting the length! Attach one of the ends to this jumpring.


Step 4" Attach the other end of your chain to the 5mm chain, about 1.25" up from the clasp. To wear, first put your ring on, with the bead panel layin on top top of your hand. The 5mm chain should fall down, and clasp it shut like you would a normal bracelet. You should be able to still move your fingers freely, but it shouldn't be hanging off real loose! If you need to edit your lengths, do so!
This is great for the beach; it can go over your cover-up...


Or on when you are sunbathing!


Instructions and photos (excluding very first image of models wearing other body chains) copyright Allison Beth Cooling. Don't post this tutorial or any of my pictures without crediting me, and don't claim as your own please!
A special thanks to my model, Karlee Dewan

Friday, July 12, 2013

Original Tutorial: Sundara Earrings!


My newest tutorial: my Sundara earrings! These remind me of those very ornate earrings you find in India. My mom's friend came back from India with beautiful jewelry and bags, and I was lucky enough to receive a metal cuff bracelet with intricate flower detailing. Sundara means "pretty" in Hindi, and I wanted to name these earrings after this very inspiring culture.


These earrings are not as easy to make as some of my other tutorials, but just take one step at a time; they look a lot harder than they actually are to make!


What's great about these is that like many of my other tutorials, the metal color and bead color can be changed to accommodate any style. I went with a pure silver scheme so that the earrings looked super chic. They have a lot of movement to them, with the inner horseshoe and outer frame, which surely will shine and attract attention!


This is an original design of mine, not a designer knockoff! I hope you all will be happy with it!
Let's get started!


Step 1: Gather materials. Needed are pliers (round nose and long nose), two pearls (appx. 7mm): mine are from Cousin Beads, which you can buy at many craft stores like Michaels, 20g wire, 18g wire, 28g wire, two ear wires, and Sterling Silver 4mm beads. Please use half-hard wire here, not dead soft. I usually only use half-hard wire just because I think it is sturdier.
A tip: the larger the # of wire (ex. 28g), the thinner the wire is. 28g wire is much thinner than 18g wire.


Step 2: Cut two coils of your 18g wire. Wrap these around a nail polish jar, making them into teardrop shapes. It helps to gently flatten the ends of the wires (by grabbing the ends and pulling them slightly away from the direction they curve) with the long nose pliers to make them less circular shaped. Your teardrops should end up looking like this, above. Make sure they are the same size, for same size earrings.


Step 3: Where the ends meet, grab the wire with the pliers (one by one) and bend them straight up. Cut one of the wire ends about 1mm from the bend, and make this into a loop, catching the other wire. Cut the remaining wire about 1mm from this loop. I hammered these frames a bit outside for texture and to work-harden them, if you would like to keep these plain then you can do so. If you would like to file the ends of your wire through the steps for a clean look, you are free to do so. Beginners don't necessarily need to if they don't want to!


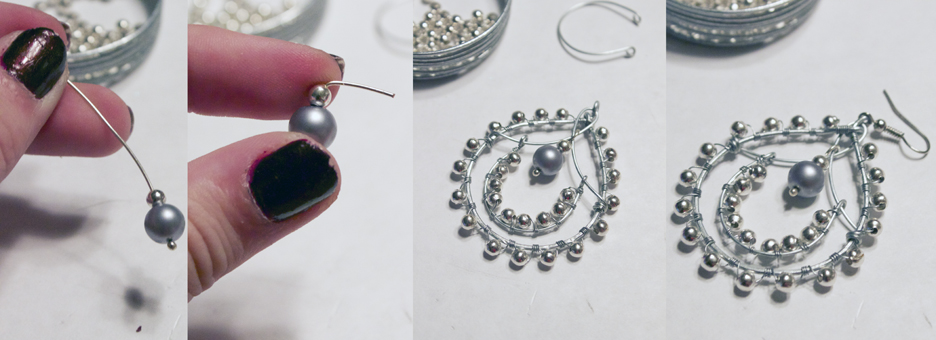
Step 4: Now, finish by making a loop on this wire to close. Start wrapping! Take your 28g wire, and cut 2 feet. Starting about 1" from the end of the 28g, and near the loop on your earwire frame, start to wind the wire around the frame. Once you have about 6 wraps tight (if you didn't wrap that extra 1" of wire, you can cut it off flush to the frame), add on a bead. Catch it in a wrap, and continue to wrap tightly to the frame. It helps to hold both the bead and wire in place with one hand, then wrap with the other. Make three wraps now without the bead. Continue this process until the full wire is wrapped, making again 6 plain wraps by the end to finish it off, mirroring your start. 


Step 5: With your 20g wire, cut two equal size pieces (5" or so), and thread one piece through the top loop of your ear frame. Gently pull the ends of the wire in opposite directions of each other, making an elongated loop (pic 1). Take the excess ends of the wire, and wrap 2 wraps, making sure 4 metal beads are above each wrap. Cut the wire flush to the frame. They should look like these, above.


Step 6: With your 20g wire, cut two 2" pieces of wire, and use the paintbrush part of the nail polish jar to make teardrops. Loop each end of these frames. Wrap these like in step 4 with beads, but making sure the beads wrap to the INSIDE of the frame this time. Loop each loop on the frame we created in the last step; be careful to not bend any of the wire. It should look like the last picture above.


Step 7: With your head pin, thread on a pearl and metal bead. Cut and loop the end of this, and then place through that inner elongated loop we made in step 5. Attach your ear wire to the very top loop of the earring. 
You are finally finished!
Like I said, this was a more difficult tutorial than most. Take one step at a time! Comment below if anyone has questions!


These earrings are indeed larger, which remind me of the jewelry from India. You can alter the measurements if you need smaller earrings, but big chandeliers make an impact for sure.


Using gemstone beads, or even crystals will give a different look.


These are great for adding interest to outfits; wear with a simple black dress for evening, or summery white blouse and jeans for a casual-cool look.


 Instructions and all photos copyright Allison Beth Cooling. Don't post this tutorial or any of my pictures without crediting me, and don't claim as your own please!