Showing posts with label gold. Show all posts

Wednesday, May 27, 2015

Gilded Briolette Drop Earrings


See the sparkle, see the shine!


My newest tutorial will have you looking totally luxe in no time at all.


Classy, chic and always stylish, briolettes are something I don't work with often. But, for this tutorial, they stand front and center as the focal point of these earrings.


These amethyst faceted stones seemed a little "plain" to me, so I gilded them with some gold flake (I'll show you how to later). This gave added detail and shine, and make them look like they've been dipped in gold!


Attach those to a sleek cable chain, add an ear wire, and you're set to go. These are great earrings for work, as they aren't too long and are definitely dressy but not fussy.


If amethyst isn't your fav gemstone, feel free to pick other colors. I also have citrine, rose quartz and peridot briolettes and are sure they'd look great. One thing - if you choose silver flake and metals, it will evoke a more contemporary look. Gold is more traditional. Experiment with combos and see what turns out!


Step 1: Gather materials. You will need round nose pliers, wire cutters, top-drilled briolettes (I used 6mm X 8mm amethyst ones, you can find similar ones here), Cousin Elegance Metals 14k gold plated fishhooks, Cousin Elegance Metals 14k gold cable chain, ball-end gold headpins, and 24g gold wire (mine by Cousin Jewelry Basics). You can find all these Cousin brand materials at craft stores like Michaels and JoAnn Fabrics.

 To get the gold gilded look on your briolettes, I simply adhered gold flake with clear gloss glaze. You can look on my Instagram account for the mini tutorial!


Step 2: First start by cutting a 3" piece of your wire. Create a wrapped loop at one end, catching in a 3" piece of your gold cable chain.


Step 3: Thread the wire through the briolette. Create a wrapped loop at the other end, catching in the other end of the chain.


Step 4: Get your ball-end headpin ready by bending it at a 90 degree angle, right after the ball. Thread the headpin through the middle chain link, and create a wrapped loop at top. Your chain link should be caught between the ball and wrapped loop.


Step 5: You should have something looking like this. I squeezed the ball closer to the top loop with flat nose pliers to prevent movement and tighten. Finally, add a fishhook to that top wrapped loop.


This is an alternative way of finishing, instead of just catching the middle chain link in the fishhook. Adding a bit more detail, this creates a dressier vibe!


A high-quality drop earring that's super versatile - plus, with the added bonus of being handmade - will be your next go-to accessory, trust me. Pair with a blouse and cropped slim pants for work, or mix with a bohemian printed maxi dress and sandals for a beachy look.

   
You can also play around with chain lengths, to create a shorter or longer drop earring. It might even be cool to add more than one briolette to the wire, to create a fan-like drop. I'll leave you with some inspo pics to finish. If you follow this tutorial, post your creation to Instagram and tag me @quietlioncreations - I'll repost you!


All photos copyright Allison Beth Cooling for Quiet Lion Creations. Do NOT post or reuse without crediting me and linking to me!

Thursday, October 24, 2013

Behind the Chandelier Earrings


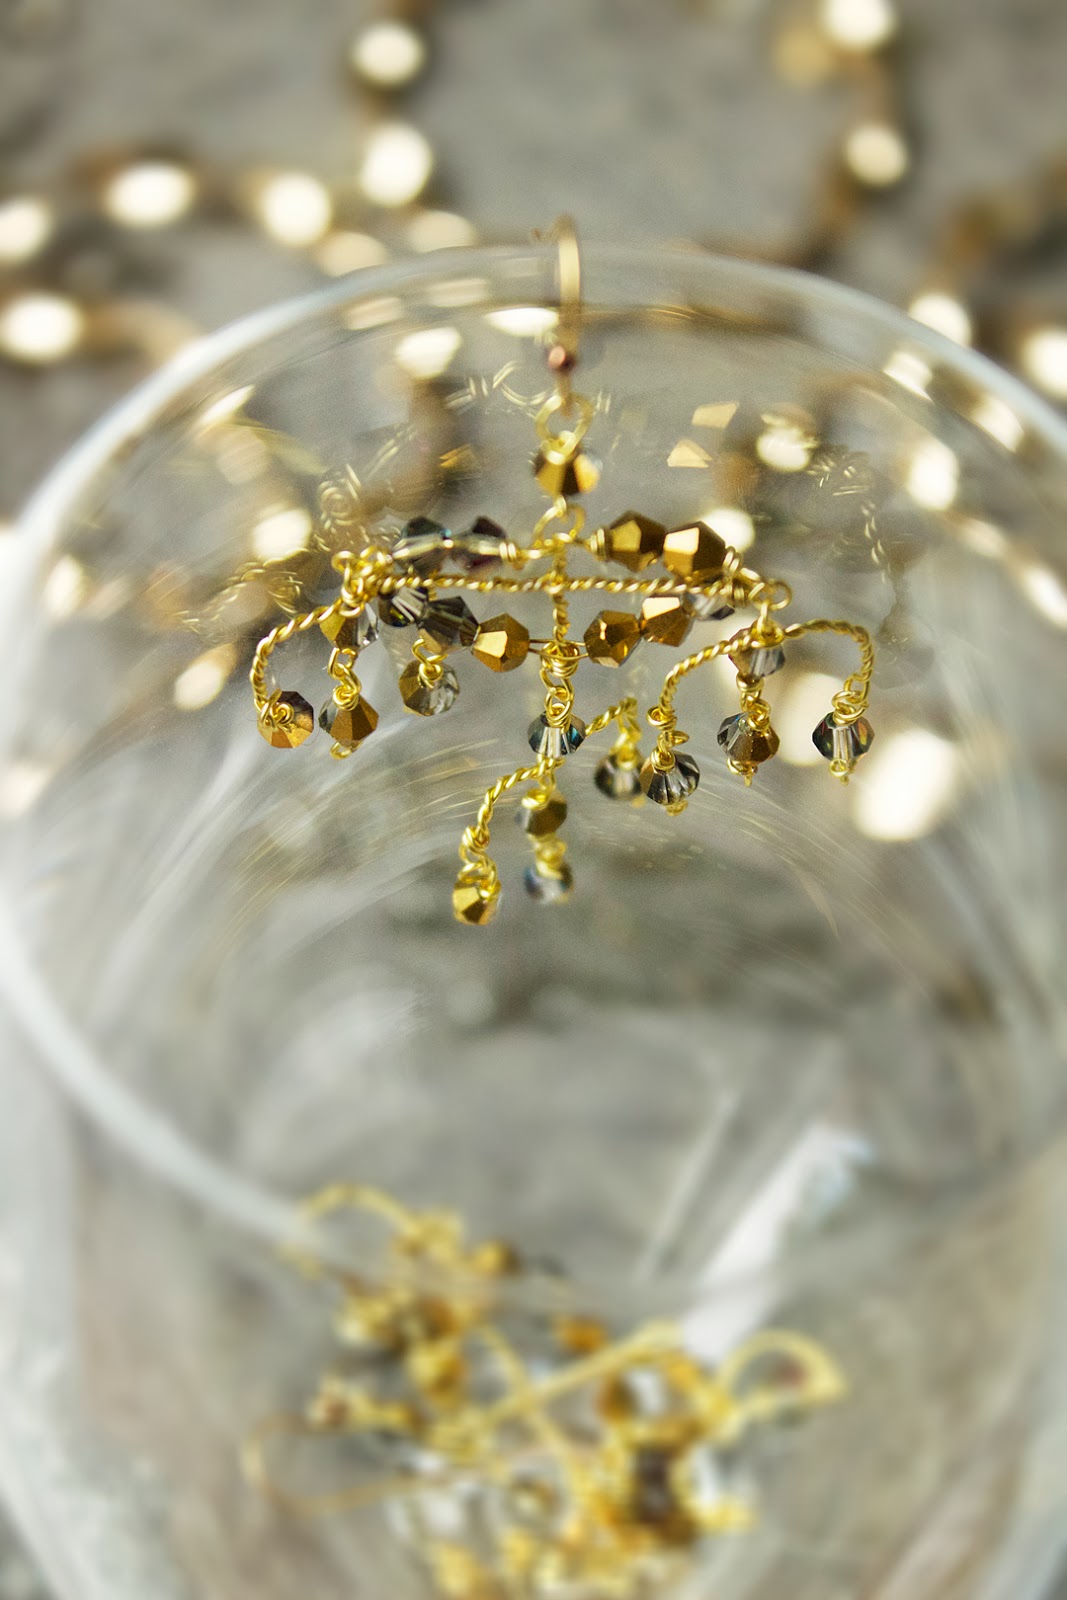
These Perriwinkle Frost Chandeliers by Phillipa Kunisch at Anthropologie are so dainty and elegant. I love the use of only wire and crystal to make such an intricate earring! These inspired me to make a version of my own.


I really love gold, and these two-tone crystals by Cousin were the perfect choice to use because of their gilded look! That paired with the thin, textured twisting of the wire and dangles that flow in the air make for a pair of sure statement earrings! For my DIY version, I used smaller crystals, but more of them, to create even more sparkle.


People will have no idea that you made these yourself, trust me! They will be great for wearing to upcoming holiday parties or any other special events.


Did I mention that they are super lightweight?? Seriously, usually chandeliers are lobe-stretching heavy, but these are light and airy, which is good for everyone!
Let's get started.


Step 1: Gather materials. All you need are pliers, gold earwires, 24g gold wire (mine from Cousin) and 4mm or 5mm crystals (mine from Cousin).


Step 2: Make wrapped links with two of your crystals, cutting the wire flush to finish. Cutting the wire flush on each link will be key here, to keep a clean look to your earrings! Add the top loop of each link to the earwire.


Step 3: Make two more links, but this time with two crystals per link. Cut about 6" of wire, string on the links you just made AND the bottom loop of the link attached to the ear wire, and group all these links together by holding the joint with your roundnose pliers and twisting the wire against itself with your other hand. It should look like this (bottom pic).


Step 4: Continue wrapping the wire until it is about 2cm long, and finish with a wrapped loop.
I repeated the last step and this step for the other earring.


Step 5: To make the cross-section, add on another 6" piece of wire on the open end of one of the 2-bead links. Fold in half and then start twisting the wire on itself, like in step 3; when the wrap is about .5" long, insert the vertical twisted wire inbetween the wires, and twist tightly to hold in place; twist another .5" until you reach the other side of the earring; finish off this horizontal piece by ending with a loop, catching the 2-crystal link's open end into the loop. It should look like this (last picture).


Step 6: Add two 1-bead links to either side of the horizontal crossbar. To add the chandeliers, cut about a 4" piece of wire, and fold in half. At the half, make a small loop and then twist the wire upon itself just like how you have been doing. When you reach a little over 1cm of a twist, insert the top loop of the 1-bead link you added, and twist tightly to secure like you did with the vertical crossbar in the last step. Finish off with another 1cm of wrapping, then end with a loop. Repeat with the other side of the earring. Add 1-bead links to the empty loops  on the chandeliers (4 in total).


Step 7: Add a final chandelier to the bottom loop of the central bead link, then add 1-bead links to the empty ends of the chandelier. To add the crystal finishes in the center, cut about a 5" piece of wire, and fold in half. Thread on to the side of the horizontal crossbar, right at the halfway mark, and twist to secure. Add three crystals, then thread through the vertical crossbar, then another 3 crystals. Wrap at the other side of the horizontal crossbar to secure, and cut flush. The arrows show where to start the wrap, and the thread-between of the vertical crossbar!


To finalize, add one more crystal drop at the center chandelier. 


Even though these earrings look expensive, they are so cheap to make! The materials cost less than $10 all together, while the Anthropologie version is about $250. 


You can make these in all colors of crystals; try using silver wire if you like silver, or maybe a copper wire would look cool with some turquoise-colored crystals, for a western-inspired look?! The possibilities are endless!


If you share/use/post this tutorial, you must link back to me please. All Photos (except Anthropologie one) 
copyright Allison Beth Cooling. Do not use photos without crediting me!


Wednesday, August 7, 2013

Anthropologie Stormy Seas Necklace; an Elegant Re-Vamp!


This Anthropologie Stormy Sea necklace is an oldie but goodie; I have been wanting to make a tutorial on this for a long time, and finally got around to it. What I love about it, like any Anthropologie item, is the uniqueness of it. It features drop beads and closes with a cotton tie. Plus, statement necklaces are totally in fashion right now. Designers like Kate Spade are totally on board with the trend!
*EDIT* Today, a day after I made this post, I got my August 2013 issue of Harper's Bazaar. What were the fashion/accessory features throughout the magazine??? BLACK, WHITE, and GOLD accessories. All in that color combo. Designers like Nicholas Kirkwood, Michael Kors and Lanvin's fall collections all feature these colors. What's also gonna be hot is chunky chains, chunky necklaces, and black boots/booties. What's more perfect to make for the upcoming fall trends than this necklace??? 


Another huge trend throughout the summer has been black and white, basically started by runway shows such as Marc Jacobs back this spring.


Obviously the trend has caught on. I went to Forever 21 the other day and the whole top floor was black and white! Part of my inspiration for this look came from Breakfast at Tiffany's; total elegance, black and white with a little gold (instead of silver) added in. I just happen to be partial to gold, use whatever metal color you like. I made this tutorial using mostly Cousin products, showing that you can make awesome jewelry without having to spend the $100 and up on "designer" pieces!


This is obviously a lot more glam than the original Anthropologie necklace. You can feel free to alter what beads you use, if you want a more casual feel skip the top drilled gold beads, or maybe switch the crystals for pearls for a new take on Audrey Hepburn's style.


I couldn't help myself, sorry. Like she would ever say that!? Oh well, it's my "artistic license...."
Ok, let's finally get started, shall we?
*mm always means millimeter* 


Step 1: Gather materials. Needed are pliers (here by Cousin), a plain white cotton tee shirt, 20mm acrylic briolettes (from Cousin), clear 6mm, 10mm and 15mm acrylic crystals (here by Cousin), 4mm metal beads, 10mm faceted gold beads, top drilled gold metal beads/charms (mine were 1.5" long, and hollow on the inside like tubes), jumprings and crimps, and fishing line (8 pound). 
Instead of the top drilled metal charms, try spike charms for a real edgy look (if you're not into Audrey.....)  You can find beads like this at Michaels or JoAnn.
I always like to use fishing line because it is clear and you get a lot more than if you buy a small little beading cord package! The kind I have is 8 pound so it is thin and not bulky.


Step 2: Cut about a 4' long piece of fishing line and fold in half. Thread on a jumpring and crimp, and at the halfway mark secure on the jumpring by crimping the clasp. It helps to use a bead board to lay out the composition of your beads. This is going to be the shorter strand of beads, so that the strand will be about 12" long. I started out with the 10mm crystal, alternating with metal beads, the briolettes and the metal charms, adding a large 15mm crystal in the very center.


Step 3: After stringing on all the beads for the shorter strand, use the other empty fishing line to create your longer strand. I played around with my composition; most importantly, you want this strand to be longer, mine was 14". 


I started by adding two (NOT THREE as the pic shows, sorry) 6mm crystals alternating with the metal beads, then used my 10mm crystals and faceted metal beads here (view pic below to see what combo I ended with)


The center of this strand has that metal faceted bead, and the beads lay nicely with the briolettes alternating spaces. When your strand is finished, add a crimp through both empty ends, then a jump ring. Thread back through the crimp, pull the line tight (not TOO tight though, you want a little bit of wiggle room) and crimp shut. Cut excess line off. 


Step 6: Cut four long pieces of your tee shirt (I went around the stomach area, about in .5" wide strips), and thread two through each jump ring. To tie, simply gently knot the strips together!


This really creates a statement! Pair with a totally on-trend black and white check dress (here, from Generation Bliss) and simple black peep-toe heels for a totally chic look!


Even though these gems are acrylic, they definitely sparkle.....


GOLD+BLACK+WHITE= totally awesome. In my book.
And to end with a theme quote: "Anyone who ever gave you confidence, you owe them a lot".
-Holly Golightly, Breakfast at Tiffany's, 1961


Instructions and all photos copyright Allison Beth Cooling. Don't post this tutorial or any of my pictures without crediting me, and don't claim as your own please!