Showing posts with label gemstone. Show all posts

Tuesday, April 7, 2015

ecuador necklaces +diy

ecuador necklaces

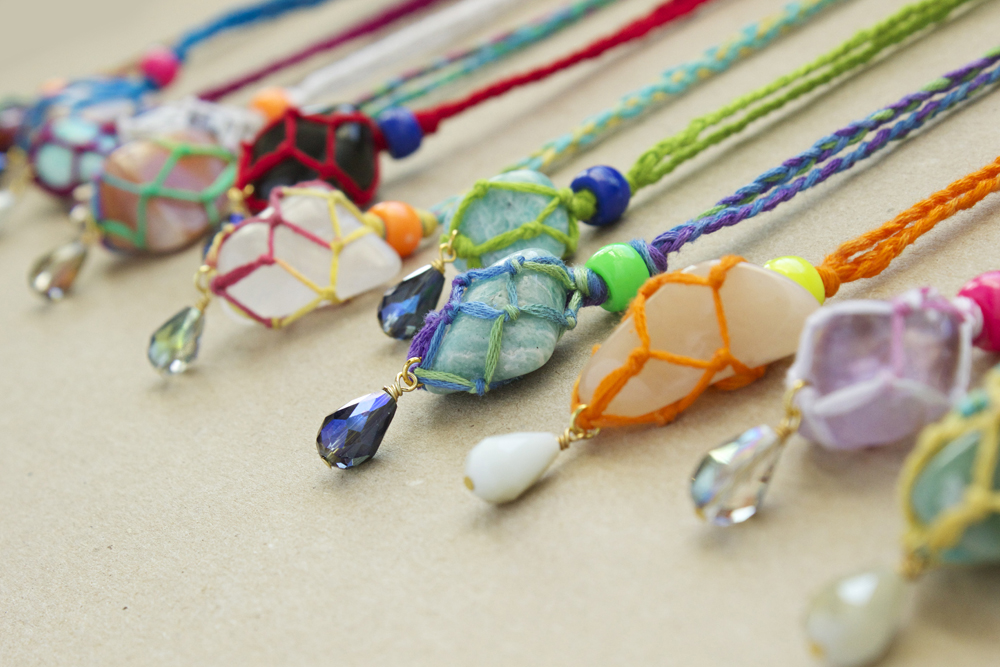
A sea of rainbow colors, polished gemstones, sparkly crystals and overall good vibes.
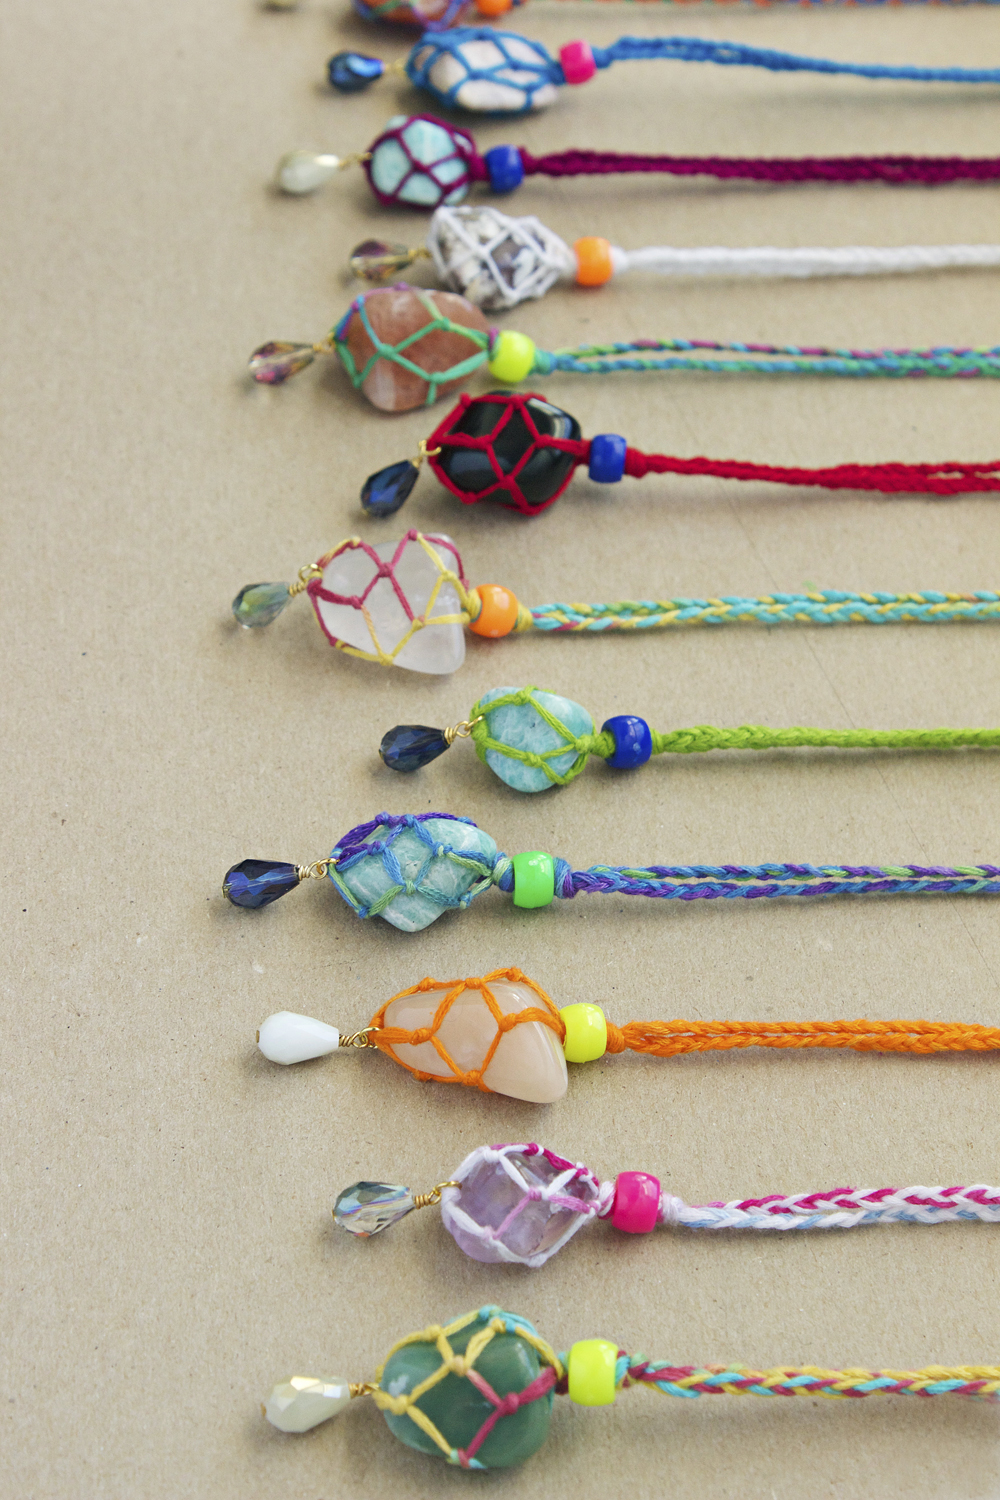
wrapped rainbow gemstone necklaces

This is a project that I've been hiding for a while - a while back I got a request (from my cousin Eric) to make some colorful necklaces for his friend Diego's mom and sister. Diego was an exchange student from Ecuador, and Eric wanted to send Diego back with some presents for the family. Of course, I thought, that's a great excuse for me to make some jewelry (but when do I need an excuse?!)...

wrapped gemstone necklaces with cousin brand products

So I made two necklaces - one with an Apache tear gemstone dangle (quite similar to the black/red necklace you see above) and another Adventure necklace. If I haven't told you before, Eric (along with his dad) tumble their own rocks. They buy large chunks of earth, with the promise of gemstones inside. They think of it as a hobby - I think of the rocks as awesome additions to my jewelry supplies inventory. What's also great about these rocks is because they are hand tumbled with care, as opposed to bought at a store, I feel they have more powers, in a way…..


So back to the story. These two necklaces traveled to Ecuador to meet Diego's sister, Dome, and his mom. Dome wore her's to school, and the class, along with the teacher, loved it. So, why not make a batch for the whole class?! I surely have enough rocks (yes, bins of them)….and thought that spreading the colors, sparkles and good energy overseas was definitely worth it.


So I first got the info - 12 necklaces I'd need to make, 11 for the students and 1 teacher. The class was an all-girls class, so I didn't need to worry about gender-neutral colors. Dome's school is the Unidad Educativa Nuestra Familia in Cuenca, Ecuador. Knowing how long overseas travels are, I made them quickly to make sure they'd arrive in good time.


As a Cousin Corporation of America Ambassador, I called upon Cousin to grant me with some supplies (other than the gemstones and embroidery floss that I already had) and they happily gave me my requested beads and findings.


I even recorded how I had made these gemstone necklaces, just for you all! It's a macrame pouch that holds these rocks in place. Don't worry, they are easier to make than they look. I just whipped up 12 in no time, you can surely make one without trouble.
Look below.


Step 1: Gather materials. You will need embroidery floss, pliers, gemstones - if you don't have a stockpile like I do, you can get a tumbled stone mix from Amazon, pony beads (mine from Cousin), crystal teardrop beads (mine from Cousin Jewelry Basics), jump rings, headpins and scissors.

A special thank you to Cousin for working with me on this project!


I first worked on getting colors pinned down. I made them in all hues, but I demonstrate the steps with white floss so it's easy seen!


Step 2: Cut four equal lengths of embroidery floss. I cut a little more than 4 feet each time and that leaves me with plenty. Tie all four in an overhand knot right in the center of the lengths. Then, divide each side into two pairings of two strings - tie these in knots together.


Now, divide these pairings into individual strings - tie the center two together. Divide these pairings on the lefthand side so you have four separate strings again. Tie each to the one next to it. Look at the picture for help! You should have a little diamond shape.


Do this once again, tying each string to the one next to it like in the last step. It should form into somewhat of a pouch. Stick your gemstone in, then tie a tight knot at the top. I added a bead dangle with a jumpring at the bottom of the pouch. I then knotted on a pony bead for a bright neon pop! To finish, divide the strings into two groups of four- braid each group together and then overhand knot to finish. These will be long necklaces, so no clasp is needed!


I made these mainly in bright colors, knowing kids were the recipients and the fact that they are Ecuadorean, whom as a culture love bold color. I figured the mix of the neon pony bead, elevated a little with the crystal dangle, made for a kid-friendly but still somewhat "fancy" accessory.


Shipping these did take a while, but I was assured by Eric that the necklaces had reached their destination and that the class loved their new bling. Also, if you're wondering, that's a water decal on my nail- they are SO much easier to use than sticker decals! Find a similar pack here.

Here is Dome receiving the necklaces! I had an awesome time picking out the rocks, making the necklaces and packaging them up for shipping. This was my first "overseas" shipment of my jewelry, so I was indeed nervous about them finding their way. Everything went smoothly, fortunately, which makes me eager to do something like this again.

Enjoy!


COPYRIGHT
Because I take all photos for my blog, the images within this post are all copyright Allison Beth Cooling for Quiet Lion Creations. If you'd like permission to use a photo, email me at allison@quietlioncreations.com

Sunday, December 7, 2014

Free Bird Bohemian Necklace Tutorial


70's hippie style meets a grungy, free-spirited vibe to create this totally killer leather and gemstone necklace.


A beaded "ladder" was made to highlight these beautiful oval turquoise tablet, tiger eye and pearly white natural stone beads. The ladder lays so nicely, perfect for pairing with a burnout sweater and leggings/boots, or even a black flowy maxi dress and strappy shoes for warmer weather. Adding a floppy gypsy hat is so totally necessary, don't you agree?!
The bright blue is such a pop of color, while the brown acts as a neutral.


Layers of chain and (cruelty-free) feathers dangling down evoke that indie, rocker vibe. I chose white chain, feathers and charms to contrast against that black (faux in my case) leather. Also, white matched those little gemstone rounds in the rest of my design.


Too bad Coachella is super over and I got the idea for this tut now, like of course it would have been so choice to make this for summer festival-style fashion, but winter can't stop me from rockin' it now.
And it can't stop you either. Read below to find out how to make your own!!


Step 1: Gather materials. Needed are:

-Flat Leather or faux flat leather cord. I found some faux leather online.

-Gemstone beads. Any color, any size, choose what you like! I used some tigers eye beads from Happy Mango Beads. There are a ton of awesome gemstone beads on their site! I also used small white rounds and bigger tablet beads (sorry, cannot remember specific gemstone, but all are from Happy Mango Beads). Seriously, you have to take a look. Great for hippie style necklaces of all kinds! 

-Beading wire. Mine was Cousin's silver beading wire.

-Some 16 gauge wire, mine again from Cousin. I used silver here.

-Silver or metallic small 3mm to 4mm beads. I used silver disc beads here. These are just for a little added shine, not totally necessary. I only used 4 beads per necklace.

-Feathers. I got mine from a cruelty-free, no-kill animal shelter in Iowa run by a rabbi. Legit. I don't want to tell you what to do, but if you do use feathers, please don't buy the ones from Michael's or JoAnn fabrics, as that just perpetuates animal torture/cruelty. Now back to the tutorial.

-Charms or amulet style beads (the Cousin disc beads and the scarab-which I didn't end up using, but just wanted to show you options). Scarab from Happy Mango Beads.These are purely ornamentation.

-2mm or small chain, mine from Cousin and not pictured in this shot.

-Pliers

-Crimp beads

-Cord ends if using feathers

-Closed jump rings (5mm or so)

_________________________________________________________

To start, ignore the middle shot in this picture. What was I doing while editing? Watching the Blackhawks game, aka a little distracted. 
Anywhoo, first you want to cut a long piece of your leather, mine like 24" or so. Fold over one end, and with the wire, twirl around a few times to hold. Cut flush and crimp with your pliers. Repeat with the other side of your leather.


Thread beading wire through that loop you just made, and string on an appealing arrangement of beads. I made sure to string on 3 closed jump rings in between my oval tablet and tiger eye beads so that I can make the horizontal "ladder rungs" and use these to connect. Be sure to do so! Highlighted in the third picture.

I also created two leather dangles, about 6" long or so- create these by simply cutting a 6" piece and repeating that loop technique used in the first step. To finish the sides of your ladder, thread the bottom of the beading wire through a crimp, these dangle loops, back through the crimp, and crimp shut. You should have the second shot in the pic.

To create the horizontal rungs, simply cut another 6" or so piece of beading wire, thread on a crimp, through the top closed jump ring you added, then back through the crimp; crimp shut. Add on another arrangement of beads, checking to make sure it will fit across nicely. Thread on a crimp, through the other side's top jump ring, then back through crimp. Crimp shut.

Repeat for each rung, using the same orientation of beads. I had three rungs.


I also decided to add some chain and feather dangles. To do so, simply add a large jumpring at the bottom junction between leather dangle and ladder side. Add on varying lengths of chain, disc charms, and feathers. I just did random lengths here, making sure to be symmetrical with both sides. Play around with lengths till you find something that suits your look! Finally, to weigh the leather down, I wove on an oval tablet bead to the bottom of the dangle with some wire. Voila!


This is my new favorite necklace. Gonna be making a lot more of these.


This being totally customizable, it's up to you to supply the creativity here. Choose colors that you love, and add amulet charms or even crystals to match your personality!


If you happen to use this tutorial to make your own necklace, snap a pic and post to Instagram, tagging me @quietlioncreations . I'll repost it! Follow me there too, for sneak peeks into new tutorials!
"Won't you fly high, free bird, yeah?!"


All photos copyright Allison Beth Cooling - do NOT post or reuse without crediting and linking to me.


Thursday, October 9, 2014

Cheyenne Feather Necklaces


I'm lovin' the mix of bohemian and glamour that these necklaces bring!


This is a simple tutorial which allows for a lot of customization. I also will show you a quick way to "dust" these feathers with a bit of metallic nail polish for a subtle shimmer. What's great about these is that they can be as simple or as complicated as you'd like. I'll teach you how to chain-wrap those gemstones, but if you're a beginner, you could create a simple drop at top and these necklaces would still look chic! 


These look awesome with a flowy top, skinny denim, some cowboy boots and of COURSE a cool hat. 


I've got two versions here, both with a distinct style. My turquoise one has a more Southwestern vibe, while the peacock feather one has a chic look. All the beads I've used are from Cousin Corporation, which you can buy at any craft store: Michaels, JoAnn, Meijer, Walmart and AC Moore. Follow Cousin on Facebook for giveaways and more!

Ready to learn? Let's go.


Step 1: Paint your feathers. I have an assortment of cruelty-free feathers I got from a no-kill farm in Iowa run by a Rabbi (who knew?!). I took metallic nail polish and used a nail sponge to dab a light dusting of the metallic paint at the bottom of the feathers. I left the peacock feathers I had plain because they already had a beautiful sheen (and I used these for the crystal necklace). I used a mix of plain and metallic-dipped feathers for the turquoise necklace. Pair your feathers up by crimping at the top with a ribbon end. There are no right or wrong ways; play with your beads and types of feathers to create a cool combination!


I took a Cousin Coropration large gemstone pendant (you can find similar ones here) and thread an eye pin through, looping the other end to create a link. I took a Cousin large crystal (or you could layer with another gemstone, like my turquoise necklace), inserted a 5" piece of 26 gauge gold wire (match all your metals here for a clean look) and threaded back through the larger gemstone's hole, then wrapped around the top and bottom link to hold. Wrap tight and it will stay put. Now, take a long length of chain and open the last link. Close it after hooking through the gold wire (that's threaded through the crystal), either at the top or bottom of your pendant. Start wrapping around the crystal, making sure to open and close the links around the gold wire (at top and bottom) to make sure it won't unravel. I tried to just wrap but it DID unravel. Wrap as many times as you want, then clip off the excess. Wrap tight.


With a long piece of nylon cord or faux leather, take a headpin and wrap a couple times around the center of the length, creating a little loop where you should attach the pendant with a jumpring. I just knotted the top of the leather to create the necklace; if it's long enough, you can just pull on over your head. No fuss! 


These are great layering necklaces, which just will add to that total boho look. I like to mix different lengths of necklaces together and different materials- find combinations that work for you!


I could also see this technique, on a smaller scale, working for pretty earrings. Use one metallic-dipped feather earring and pair with a simple crystal at top. Cool, right?


I'd really love to do a black version with black cord, gold-dipped feathers and a black crystal. Just my style!

All photos copyright Allison Beth Cooling. DO NOT post/use images without linking to me!


Monday, September 29, 2014

Supernova Necklace


A prismatic array of full-specturm color.


I found this amazing Aurora Borealis Quartz Crystal at the Lizzadro Lapidary Museum and had to have it. The multicolored coating (read more below) is a statement on its own. 


I didn't know at first what I wanted to make out of it. I had some ideas but ultimately decided to go a simple route.


I wrapped in gold wire and attached to a 14K gold chain, finishing with 14K gold clasps and jump rings for a high-quality piece. The 14K findings were all part of Cousin's Elegance Metals line, which features affordable 14K gold, sterling silver, platinum and more supplies that add a total luxe touch to your jewelry. The dainty cable chain was perfect and held up to the high quality of the stone.

The tutorial below exhibits the steps I followed. If you have a quartz-type stone you could always do something similar!


Step 1: Gather materials. Needed are round nose pliers and wire cutters, E6000 glue, Cousin Elegance Metals 14K gold cable chain, Cousin Elegance Metals 14K gold jump rings and clasps, and Cousin 26 gauge gold wire.


Step 2: Decide at what two points you want to wire-wrap your stone. My stone had two clear high points on either side, which made it easy. If you are buying a stone, make sure it's not too heavy and has good quartz "spears" to wrap with. I created a loop on a 5" piece of wire with my pliers, then started wrapping around the spear. Wrap VERY TIGHTLY. Wrap both around the spear then back up by that first loop you made, and wrap below it to finish. Cut flush.


--Some info on the stone--


Once you've wrapped both sides, use the 14K gold wire and attach to the loops on each side. You can use a small dot of E6000 glue on the back of the stone to hold the wire.


I finished the ends by attaching jump rings and a clasp.


I don't usually like to wire wrap like this, but because of the lightweight stone and easy wrapping points  it was better than gluing on a bail!


And those who don't know what "lapidary" means-- a quote from Wikipedia:

"A lapidary (lapidaristLatinlapidarius) is an artist or artisan who forms stoneminerals, or gemstones into decorative items such ascabochonsengraved gems, including cameos, and faceted designs.[1][2] The primary techniques employed are cutting, grinding, and polishing.[2][3] Carving is an important, but specialised technique.[3]"

The Lizzadro Museum in Elhmurst, Illinois is super-cool, and anyone in the area should go. Carved jade, cameos, stones and other amazing sculptures, statues and jewelry pieces are on display. The shop at the bottom also houses stones/gems galore and they are so affordable. I would recommend it to anyone!


Delicate yet full of interesting texture and major color! I have a couple more stones I picked up the museum, so stay tuned for more pieces!


All photos copyright Allison Beth Cooling. DO NOT post or use without crediting and linking to me.