
Want sparkle for Valentine's day, but don't have the cash?
No worries.
Make yourself a cheap-o diamond heart necklace out of clay and glitter.
Again, another fast and easy tutorial that doesn't take mad skills to complete.

Sparkles!!!
And you won't have to dish out $1000+ dollars for them.

Quick to make, these will become addictive.
Maybe make them in other shapes if you are not into hearts (like me)....

Let's get started.

Step 1: Gather materials. Needed are pliers, glitter, clay, a headpin and a chain.
I used a box chain because I think it sometimes looks fancier than regular chain.

Step 2: Pick out your color of glitter; make sure it's superfine glitter, not chunky.
Take a marble of clay; color-match the clay to the same color of the glitter.
Some tips: add in little bits of color at a time, to slowly work to the color.
To make a color duller, add in some of the contrasting color, not black.
Your clay doesn't have to match exactly, but make it as close as you can.
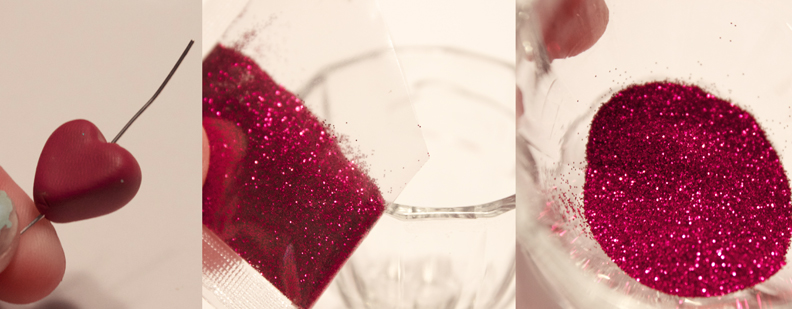

Step 3: Take your marble of clay, and shape it into a little heart. It helps to flatten out the marble, then take a toothpick and press it right in the top, to create the two rounded pieces at top. Push your headpin right through the center.
Take your glitter, and pour into a small cup or little dish. Gently rub the glitter onto your bead, pressing down to adhere the glitter to the surface of the clay. Press firmly but don't disfigure the bead.
You will want all the glitter to cover the surface of the bead; this is where the clay color comes into play; if some of the clay shows through, it will be unnoticeable if the colors match. If they are off by a lot, then it will be very noticeable.

Step 4: Once all the glitter is rubbed in and covering the surface, go and bake your charm. I usually do like 125 degrees or less for 15 minutes in my
toaster oven.

Step 4: Once the bead is baked and cooled, place back on the headpin (you could have baked with the headpin in as well if you wanted), cut and loop the wire. Attach to the chain.
You can also seal the bead with clear lacquer after baking if you want, to make sure any glitter doesn't rub off. It's recommended.

Pretty! Not real diamonds, but very sparkly and festive.

Make some in different colors for each outfit.
I made a hot pink one as well.
I won't be wearing any of them, I'll give 'em away.

The box chain sparkles and looks a lot richer to me than other types of chain!
You could also use gold findings and chain if you like yellow gold better.
All images and text copyright Allison Beth Cooling. If you share/use/post this tutorial, please link back to me.
It is much appreciated!
Wow, great tutorial. I want to try this, what sort of clay did you use, was it polymer clay?
ReplyDeleteYes, I always use polymer clay. no specific brand I have found works better than the other....
ReplyDeleteI love it!!!! Definitely one I will be making. Thanks for the tutorial .
ReplyDelete