Friday, February 8, 2013

Cheap-o Pave Heart Necklaces- For Valentine's Day!


Want sparkle for Valentine's day, but don't have the cash?
No worries.
Make yourself a cheap-o diamond heart necklace out of clay and glitter.
Again, another fast and easy tutorial that doesn't take mad skills to complete.


Sparkles!!!
And you won't have to dish out $1000+ dollars for them.


Quick to make, these will become addictive. 
Maybe make them in other shapes if you are not into hearts (like me)....


Let's get started.


Step 1: Gather materials. Needed are pliers, glitter, clay, a headpin and a chain.
I used a box chain because I think it sometimes looks fancier than regular chain.


Step 2: Pick out your color of glitter; make sure it's superfine glitter, not chunky.
Take a marble of clay; color-match the clay to the same color of the glitter. 
Some tips: add in little bits of color at a time, to slowly work to the color.
To make a color duller, add in some of the contrasting color, not black.
Your clay doesn't have to match exactly, but make it as close as you can.
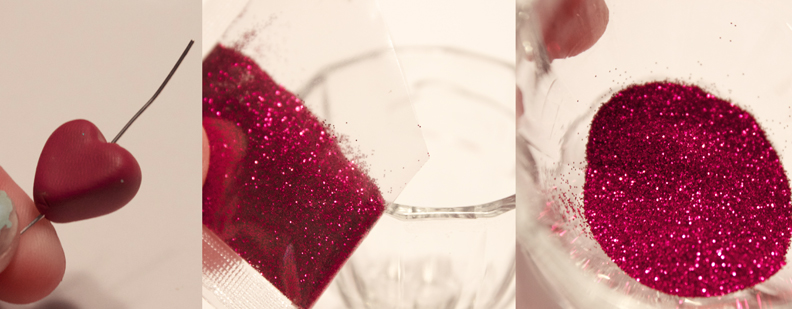


Step 3: Take your marble of clay, and shape it into a little heart. It helps to flatten out the marble, then take a toothpick and press it right in the top, to create the two rounded pieces at top. Push your headpin right through the center. 
Take your glitter, and pour into a small cup or little dish. Gently rub the glitter onto your bead, pressing down to adhere the glitter to the surface of the clay. Press firmly but don't disfigure the bead.
You will want all the glitter to cover the surface of the bead; this is where the clay color comes into play; if some of the clay shows through, it will be unnoticeable if the colors match. If they are off by a lot, then it will be very noticeable. 


Step 4: Once all the glitter is rubbed in and covering the surface, go and bake your charm. I usually do like 125 degrees or less for 15 minutes in my
 toaster oven.


Step 4: Once the bead is baked and cooled, place back on the headpin (you could have baked with the headpin in as well if you wanted), cut and loop the wire. Attach to the chain.
You can also seal the bead with clear lacquer after baking if you want, to make sure any glitter doesn't rub off. It's recommended.


Pretty! Not real diamonds, but very sparkly and festive.


Make some in different colors for each outfit.
I made a hot pink one as well. 
I won't be wearing any of them, I'll give 'em away.


The box chain sparkles and looks a lot richer to me than other types of chain!
You could also use gold findings and chain if you like yellow gold better.


All images and text copyright Allison Beth Cooling. If you share/use/post this tutorial, please link back to me. 
It is much appreciated!


Sunday, February 3, 2013

Thin Gold Bangle Bracelets


I'm back! Yes, I haven't posted a tutorial in a long time, very busy. 
These literally come together in minutes flat. I didn't even bother to braid the ends, and used these more of like a friendship-style bracelet. 


You can even add beads, or crystals to fancy them up.
The pearls I used are from Prima Beads. Great selection of beads, findings, other goodies and free shipping! Mixing pearls with the metal and the floss creates a cool mix of textures. Great for layering for the summer. They are delicate and mix well because of the simplicity of the bracelets.


Step 1: Gather materials. All that's needed are scissors, pliers, embroidery floss, and thick wire (maybe like 16 or 18 gauge, just make sure it is thick and doesn't bend that easily). Beads too if you want to 
add some.


Step 2: I cut about 3" of my wire and looped each end. If you have smaller or larger wrists you can cut accordingly, adding or subtracting an inch. Cut about 1 foot of your floss, and bend in half. Cut another foot and fold in half again. These will be your tying pieces.


Step 3: I went outside and gently hammered my wire piece like in the Perched Harmonies necklace. Go easy with it, not totally flat, just enough to give it some texture. You don't have to hammer it, you can keep it plain, or mix and match hammered bangles with regular wire ones to mix the texture. After hammering, bend it around a glass or bottle to give it an arched shape.


Step 4: Take one of your floss pieces, and thread it through the loop 'till the folded part: tie a knot here to secure the thread onto the wire. Repeat with the other side.


Finished already! See how easy it is? The hammering gives it a little texture as seen in the picture.


I made another one with one pearl, a whole pearl-beaded one, a thicker gold one, and then the hammered one. The mixing of metals is very chic-looking.


To wear, simply tie-on in the back. Give these out as friendship bracelets with their favorite color floss!


All images and text copyright Allison Beth Cooling. If you share/use/post this tutorial, please link back to me. 
It is much appreciated!


Wednesday, December 26, 2012

Homemade Nail Wraps


Nail wraps are all the rage!
With the super-cool designs and easy application, why not make your own with the nailpolish you have laying around? 
I will show you the basic technique on how to make these wraps, but you can customize the design to fit your needs and style.


It's a lot easier to make a detailed pattern on a flat surface instead of a curved nail!


Step 1: Gather materials. Needed are nail polishes, a ziplock bag or laminate report cover, a sharpie, a toothpick, and an xacto knife. You need somewhat of a thick plastic base to paint your decal on, so don't use a flimsy sandwich bag or something....


Step 2: Cut a square of the plastic from the bag so you are only working with one plastic piece.  Trace an outline of all our nails on one side of the zip-lock bag. Turn the piece over so you will not be painting on top of this Sharpie (it will leech off into your decal and look bad if you paint on the same side).


Step 3: Paint a thick layer of paint on one of your outlines. I added four drops of other colors and marbled them with a toothpick. Repeat this for all your nail outlines. Make sure your plastic is lying flat


You should have something that looks like this. Let all your paint decals dry for one day.


Step 4: Take your xacto knife and trim off any ragged edges so that the plastic is more of a nail shape; slice very gently with the blade so you only cut the nailpolish decal, not the bag underneath. Once you have a decal shape, gently lift off the whole decal, being careful not to rip it; it helps to pry the ends up with your blade. Paint a layer of nailpolish on your nail and when still wet, place the decal on top. Gently burnish the decal to adhere and remove air bubbles. 


Step 5: Repeat for each nail. If the decals are longer on the edges, you can gently trim with scissors and/or file them to shape the nail. Once they are all totally adhered and the paint beneath has had time to dry, finish with a top coat to totally seal.


There are so many possibilities with this! I will be experimenting with different designs and posting them. I started out with a simple marble to show the technique. This is great to make decals ahead of time, and then have several to choose from the next time you want a manicure!


All photos and instructions copyright Allison Cooling. Do not repost this or use my photos unless linking back to me.


Tuesday, December 11, 2012

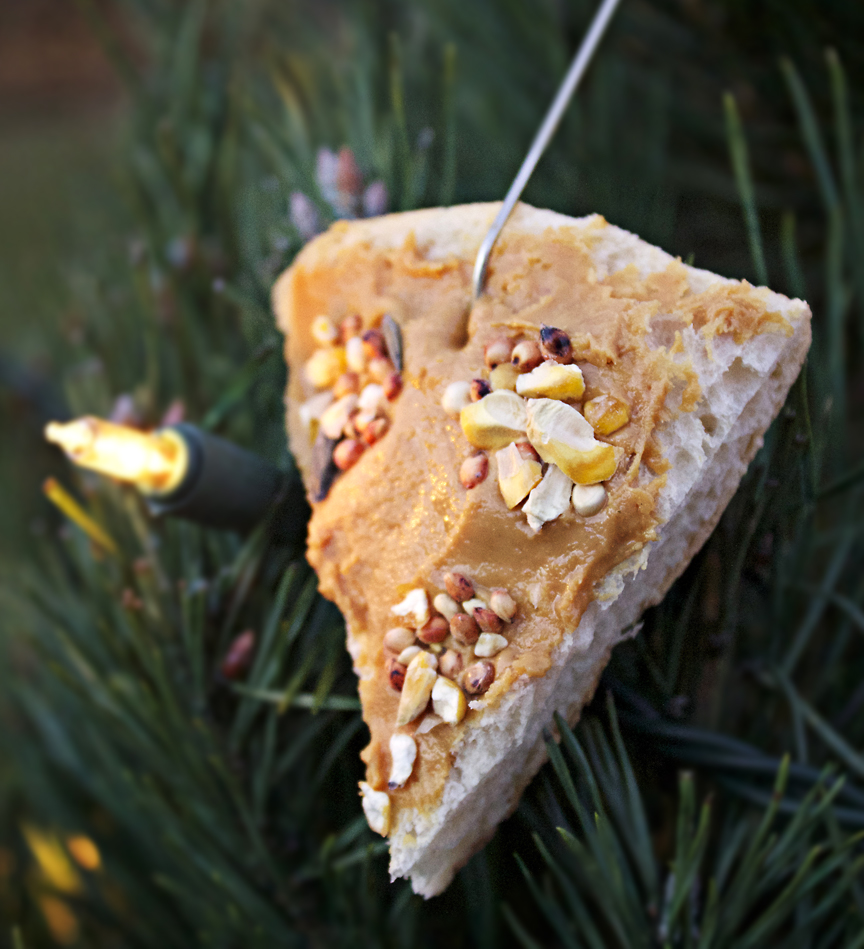
Pizza for the Birds!


It's pizza....for the birds! With the holidays and winter time, I always like to help out the wildlife! A great way to use stale bread, and they look cute hanging from outdoor trees! Put them by your window to see all the different types of birds stop by. This is also super easy and a good craft to make with kids!


Just a slice!


Step 1: Gather materials. Needed are birdseed, peanut butter, scissors, stale bread (use thicker bread like halved sandwich rolls or something, so that they hold up. Don't try with plain sandwich bread), and paperclips.


Step 2: Use the scissors to cut out triangles like pizza slices. Spread with a good layer of peanut butter.


Step 3: Take the birdseed, and if you want it faux-pepperoni, place a bunch of seeds in small clumps and press down. You can just coat the whole thing with seed if you'd like.


Step 4: Un-bend your clip, so that the outside piece of wire is bent at 90 degrees, and the top still retains a hook for hanging. Stick this through the slice.


That's it! Go hang on a tree outside, and wait for the birds.


All images copyright Allison Cooling


Monday, November 12, 2012

Color Monday: Rabbit Food


A palette of greens! From bright lime to deep emerald, all the possibilities within a lettuce leaf!
Feel free to use the palette in your art works and other projects.

Wednesday, November 7, 2012

Quilled Peacock Earrings


For this next project, I used a different inspiration than my normal
 designer pieces. Peacock feathers!
I wanted to capture both the colors and the elegance of these beauties, so I figured I'd try something new and make a quilled earring. For those who don't know, quilling is the art of rolling and shaping thin paper strips. I find it very pretty and versatile, and not used often in the world of art.


This is a very easy tutorial for quilling beginners; usually, you want to use a quilling tool (sort of a wand with a slot at the end to insert and roll the paper), but you can use an eye of a large sewing needle instead if you are new. It will be a little harder 
though, but it's still doable.
Adding gems and glitter to these earrings makes for very sparkly and eye-catching earrings, despite their size. A perfect party accessory when you want something just a little different, something that people haven't seen before. They will be surprised when they find out the majority of the earring is paper!
We seal these earrings with clear gloss so they are somewhat waterproof, but still be careful with these.


Use any color combination, my combo was obviously inspired by peacocks, but if you have a certain outfit to match please do. Make these in all different color schemes for different party outfits!


Let's get started.


Step 1: Gather materials. Needed are scissors, glue, a toothpick, glitter, clear gloss (not shown), flatback gems (like 3mm or so), two earring posts, a quilling tool, and quilling paper.

If you're new to quilling, I suggest you buy yourself a quilling set like this one, it's got all the basics you need and isn't expensive at all. That's what I did when starting out! You can get really creative with the art, and can even make things like Christmas ornaments. The possibilities are endless!


Step 2: Cut 6 4" pieces of quilling paper. Create coils out of each strip, winding, the paper around the quilling tool, and glue the end down to hold. The toothpick helps you with getting little bits of glue on the paper! Let these dry.


Step 3: Pinch both ends of your coils to form eye-shapes. Glue two of these shapes side to side, as seen in the middle pic. Glue the third eye right into the center, then the posts onto the arrangement, as seen in the picture. Let dry.


Step 4: Glue three gems onto each center of the three coils. Let dry. Take the gloss and paint the edges of your earring, and cover in glitter. Let dry.
Then, paint the whole earring with clear gloss (don't paint over the gems as this will make them glassy), and let dry. This will help seal and strengthen the earring. Let dry.


Very elegant and dainty, plus tons of sparkle!

Little, but pack a punch of sparkle!


All photos and instructions copyright Allison Cooling. Do not repost this or use my photos unless linking back to me.

Monday, November 5, 2012

Color Monday: Jungle Fever Palette


A bright blend of the colors of the jungle; yellows and greens, browns and deep reds. Catch the fever!
Feel free to use this palette in any of your designs.