Showing posts with label wrap. Show all posts

Wednesday, October 2, 2013

'Tis the Season.. Swirl Mint Bobby Pins!


I know it's somewhat early for thinking of "holiday time"...... But it's never too early to think of cool accessory ideas! These simple bobby pins are great to whip up quickly for yourself or any gifts or favors, holiday or not!


The 'Tis the Season theme coincides with Cousin's new launch of their product line in both AC Moore Craft Stores (all along the east coast)  and Beverly's (for all my California followers!) This 'Tis the Season line features all different cute charms, beads and findings that are super cute and great for making all sorts of jewelry or crafts! The whole collection can be seen here, or buy them at Prima bead online!
To follow Beverly's on Facebook, click here!
To follow AC Moore on Facebook, click here! 
To follow Cousin on Facebook, click here!
Both have great jewelry ideas, tutorials, promotions, sales and other cool things for craft DIY-ers!


These would be great as handmade holiday presents! You could even make these in different colors for different holidays; maybe try these cool orange beads and black crystals for a spooky halloween vibe!
I used colored bobby pins to coordinate the look, and for it to be a little fancier.
Let's get started!


*MATERIALS NEEDED*
-Two bobby pins


Step 1: Cut about 2' of your wire. About 1" from the end of the wire, start wrapping right at the bend of the bobby pin; wrap about 5 wraps, nice and tight to secure wire on. Add on a 4mm crystal. Secure the crystal by wrapping the wire twice around the top arm of the bobby pin, right up against the bead.


Step 2: Add on one swirl bead; wrap again twice right after this bead, pulling the wraps tight up against the bead to secure. Continue; add on two more swirl beads, wrapping twice in between the beads. Add on the last 4mm bead and wrap all the way to the end; cut the wire flush when you reach the end!


Quick, simple, easy!


I like to put them on a topknot for a cool but hip look.


Pattern and all photos copyright Allison Beth Cooling. Please do not use/post without linking back and crediting me! 


Sunday, July 7, 2013

Beginner Tutorial: Easy Arrowhead Necklace for Women or Men!


Another "beginner" tutorial, this time for a cool painted arrowhead necklace! These can be made for women or men, just by switching up the colors with the cord and the paint! 


This is a super-easy necklace to make, and can be layered with other necklaces for a cool look. This is just a long tie-on necklace, so you don't even have to bother with a clasp. 


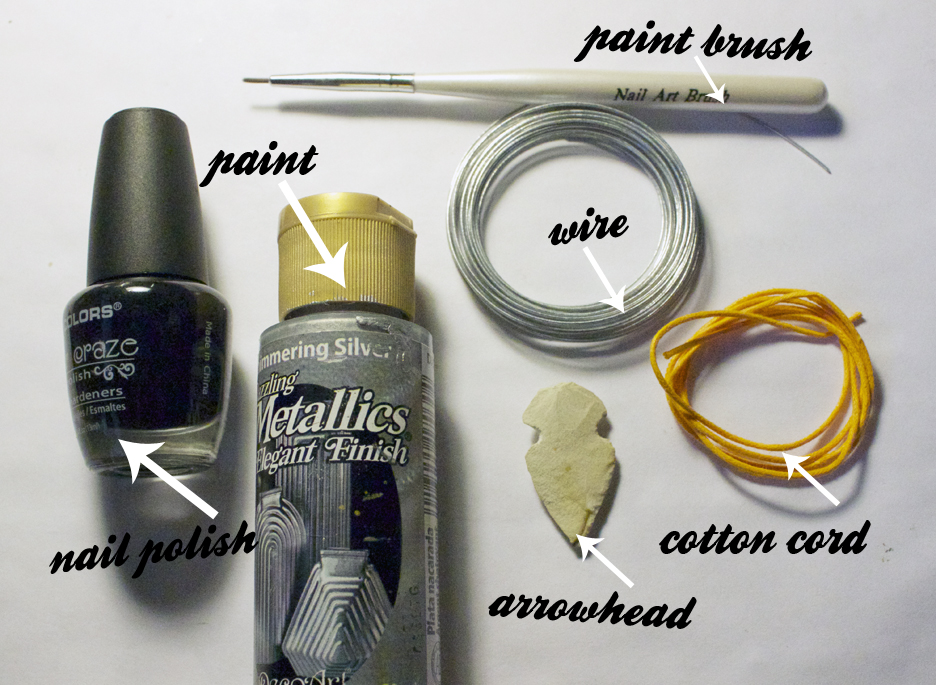
Step 1: Gather materials: needed is a paint brush, nail polish and/or acrylic paint, an arrowhead (small), cotton cording, and wire (the gauge doesn't matter so much, maybe 20 gauge or so). You will also need pliers and wire cutters. You may choose to use beads as well. I used metal beads of differing sizes; try maybe pearls or glass beads for a contrast! Maybe even add a crystal for sparkle....


Step 2: Cut a piece of wire a couple inches long. Wrap a couple of times around the niche in the arrowhead, starting in the middle of the wire, and then bring the ends together in the back of the arrowhead. Twist the wires, and use one of the wires to make a loop (bring the excess wire down to meet the twist again), and use the other wire to wrap around the excess wire.


Step 3: Make a couple of wraps, and then cut both wires flush. It helps to add a little glue on this to seal it, I use E-6000 glue. Then, paint your arrowhead as you want it; you can use neon colors for girls, or to make this a men's necklace, use dark colors! Paint any pattern you want!


Step 4: Cut a length of cotton cord that's large enough to go over your head comfortably, plus 2 inches. String on your arrowhead, and if you choose, any beads. To lock the beads in place, tie two knots on either side. It looks cool to have the beads in an asymmetrical pattern! To close the necklace, tie a tight knot with both the strings, and glue this knot to seal.


These are cool by themselves, but layering them with other necklaces gives a boho look! 


Simple enough for beginners, but really anyone can make these!


If you share/use/post this tutorial, please link back to me. It is much appreciated! Don't use my photos without crediting me please!


Wednesday, December 26, 2012

Homemade Nail Wraps


Nail wraps are all the rage!
With the super-cool designs and easy application, why not make your own with the nailpolish you have laying around? 
I will show you the basic technique on how to make these wraps, but you can customize the design to fit your needs and style.


It's a lot easier to make a detailed pattern on a flat surface instead of a curved nail!


Step 1: Gather materials. Needed are nail polishes, a ziplock bag or laminate report cover, a sharpie, a toothpick, and an xacto knife. You need somewhat of a thick plastic base to paint your decal on, so don't use a flimsy sandwich bag or something....


Step 2: Cut a square of the plastic from the bag so you are only working with one plastic piece.  Trace an outline of all our nails on one side of the zip-lock bag. Turn the piece over so you will not be painting on top of this Sharpie (it will leech off into your decal and look bad if you paint on the same side).


Step 3: Paint a thick layer of paint on one of your outlines. I added four drops of other colors and marbled them with a toothpick. Repeat this for all your nail outlines. Make sure your plastic is lying flat


You should have something that looks like this. Let all your paint decals dry for one day.


Step 4: Take your xacto knife and trim off any ragged edges so that the plastic is more of a nail shape; slice very gently with the blade so you only cut the nailpolish decal, not the bag underneath. Once you have a decal shape, gently lift off the whole decal, being careful not to rip it; it helps to pry the ends up with your blade. Paint a layer of nailpolish on your nail and when still wet, place the decal on top. Gently burnish the decal to adhere and remove air bubbles. 


Step 5: Repeat for each nail. If the decals are longer on the edges, you can gently trim with scissors and/or file them to shape the nail. Once they are all totally adhered and the paint beneath has had time to dry, finish with a top coat to totally seal.


There are so many possibilities with this! I will be experimenting with different designs and posting them. I started out with a simple marble to show the technique. This is great to make decals ahead of time, and then have several to choose from the next time you want a manicure!


All photos and instructions copyright Allison Cooling. Do not repost this or use my photos unless linking back to me.