Showing posts with label red. Show all posts

Wednesday, April 16, 2014

Grinning Geisha Bracelet


What a doll!
For this tutorial, I took inspiration from this little Geisha bead from Beadmixer.
The clean whites but pops of contrasting red/pinks and greens.


I decided to mix materials by weaving cotton and a mix of glass and porcelain beads through flat silver cable chain from Cousin.
How perfect are these porcelain flower print beads, also by Beadmixer?
I am in love with Beadmixer's selection of porcelain beads. They are all a little different and in all different colors and shapes. I knew I wanted to feature them in this design!


I love the fun, "lightness" to the design, while still using a chunky chain and larger beads. Taking hues of pink and red directly from the geisha charm, as well as the floral element makes for a perfect combo.


Usually pinks and reds are not paired together. I say why not?? Last year, fashion runways showed color blocking in a new way, with similar hues like orange/red, pink/red and a mix of blues/purples paired with each other. I am still lovin' the trend a year later. 
If you make your own, find a color combination that works for you! 

Be sure to check out the Beadmixer site, ESPECIALLY if you love to use vintage rhinestones.
You can also connect with Beadmixer through their:


Are we ready? Let's get started!


Step 1: Gather materials. Needed are:

-6mm or 8mm glass beads (I used pink)
-Embroidery floss
-Large link flat chain- mine from Cousin-you can buy from the link or at AC Moore stores 
-Porcelain flower print beads. I used Beadmixer beads
-A large porcelain charm. Mine was a geisha charm from Beadmixer
You will also need a clasp and some jump rings, as well as pliers and headpins.


Step 2: Cut two 1.5 foot pieces of embroidery floss. 
Starting somewhere in the middle of the length of chain (you could also start at the end), thread the floss up through a link. Make sure there is about 4" of thread to the left of where you started threading, you will need to knot this later. Add on a porcelain bead, then thread down through the fourth link next to it. add on a bead, and thread up the fourth link from that chain. They should lay next to another.
Repeat this process unit you have enough porcelain beads threaded on to make your bracelet long enough for your wrist.
Take off the extra links on either side of your porcelain beads to secure the length of the bracelet. If you started at the end, only take off the long excess on the other side of your beads.


Step 3: Then, thread through the end link. Add a glass bead, and thread down two links over. Thread up through the next link. Thread on another bead, and thread down two links over. Thread up through the next link.


Keep repeating this process. It helps to lay the bracelet on your knee instead of a table because it will curve and be easier to weave with. I kept going until the pink beads reached the end of my chain.
Then, take both ends of the floss and tie in knots, incorporate the red floss from the porcelain beads. Make sure the are woven in opposite directions on the end link of chain so that the knot stays put.


Add your extender chain with jump rings to the end of the chain, and add your charms here with looped headpins. That's all there is to it!


Try out all different bead and color combos! Gold chain would look sweet with bright blue and white for a Grecian look, while copper chain would pair with turquoise and silver. 


As for the geisha charm, Beadmixer has all different colors and styles, and even has little russian doll charms and owls! They are totally unique and quirky which I love.


Hope you enjoyed the tutorial! If you make this bracelet, be sure to post on Instagram and tag @quietlioncreations!! I'll repost it!


All photos and text copyright Allison Beth Cooling. Do not post/use tutorial without linking back to me.


Monday, February 18, 2013

Color Monday: Heart's Desire


A post Valentine's Day palette of warm browns, cream, and red!
Feel free to use this palette in any art project you have!

Monday, July 9, 2012

Color Monday; Hot Chick Palette


Spicy! Bright reds, oranges, greens and yellows are contrasted by a stark black.
A very assertive scheme.

Wednesday, July 4, 2012

Kenneth Jay Lane Strawberry Necklace


Sweet! This cute necklace by Kenneth Jay Lane looks like a piece of candy! Best of all, you can make it yourself and save about $115. Super sweet!
Red is traditional, but I am NOT a traditionalist.


Yes, mine is turquoise. Why not?


All you need is some leftover polymer clay and a few more "ingredients"....


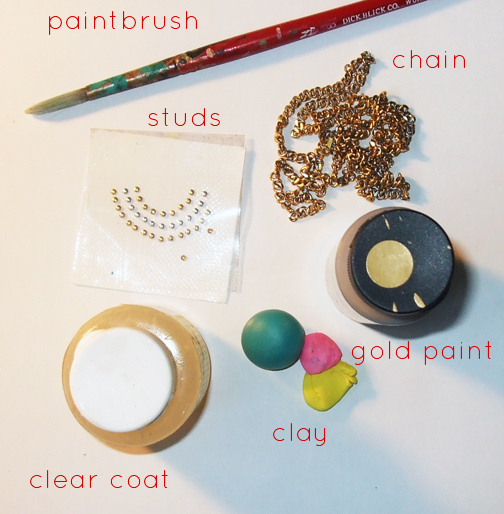
Step 1: Gather materials. Needed are Sculpey Polymer Clay, Triple Thick Gloss Glaze, a paintbrush, Gold Acrylic Paint, a long chain, and Round Stud Rhinestone Nail Art Decoration. You will also need a length of thick wire or a headpin with a loop, and a jumpring.


Step 2: Shape your clay into a strawberry shape. Roll into ball and gently pinch the one end to make it elongated. No, make about 8 little teardrop nuggets, these will be for the strawberry petals. 


Step 3: Flatten those teardrops and attach them to the top of the strawberry. Flip them up a little at the end to mimic a real strawberry. Take your length of wire or headpin with the top looped and stick through the top of the strawberry, press down far to secure. Make sure only a little bit of the loop sticks out, so that it's not totally noticeable. After baking, you can add some superglue around this spot if you like to make sure the wire won't pull out of the strawberry.


Step 4: Take your little stud decal; pick off one of the gold studs and press into your strawberry. Continue all around to add seeds on all sides, make sure you press the studs far down to secure.
Now bake your strawberry. I do about 125 degrees in a toaster oven for 25 minutes or so. Paint the top petals with the gold acrylic paint, and cover all in a clear lacquer to finish. Add to chain with a jumpring.


Delicious- you're all set!


Sunday, March 11, 2012

YSL Mondrain Nail Design


Another nail design tutorial! This time, it's YSL-inspired. You know the iconic Mondrian dress? Well, you can create this on your nails; who knew? Anyways, with a couple of simple steps, you can have this super-cool mani done and ready to wear anywhere. It's pretty similar to my last tutorial, so that means once you get the technique down, you're ready to roll. 


Step 1: Gather materials. Needed are scissors, masking tape, a thin paintbrush, and white, black, yellow, red and blue polish. You also want a nice clear topcoat to finish, and as always polish remover and Q-tips for easy cleanup!


Step 2: Paint a coat of white (or two, if your polish is thin). LET DRY COMPLETELY. Next, cut really thin strips of tape; I used three strips per nail. Set these up so they make a nice Mondrian-esque geometric grid on your nails. You can do a different arrangement on each nail for added interest. Once you've got the tape nice and pressed down (so polish doesn't leak underneath), paint one chunk red, one chunk yellow, and one chunk blue. Leave the others white, to mimic Mondrian's iconic art. Like in the last tutorial, rip the tape strips off as soon as you can (start with the tape on top of the rest, then the one underneath, then the last one to prevent smearing). 


Step 3: Take your black paint, and use your paintbrush to paint over where your tape grid was. Make nice even black lines to finish outlining your color chunks. Clean off any polish on your fingers before it dries. 
Repeat for next nail (see, I have a different tape composition on this nail).


Step 4: Repeat step 2 for this nail. Continue taping, painting the chunks, and ripping the tape off. Then, continue with step 3 for all the nails, finishing your grids with black paint. Clean off any polish from your cuticles/fingers with the Q-tips. Let them dry completely. Finish with topcoat!

Very Mondrian!


Sunday, March 4, 2012

London Calling: Nail Design


Ok, here it is. In honor of London Fashion week, I have made an original nail design tutorial that's easy enough for any budding artist. This tutorial doesn't use any materials you don't already have in your house.
 Cool enough for pretty fashion icons, rock 'n rollers, or even plain Janes; the Union Jack pattern is totally eye-catching on your nails! 
Let's get started...


Step 1: Gather materials. Needed are red, blue and white nail polish, clear coat, masking tape and scissors. You will also need a thin paint brush.


Step 2: Paint your nails with the white. You may need two coats to fully cover. LET DRY COMPLETELY. If you don't let 'em dry, your nails will be ruined in the next steps.
Now, take your masking tape and cut two strips; place them in a cross pattern on your nail, right in the center. Then, cut two thinner strips and crisscross them over the thicker cross, mimicking the Union Jack pattern. Refer to picture for placement! Make sure your tape is fully pressed down, all the way to the edges of the nails. This will make for crisper lines.


Step 3: Paint! Paint right over all that tape with your blue, filling all the white space. As soon as you can, carefully rip the tape off. If you wait 'till the paint dries, you will ruin your design. When this blue is dried, take a thin paintbrush, and use it to carefully paint a red cross in that center white cross to finish the Union Jack. If you have any polish on your skin, clean it off with a q-tip as soon as you can; it's easier to clean when still wet. 


Step 4: Continue with each nail. My tape crosses stuck together like a decal, so I could reuse it. You might have to cut new tapes for each nail if yours does not stick as well. 
When you have completed each nail, you might need to re-touch some of the lines if they didn't come out perfect. You can use that paintbrush to touch up lines, just clean it off with nail polish remover in between colors.
Paint with clear gloss once EVERYTHING IS FULLY DRY. 
You are ready to rock!


If you share/use/post this tutorial, please link back to me. It is much appreciated!