
Sweet! This cute necklace by Kenneth Jay Lane looks like a piece of candy! Best of all, you can make it yourself and save about $115. Super sweet!
Red is traditional, but I am NOT a traditionalist.

Yes, mine is turquoise. Why not?

All you need is some leftover polymer clay and a few more "ingredients"....
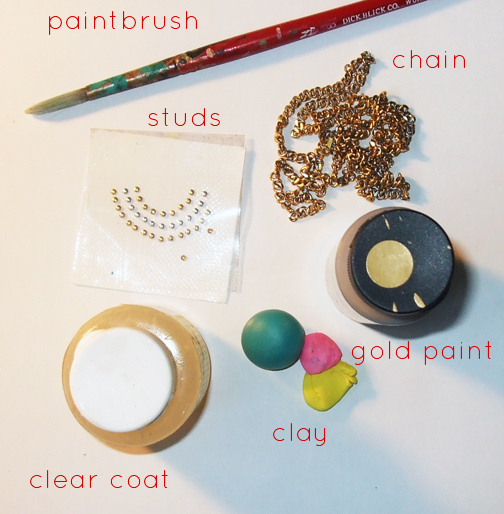
Step 1: Gather materials. Needed are Sculpey Polymer Clay , Triple Thick Gloss Glaze
 , a paintbrush, Gold Acrylic Paint
 , a long chain, and Round Stud Rhinestone Nail Art Decoration
 . You will also need a length of thick wire or a headpin with a loop, and a jumpring.

Step 2: Shape your clay into a strawberry shape. Roll into ball and gently pinch the one end to make it elongated. No, make about 8 little teardrop nuggets, these will be for the strawberry petals.

Step 3: Flatten those teardrops and attach them to the top of the strawberry. Flip them up a little at the end to mimic a real strawberry. Take your length of wire or headpin with the top looped and stick through the top of the strawberry, press down far to secure. Make sure only a little bit of the loop sticks out, so that it's not totally noticeable. After baking, you can add some superglue around this spot if you like to make sure the wire won't pull out of the strawberry.

Step 4: Take your little stud decal; pick off one of the gold studs and press into your strawberry. Continue all around to add seeds on all sides, make sure you press the studs far down to secure.
Now bake your strawberry. I do about 125 degrees in a toaster oven for 25 minutes or so. Paint the top petals with the gold acrylic paint, and cover all in a clear lacquer to finish. Add to chain with a jumpring.

Delicious- you're all set!

how do you connect the strawberry to the findings?
ReplyDeleteLOVE it! Very cute! I like that you made the actual pendent. :)
ReplyDeleteit's folk art #660 metallic pure gold. it took some coats since the paint is a bit watery but it turned out fine!
ReplyDeleteSo fabulous! I love how easy your DIYs are, but with such a HUGE impact!
ReplyDeleteI love the pictures, it looks like a perfect storebought one! :)
ReplyDeleteThis is ADORABLE. I love the unique color choice.
ReplyDeleteAny chance you would be willing to take orders? Etsy perhaps?
I unfortunately don't own most of the supplies you listed and equally unfortunately have limited artistic ability.
what mm size are the studs and any suggestions on where to get them? I have looked all over a no luck. LOVE this though and can't wait to get started on it! Thanks for sharing.
ReplyDeleteThis is so pretty! I was looking for crafts to do with my friend and this will work perfectly!
ReplyDeleteOh my god, your DIY versions of expensive jewelry are amazing! This looks so perfect!
ReplyDeleteI love strawberries..OMG cant wait to try this!
ReplyDeletefor a regular oven I wouldn't go above 200 degrees just to be safe.
ReplyDeleteit depends on the type of clay, but I'd say at least 30 minutes. make sure the clay doesn't darken too much because with more time in the oven clay darkens.
ReplyDeleteWow!! I really love this necklace!! What kind of polymer clay do you use? I use fimo or premo
ReplyDeleteI used sculpey clay I think. But it shouldn't matter, they should all work good if you've got a good brand.
ReplyDeleteYour nails are awesome! Did you do them yourself?
ReplyDeleteMade it and love it!!!!
ReplyDeleteWOW....I am so amazed. I bought a strawberry from claire's but now that i know i can make it myself i'd love to have different colors as well. Thanks, Thanks, Thanks
ReplyDeleteIt was nice of you to acknowledge the one by Kenneth Jay Lane, but I like yours' much more and I love the turquoise! Great job, TFS!
ReplyDelete