Showing posts with label ASOS. Show all posts

Sunday, July 29, 2012

ASOS Ribbon Stretch Bracelets


Who would pay $17 for two simple ribbon bracelets?! Not me. And don't you either. Follow my tutorial below to make the ASOS Ribbon Stretch Bracelet yourself.
This tutorial produces the SAME EXACT bracelets that ASOS sells. Know how some of my tutorials produce "look-alike" results? Not here. 
Here, you will make literally the same piece of jewelry. 
For literally less than $2.
Are you stoked yet?


All these bracelets are is a ribbon strip woven on stretchy cord.
 Believe me, I checked it out.
The results will vary if you use thicker ribbon, or different color ribbon. Feel free to make your fav colors into bracelets. Maybe even use different strips of ribbon in the same bracelet? Could be cool!


Step 1: Gather materials. Needed are scissors, tape (not completely necessary), ribbon (I used satin ribbon a little more than 1/4" thick, this produced great results. Don't go more than 1/2" thick and don't go too thin), pliers, a crimp, elastic cord, and a large-holed embroidery needle. You also need clear nail polish to coat the end of the ribbon so it doesn't fray. Your ribbon needs to be different lengths depending on how large your wrist is. The best bet is to use ribbon still on the spool so you have a lot left! This ribbon above gave me just the right amount, I was lucky!


Step 2: Cut a length of elastic about 1.5 times the length you want your finished bracelet. Thread on to your needle; leaving about 1/2" loose on one side. Secure needle to the cord by tying a knot with the long end and 1/2" end, then tie another knot nice and tight to completely secure the needle on. Coat the end of your ribbon with clear nail polish to make sure it doesn't fray. 
Thread the ribbon on your needle, then as seen in the second pic, bunch it up a bit and stick the needle through again. There should be a little less than 1/4" between each time you stick the needle through.


Step 3: Continue threading on your ribbon, bunching it up again and again. Slide the ribbon down gently every so often onto the elastic. When it is long enough (bottom pic), slide all the ribbon onto the elastic, cut the ribbon and coat the ends with clear nail polish. Center the ribbon "snake" on the elastic, and cut off the knot/needle. Slide on a crimp and bring the other end of elastic through the other side, pull tight so the ends of the "snake" meet. Crimp shut, cut off excess elastic.


These would also make good scrunchies. For a pop of color use neon ribbon!

Feel free to make them in different colors!
Also, I used ribbon with those loops on the sides for the yellow and blue here. Cute.


Friday, June 1, 2012

ASOS Matchstick Necklace


This Asos necklace is simple yet cool. Plus, it's totally easy to make on your own. It's a quirky accessory that is guaranteed to catch eyes. My DIY version uses things that you surely have on hand, and comes together quick!


I like the sleek look of this design. It's perfect for those who like edgier jewelry!


Let's get started!


Step 1: Gather materials. Needed are pliers, chain, jump rings, a match, gold wire, gold paint, black nail polish, clear glaze, hot glue and some superglue.


Step 2: Take your gold wire and make two small looped headpins (first pic). Set aside. now, take your match and paint the stick part gold. You will need a couple of coats. Paint the end black. When this is dry, cover in clear gloss glaze. Let dry.


Step 3: Take a small dot of hot glue and attach one of the loops to the back of the match. Repeat with other side. I added superglue around the small dab of hot glue for added strength. Attach these loops to either end of your chain, making sure there is an even amount of chain on both sides so it lays right!
Simple enough?!


The necklace on

Wednesday, March 21, 2012

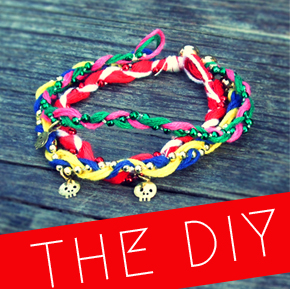
ASOS Braided Friendship Bracelets


The next tutorial is pretty cool. I love the mix of shiny with matte thread, and these ASOS Retro Skull Friendship Bracelets would be super-cool to make for your friends and yourself! Plus, you can add charms to these (yes, I used a skull, but you don't have to) to customize these. These come together really quick because they are braids, so they are a lot quicker to make than some other friendship bracelets!


Use all different colors to create a rainbow effect! 
Let's get started.


Step 1: Gather materials. Needed are embroidery floss, scissors, a small gold charm (pirate-type skull charms here, cute skulls with bows here, dainty bronze stars hereor dainty silver stars here), a bead and crimp for closure, plastic bead trim (this was leftover from a Christmas project but you can buy this at a craft store) and tape.


Step 2: Start the braid. I used a couple strands of embroidery floss per each color for a thicker braid, and folded the long strands in half so I could make a loop closure at the end. I cut the strands about 4 times what I needed for the length of the bracelet, and this ended up being plenty of string (when you fold them they will be 2X the size of your bracelet). Take your bead trim, place it in between the loop you make with your folded floss. Take a piece of cotton thread or beading floss, and tie all the strands together, making the knot nice and tight right after that first bead in the trim.


Step 3: Glue this knot to hold your start together. Tape your loop at the top of your workspace, and braid your strands together.


Step 4: At the end, repeat what we did at the top (tying with thread, gluing knot) then snip the trim right after the bead which is tied. Thread your crimp onto one floss piece, thread on the bead, then thread back through crimp. Crimp shut. Cut excess, and cut the excess floss that you didn't use. Glue this knot to hold.


Step 5: Add your charm to the middle of the bracelet. 
Finished!

Make them in different colors for your friends!


If you share/use/post this tutorial, please link back to me. It is much appreciated!


Wednesday, February 22, 2012

ASOS Fabric Flower Studs

From ASOS
I can't believe how easy this tutorial is. And how these earrings once sold for about $15 from British fashion site ASOS.
My version is seen below. These, for less than $1. Take your pick.

My version

The only thing you have to do in this tutorial is wait for hot glue to dry. Literally. Leaves a lot of time in your day to do other things, like drink coffee, paint, bake some vegan goods, go for a run..........the possibilities are endless!
Enough talk: time for the tutorial!


Step 1: Gather materials. Needed are two fake flower heads, two crystals (I used glass cabochons), two earring posts and hot glue.


Step 2: Make the earring. Cut the plastic center from your flower. Take a dab of hot glue on the back of the stone, and place the stone in the center of the flower. Once that's dry, dab your earring post with hot glue and press it on the back. DONE!
Didn't I say that was pathetically easy?......


If you share/use/post this tutorial, please link back to me. It is much appreciated!


Friday, December 30, 2011

ASOS Feather Gem Drop Earrings


Another feather earring tutorial!
This tutorial shows you how to make the ASOS Feather Gem Drop Earrings
They are really simple and quick to make. Feel free to experiment with colors of gems and/or feathers. The longest part of this tutorial is waiting for the glue to dry!
These are really good for any parties, because you can make them in about an hour and have a totally unique accessory in a pinch!

From ASOS

My version!


Step 1: Gather materials. Needed are pliers, ear wires, two feathers (synthetic please!), ribbon ends, superglue, and plastic gems in various sizes (the ones I used are for nails).


Step 2: Attach ribbon ends to the feathers. Then, lay out your gems. You will need 12 gems. 5 in the biggest size, 4 in medium, and 3 in small to get the graduated look. Then, simply pick up a dab of glue on a toothpick, dip the gem back in it, and attach to the center of the feather. Repeat, evenly spacing all your gems till you reach the bottom. 


Step 3: Wait about an hour or until they are dry. Attach your ear wires and you are finished!


If you share/use/post this tutorial, please link back to me. It is much appreciated!