Showing posts with label flower. Show all posts

Friday, March 6, 2015

black rose


/ / / i painted it black, i know how you don't like normal things / / /
x x x


Photos copyright Allison Beth Cooling for Quiet Lion Creations

Wednesday, September 17, 2014

Spider Jewelry Part III-Poecilotheria Bracelet


Stylishly scary, but chicly creepy. 


You probably saw my last Spider Jewelry posts- a hemp necklace and a leather wrap bracelet. These were my first endeavors into the world of creepy crawly art. I thought these were so cool so I asked my cousin (who gave me the last batch of spider molts) if he could get more from the spider lab at his school.


I got an entire lot of spider helmets, fangs, full molts and a couple spider legs. Spiders molt their "skin" just like snakes do, so making jewelry of their molts does not harm them at all!


I've asked Eric to give me a little background information on this specific helmet used in my bracelet. Here's what he had to say:


The cephalothorax molt from the bracelet is from Poecilotheria striata. Poecilotheria is a genus of the family Theraphosidae, made up of 14 species of arboreal (tree-dwelling) tarantula. They are native to Sri Lanka and India (this species specifically is found in India), and are most known for their speed, very colorful markings, and their rather potent venom...(which made me sticking my hand with tweezers down in there all the more stupid and dangerous haha). Depending on the species. Female adults (the molt came from a female) can have anywhere from 6-10" leg spans, with males being a little bit smaller. When roughly translated from Greek, the word Poecilotheria itself means "Colorful Beast"


Pretty awesome right? I loved the cool white stripes on the sides of the helmet which give it a desert-type look. I've decided to use this resin charm and transform into a simple macrame bracelet. I figured reflective and magnetic hematite beads from Cousin Corporation would be the perfect match for a unisex-type bracelet.


Contrasting with silver wire and elements gives a modern vibe.
Last time there were a lot of bubbles in my charm, because the natural material was slowly leaking air and creating bubbles throughout the curing process. This time, there were a lot less bubbles because I was able to catch most of them before it was too cured to mess with. There was one bubble caught right on the helmet, but it sort of blends into the white coloring. It will get better each time!


It all comes together to create a simple yet interesting piece! I've still got a lot more material to use; check back soon for more spidey items!

All images and text copyright Allison Beth Cooling. DO NOT post/use without crediting me!


Sunday, June 15, 2014

La Boutique Chic- Vase Necklaces


Fresh flowers and sparkly adornments…..what could be better??!!


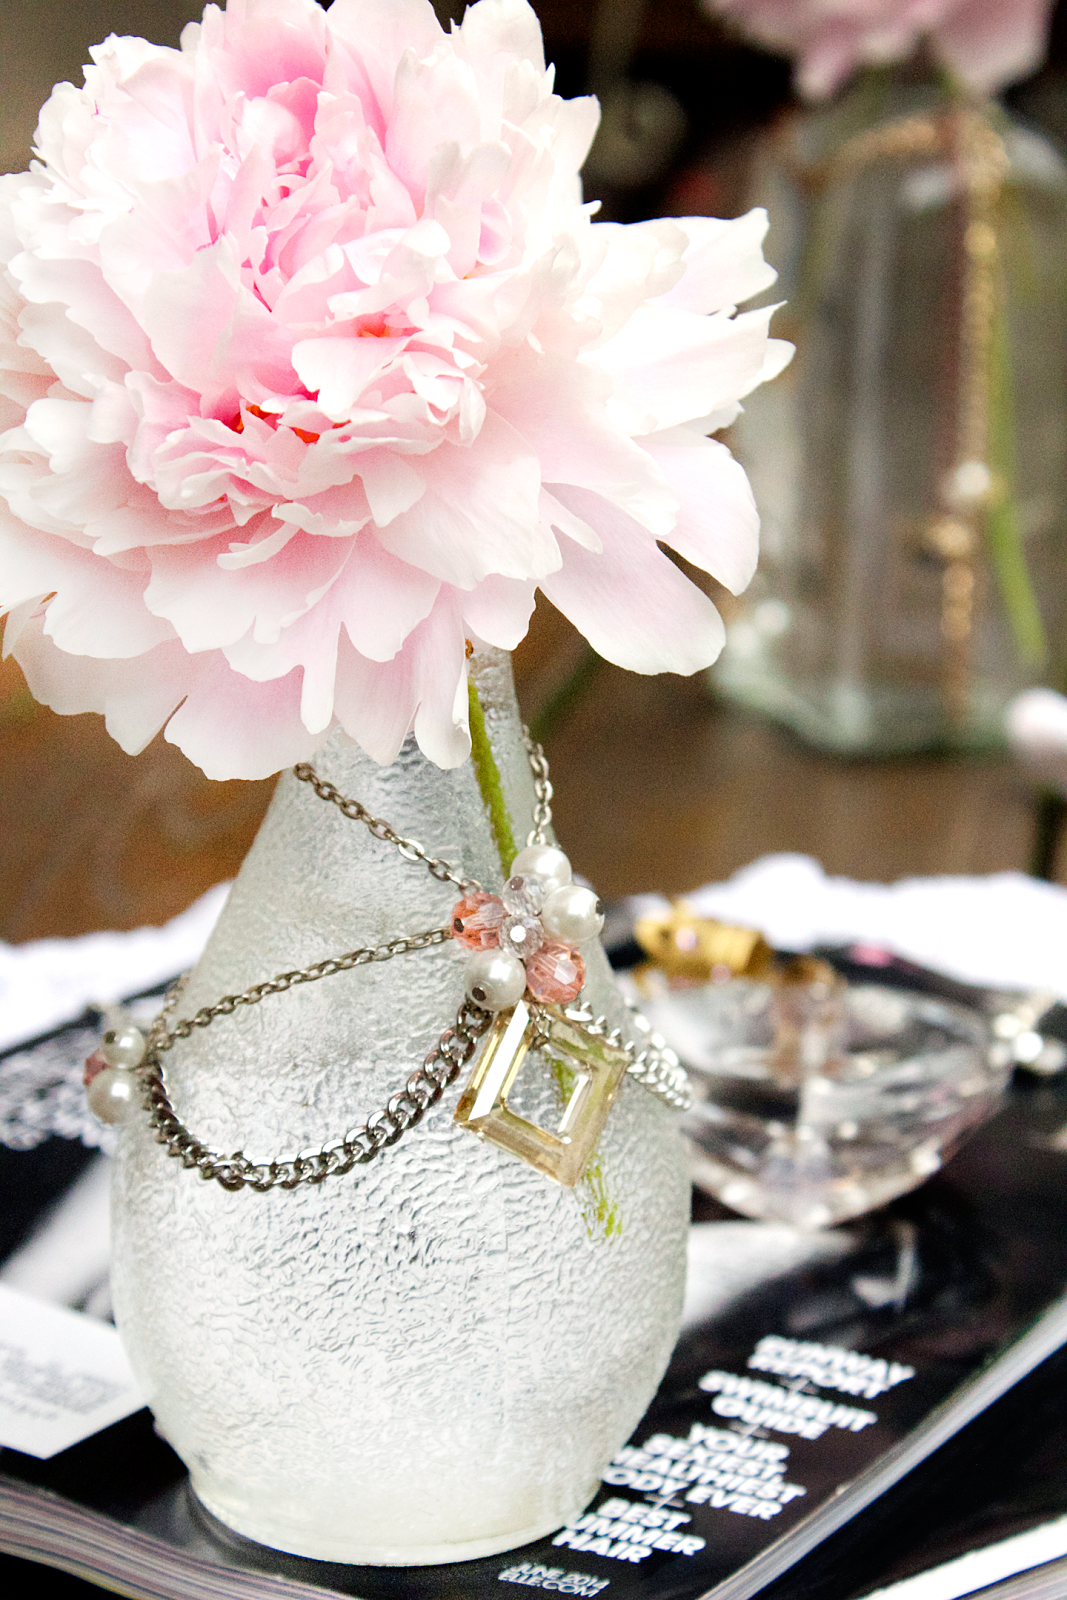
Peonies are in full bloom, which inspired me to take ordinary glass vases and jazz them up with a bit of Cousin brand crystals and chains. 


What's great about these vase "necklaces" is that you can customize them to fit a special occasion (like a wedding or shower) or color scheme. I went with neutrals and blush tones to match the peonies. I can see these totally working in wedding colors or even red, white and blue for upcoming Fourth of July. Pale pinks or baby blues for showers would provide a delicate touch to any tablescape. Decorating with  these at parties is simple too; make these ahead of time, and simply just place on your vases for an instant upgrade!


There really are no specific rules here, as the amount and configuration of chain and beads depend on your vases and the look you are going for. I'll explain what I did so you can see the steps. These are really easy to make actually. Experiment with different styles and types of beads!


I'm featuring these Cousin rhinestone beads for the bigger vase, and Cousin pink pearls  with silver chain for the smaller vase. Also, it's a great way to use up pendant beads that have been laying around. Or, if you have a lot of charms, go with an eclectic theme and mix them with crystals for a funky look!


Step 1: Gather materials. Needed are glass vases, pliers, and an assortment of beads and chain.


I used a mix of Cousin brand chain in various styles. I also used Cousin focal crystal drop pendants and Swarovski pendants. I also used Cousin Jewelry Basic crystals and pearls.


Step 2: Depending on the size of your glass, use your chain to create a "necklace". I used the smallest silver chain, and added the Swarovski pendant at the bottom. I attached a 6" piece of chain to the top of a square Swarovski pendant (adding the rhinestone bead on top at first, but I reconfigured and removed it for the final piece). Then I took larger chain and created two side drops, about 7" for each drop. Play around with your placement of chain to create something that fits the shape of your vase! There really are no rules here. Just make sure you have that initial  "necklace" and every other piece of chain is attached to this one so it stays together. I attached a 5" swag of chain with jump rings to the initial necklace, and used headpins to make crystal and pearl drops on the ends of the free chain.
Notice that the first picture is different from what I ended up with; I played with various styles until I came up with the last one which I liked the most!


For another vase I started off with a necklace again, adding chain "swags" and connecting them with jumprings and charm drops. 


It really is that easy! No glue, waiting, advanced techniques or the like.


These make for a totally glam table setting. You can even make these to put on vases all around your house. If you are a sparkle lover like me, you totally need one in every room. These bring that "elegance" factor. They actually remind me of a sort of modern "French Country" type look-- no, a French Country meets Luxe Boutique look. Any decorating at my house needs to include the glitz and diamonds, ok?!! Ring here (right picture) from Generation Bliss. These actually ended up matching my Harper's Bazaar and Elle magazines perfectly. Go figure.


Flowers+crystals+perfume+jewelry+fashion magazines = HELL YES.
Enough said.


All photos copyright Allison Beth Cooling. Do not post/use without linking back to me and crediting me!

Monday, June 3, 2013

Color Monday: Petal Play Palette


Inspired by tropical flowers, this palette has contrasting greens and red/pink hues, set off by black. Very sophisticated yet feminine! Feel free to use this palette in any of your art projects.

Friday, April 26, 2013

Beginner Tutorial: Easy Drop Earrings


The next installment in my "beginner tutorials" phase...
earrings! These are so simple and don't require any complicated wireworking skills to create.


Feel free to use any kind of beads, just make sure you have a statement bead and a smaller crystal or pearl to keep the look elegant.


These beads are just made with a headpin, bent to form a drop earring shape.


Let's get started!


Step 1: Gather materials. Needed are pliers, two larger beads, two long headpins (about 3") with a ball end (you can find them at craft stores), and smaller crystals or pearls. If you can't find the ball-end ones, you can use regular headpins but the look won't be as elegant.


Step 2: Take your headpins, and mark about 1cm from the end with a sharpie. This is where you will bend it. If you have longer/larger earlobes feel free to mark at 1.5cm.


Step 3: Thread on your bead and then crystal. Position your pliers right below the mark you made. Take the end, and gently bend it back to create a notch in the headpin.
You have just created the first earring!
To get the Sharpie mark off, dip your finger into water and just rub it off. 


Repeat the last step for your second earring. If you see, the beads will not come off the headpin if you make the notch bent enough. To wear, you might want to use clear fishhook stoppers so that the earrings don't come out of your ear.


See, I told you that was easy!


Shown worn. Don't use any super-heavy beads as these will throw the earrings off-balance. 


Make these in different bead combinations for every outfit!


All images and text copyright Allison Beth Cooling. Do not use my photos without crediting me, and if using this tutorial please link back!


Friday, March 29, 2013

Easy Spring Floral Nails


It's finally spring! However, it hasn't really felt like it.
Even with all the cold still in the air, a bright manicure can help cheer up the day!
This manicure requires basically no skills, and comes together really quick.
Feel free to make this in any color combination you'd like, but keep a light background so you can see the design the best!
Even better, florals are totally on-trend for spring.


I used a color combination from Tabitha Simmons for Peter Som heels (shown on the first picture) with a pale pink and blue combination with a touch of metallic gold.


The floral pattern is really splotches of colors! Easy to paint with your non-dominant hand!
Let's get started.


Step 1: Gather materials. You will need nail art brushes, and an array of nail polishes in your color combination. 


Step 2: Start with a base of white, you probably will need 2 coats. I then painted one coat of Ulta Baby Doll for a pale pink look. Like I said, keep the background nice and light. Now, get your paint colors for the floral design. I used an array of greens and blues.


Step 3: Start with your dark color. Start to paint small splotches onto one side of your nails, make some look like flower shapes and others more abstract. It helps to get a plastic tupperware container's lid and put a couple drops of nail polish on it and paint from there.


Step 4: Continue to add layers of your color, and vary the size of splotches; make them look like leaves, petals as well as mini flowers if you can. Nothing too detailed is needed. Make sure you only paint one side of the nail so it looks like the bouquet trails up the nails.
Repeat with the other side, except make the bouquet on the opposite side of the nail.
On the bigger flowers, I used white and made a small dot for the center, so it looks like a real flower.
I finished off with bright pink dots around and within the florals for a pop of color and more detail.

To finish, if you want a metallic shine, I painted the side without the design with a fan brush and translucent metallic gold, giving a slight texture and shine to the plain background. This adds just a little extra!


Your finished nails! Feel free to finish with top coat so they don't chip.


All images and text copyright Allison Beth Cooling. Do not use my photos without crediting me, and if using this tutorial please link back!

Tuesday, October 16, 2012

Tarina Tarantino Skull Hair Clip


This cool skull hair clip is both girly and goth. It features a sparkly skull cabochon (in true Tarina Tarantino style) offset by a silk flower backdrop and gems. It's $38 for the real deal, but we can make ours for pennies.
This kind of clip is very easy and quick to make yourself, and you only need a few "ingredients".


My version is glued onto a hair clip for easy use. You can make it in any color combination you like. I used old gems from a nail art kit, but if you want to be all legit and use Swarovski sparkly flatbacks, go right ahead! It will be even more dazzling.


And, if you're not into skulls, you can use any other cabochon you have laying around; maybe a bigger gem, button, or anything else you can come up with.


Step 1: Gather materials. You need small gems, a hair clip, silk flowers, a cabochon, hot glue and super glue.


Step 2: Glue the smaller flower on top of the bigger one (with hot glue). Glue the skull into the middle (hot glue). Use your super glue to glue on gems around your skull, on the petals. When you are satisfied and the glue has dried, hot glue your skullflower to the hair clip. Allow hot glue to dry, gently peel the hot glue (still attached to flower) off the metal clip, score the metal clip, apply superglue and re-glue that glob of hot glue back to the clip on the superglue. I make a glob because I feel it holds better and sticks better than if you just used superglue by itself. 


Let dry.
How easy was that? 
A good project to do while babysitting or at a party night. Simple enough for kids to do but the results aren't super baby-ish like other projects!


A fun bright accessory!


All photos and instructions copyright Allison Cooling for Quiet Lion Creations.
If you share/use/post this tutorial, please link back to me. It is much appreciated!