Showing posts with label glue. Show all posts

Sunday, May 5, 2013

Cheap-o Pave Crystal Earrings


Another one of my "cheap-o" tutorials, now for earrings!
You don't have to spend big bucks to make a pair of those popular pave crystal earrings. Pave is a type of gemstone setting where the gems are uniformly placed, and placed close together. This technique is used in these earrings, to give maximum shine! However, we are not using diamonds or expensive gems......


We are using acrylic nail gems!


You still get shine, yet don't have to shell out a lot of cash. Along with a couple more ingredients, these earrings come together nicely and can be made in many different colors!


Let's get started!


Step 1: Gather materials. Needed are acrylic nail gems (similar here), earring posts, polymer clay (I use Sculpey), a toothpick and E-6000 glue. DO NOT use superglue for this because it will leave a white dusty look on the clay.


Step 2: Make two uniform sized marbles of clay, flatten a little so that one side stays dome-like, while the other gets flat to lay against the ear. It helps to push down the sides of the marble gently against a flat surface. You have to pick a clay color that matches your gems, so the clay background won't stick out. I have red gems, so I have red clay here.


Step 3: Get all your gems ready. Bake the clay  (I do 15 minutes at 125 degrees in a toaster oven). Take your toothpick, pick up some glue, and attach the post to the flat side of the cooled clay.


Step 4: Stabilize your earring post (after it has dried) by pushing it onto a piece of scrap clay. This helps you while holding it, you don't have to try to hold onto a little post! Pick up a teeny tiny bit of glue on the toothpick, add it to the back of your gem, and press onto the clay. It helps to start at the very bottom, work a row around, and then make another row sitting on top of the last one. Continue in this pattern, until your whole clay is covered in the gems. Let all the glue dry.
Repeat with the other earring!


Finished! The amount of gems will vary depending on what size you use. I used 3mm gems.
You can make these in different colors, different sizes and shapes! 


Very cool!


Do not use my photos without crediting me, and if using this tutorial please link back!


Saturday, March 16, 2013

St. Patrick's Day: Pot 'O Gold Earring Tutorial


Top 'o the morning!
In the spirit of St. Patrick's Day, I have created an easy earring tutorial!
These Pot 'O Gold Earrings feature metallic microbeads and gems for sparkle. Microbeads are tiny little hole-less beads that are used for scrapbooking and nail art, but why not use them in jewelry? I actually found these at the dollar store, but you can also find them at craft stores or online even. Martha Stewart Crafts also makes them.


This color scheme is especially for St. Patty's Day, but you can change up the colors to fit any outfit you need. 
Let's get started on the tutorial!


Step 1: Gather materials. Needed are earring posts, Sculpey Polymer Clay , heavy-duty glue like E-6000, Triple Thick Gloss Glaze, Glass Microbeads, and acrylic nail gems (like 3-4mm).


Step 2: Get your clay and make two small marbles. Flatten both marbles down so they have a flat front/back but still have some height, see picture above.


Step 3: take a pen cap or a tool (here I used the end of an X-acto knife) and press an indentation in the middle, making sure not to totally distort your disc shape. Repeat with the other marble.
Bake these two discs; I use a toaster oven for about 15 minutes at like 125 degrees.
The time may vary depending on the brand of clay you use and the oven. I use Sculpey.
Now, once your clay is baked and cooled, put a small dollop of your glue in the indentation; pour your microbeads over to cover the glue, press in gently.


Step 4: Repeat with the other disc. Brush off excess microbeads, to keep them confined just to the indentation you made. While the glue is still somewhat tacky, glue down 3 more crystal flatbacks over the microbeads and press in gently. 


Step 5: Once your front of the earrings are dry, then use the glue and glue earring posts in the middle of the backs. Wait 'till fully dry. 
Now, paint the outside rim of the earrings and the backs with clear glaze (I here used a coat of sheer green glitter nail polish as well as clear glaze to give more sparkle. Feel free to do that with whatever color you have, just make sure the nail polish color is close to your base clay color for consistency.)
DO NOT paint over your microbeads and gems because this will make the gems lose sparkle and make them appear glassy, not what we want here. 
Let them dry.


Cute and clever.


These are very original! Your friends will definitely want you to make them a pair!


All images and text copyright Allison Beth Cooling for Quiet Lion Creations.
Please link back to this tutorial if posting it elsewhere!

Friday, March 2, 2012

Lightning Bolt Necklace


From Diane Kordas

This super-chic necklace from Diane Kordas, found on fashion site Net-A-Porter, is the topic of my latest tutorial. It combines 18k Rose Gold with black diamonds, with a blackened gold setting, with a pretty hefty price tag of  $755. That's ok, don't fret; you can indeed make your own look-alike for pennies, thanks to some clay, glitter, and glue.

My Version
For my version, I chose to add both black and gold glitter to my pendant for a "gold-dusted" look. If you want yours to be totally black, stick with just black glitter. You can even do different color glitters for different colored looks!
Let's get started.


Step 1: Gather materials. Needed are clay, a chain and small jumping or head pin, tissue blades or Xacto knives, lacquer, and fine glitter.


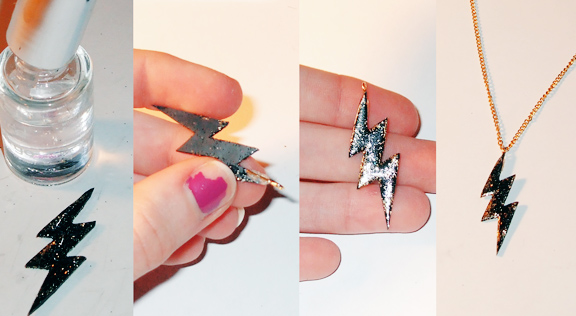
Step 2: Make the bolt. I rolled my clay out to setting 3 on a pasta machine. If you don't have one, roll till about 1/8" thin or so. Then, use your blade to cut a small lightning bolt shape like this out.


Step 3: Add the glitter. Place your cutout in the bottom of a small bowl (to contain the glitter!). Take your black glitter with a paintbrush, and "paint" a small amount on top of the clay. Use your finger to push into the clay to adhere. Don't push too much or you'll disfigure your lightning bolt. I then added a bit of gold sparkle glitter on top, pressed in, for a more gold-dusted look. If you don't even want black or gold, feel free to mix other glitters for a custom look! You could even apply this technique to different cutout shapes!


Step 4: Go bake your bolt for about 15 min. (I bake at about 120 degrees in a toaster oven). When done and cooled, paint your bolt with a bit of lacquer to finish. Then, I superglued a small headpin I looped at the end at the back of the bolt. You could do my hot-glue then superglue technique as well for more security. Add your chain!

Finished! Sparkly and cool.


If you share/use/post this tutorial, please link back to me. It is much appreciated!


Wednesday, February 22, 2012

ASOS Fabric Flower Studs

From ASOS
I can't believe how easy this tutorial is. And how these earrings once sold for about $15 from British fashion site ASOS.
My version is seen below. These, for less than $1. Take your pick.

My version

The only thing you have to do in this tutorial is wait for hot glue to dry. Literally. Leaves a lot of time in your day to do other things, like drink coffee, paint, bake some vegan goods, go for a run..........the possibilities are endless!
Enough talk: time for the tutorial!


Step 1: Gather materials. Needed are two fake flower heads, two crystals (I used glass cabochons), two earring posts and hot glue.


Step 2: Make the earring. Cut the plastic center from your flower. Take a dab of hot glue on the back of the stone, and place the stone in the center of the flower. Once that's dry, dab your earring post with hot glue and press it on the back. DONE!
Didn't I say that was pathetically easy?......


If you share/use/post this tutorial, please link back to me. It is much appreciated!


Thursday, February 16, 2012

Mimco Fabric Flower Barette


Have an old scarf? Don't know what to do with it? Make a Mimco Fabric Flower Barette! This barrette is a perfect accessory for the upcoming spring. Plus, it's a cinch to make. You can even make them in different sizes, depending on what size scarves you have. I used a pretty large one, so it made a really large flower. But it looks great on top of a ponytail!


This post was requested by a blog guest. Thanks, Linda!
Let's get started.


Step 1: Gather materials. Needed is a silk or silk-type scarf (any size will work, just make sure it's a long rectangle, not a square), a hair clip, embroidery floss and hot or tacky glue. I find that hot glue is easier to work with. It dries a lot faster!


Step 2: Find the center of the scarf. Tie a cinch with the embroidery floss (use a couple of feet of floss), nice and tight. Then, tie on your clip and hot glue this knot to hold it in the center of your clip.


Step 3: Start the flower. Flip your scarf over, and bring the floss up once again and tie another knot at the top. Then, with one side of your scarf, make a fold a couple inches long (the size will depend on how big your scarf is) and fold it over towards you. Then, bring your floss on either side under the fold, and tie a tight knot to permanently seal the fold/ruffle. You want to end up with about 3 folds/ruffles on this side, each being a little smaller than the first.


Step 4: Finish ruffles on one side. Make another fold, bring the ends underneath and again tie tight to seal the fold. Repeat once more (leaving about an inch or so of the raw ends) for 3 ruffles. Cut the floss right after the knot. 


Step 5: Cut another length of floss and tie on to the center, coming from underneath and knot at the top right at the knot you made in step 2. Just repeat steps 3-4 for this other side of your scarf. You should end up with something like the picture at the top. As for the raw ends, this is where your hot glue comes in. Roll them in towards the center (with your clip upside down), gluing with small spots of glue as you roll under. Keep rolling until your ends are neatly tucked in and you have a nice flower shape like this. Let your glue fully dry. That's all there is to it!
These look especially good at tops of ponytails, or next to topknots (if they are made with smaller scarves!).


A fashion statement!


If you share/use/post this tutorial, please link back to me. It is much appreciated :)