Showing posts with label bff. Show all posts

Sunday, October 18, 2015

indie dainty choker diy


Sometimes, dainty sparkle and shine is all that's needed to make a statement. I'm not always a fan of dainty jewelry (I like my big beaded pieces), but love the indie vibe chokers have. These braided 90s style pieces can be worn alone, or layered with other pieces for a more bohemian look.


And all those crystal charms you see?! They're earrings. I have 13 ear piercings, and I'm always losing my pairs, whether both or one at a time. I've found a use for all my widowed earrings here, using them as sparkly focal points in each necklace.


These whip up quick, because they're simply braided. I made all those pieces you see here in an hour. I'm super impatient, so I love anything that doesn't take long to make!


Step 1: Gather materials. Needed are 4mm and 6mm jump rings, flat nose pliers, 1.5mm Chinese knotting nylon cord (in all colors!), lobster clasps and miscellaneous earring posts.

Simply cut three lengths of nylon cord that are 1.5 times the length you want your choker. Braid together.


Measure out the length you want your choker, and cut an extra half inch on each side. To finish, thread the braid through the 6mm jump ring, and use a 4mm to crimp both ends of thread- squeeze the jumpring tight to secure. With your post earring, cut about a 1/4 inch of the post off with wire cutters. To create a charm, simply use round nose pliers to loop the post over , catching the braid in, Flatten then with the round nose pliers. I did have one earring that broke, so be careful!
 

This would be a great BFF project - a total update on those cotton knotted bracelets, right?! You could also use initial beads to personalize these. Make them in all color combos -the more the merrier!


COPYRIGHT
Because I take all photos for my blog, the images within this post are all copyright Allison Beth Cooling for Quiet Lion Creations. If you'd like permission to use a photo, email me at allison@quietlioncreations.com

Tuesday, April 10, 2012

Frieda and Nellie Friendship Ring


These are my kind of friendship bracelets; they've got major sparkle! I love how Frieda and Nellie incorporate gems into their designs, which adds another dimension to these bracelets; it instantly makes them more elegant!
I knew I could make a tutorial for these. However, I didn't want to spend hours knotting to make a bracelet, so I made a ring! What's great about making rings is that they come together way quicker than a bracelet, which means you have time to make more!


The contrast between the soft cotton thread and shiny gem is sure to catch eyes! All of your friends will want one.
This tutorial is a bit more tedious, but it's all about getting the knot pattern. Once you've got it, it'll get much easier!


Let's begin.


Step 1: Gather materials. Needed are scissors, four colors of embroidery floss, tape, and a gemstone with a setting; I got mine from a broken necklace. 


Step 2: You will need to cut two 3' lengths of each color of thread. This should be enough thread for you, I had some left over at the end. If you have a bigger ring size use a little more thread though.
Tie all the lengths together at the top with an overhand knot. Tape down.
For the sake of this tutorial, I will label threads R (red thread) G (green thread) Y (yellow thread) and B (blue thread). If you are using different colors, just assign these names to them as well to not confuse yourself!
 Arrange the threads: R, G, Y, B, 2B, 2Y, 2G, 2R.

Step 2.5: Take R, bring over G, then behind G and through that loop to the left and front (second pic). Pull tight to make a knot. Now, take R, bring over G but bring thread to the right and front (third pic). Pull tight again. It should look like the last pic, with the thread naturally ending up on the left side of G again.


Step 3: Now, you will be doing this same sequence but with 2R and 2G. Take 2R, bring over then behind 2G but bring thread to the right and front. Pull tight. Take 2R, bring over then behind 2G but bring thread to the left and front (second pic). This is the exact same thing you did in the last step, but the directions are reversed. Pull tight. You should have the last pic, with 2R naturally falling to the right of 2G. 


Step 4: Take G, bring over and then behind Y, through that loop to the left and front. Repeat.
Take 2G, bring over and behind and through the loop 2Y to the right and front. Repeat.
Take G, bring over and behind and through the loop B to the left and front. Repeat.
Take 2G, bring over and behind and through 2B to the right and front. Repeat.


Step 5: You should have something that looks like this first pic. Then, take G, bring over and behind 2G to the left and front. Repeat.
You should have one complete chevron, looking like a V-shape. See the last pic?


Step 6: Now, we will repeat steps 2.5 through 5. However, instead of knotting the G's all the way across the other threads, since the yellows are next to the outer red thread (you will NEVER knot reds across any other threads than the one next to them; they are your outlines for your ring), we will knot across the threads with yellows. Start by knotting R and 2R in the way of step 2.5, but knotting on the yellows next to them instead of greens. Continue with the steps, but use Y and 2Y in place of G and 2G. 
You will be knotting both Y's over blues first, then greens. Remember to finish the yellow chevron in the manner of Step 5. Your completed chevron should look like the first pic.
Keep repeating steps 2.5 through 5, changing out the color names as needed. Your next chevron will use the reds to outline (as always), then the blues to knot the chevron (second pic).
Then, it will be back to reds for outline and green for the chevron. 
Keep with the pattern until you are at about halfway of the length you need for the ring.
Take the two center threads (in this case, it's greens) and thread on your gem, through the bottom of the setting. Look at the last pic for reference.


Step 7: Take R, bring over and behind Y to the left and font, pull tight to make a knot. Bring R over and behind Y to the right and front, pull tight. 
Take Y, bring over and behind B then thru loop to left and front. Repeat.
Take R again, but now over and behind B to the left and font, pull tight to make a knot. Bring R over and behind B and thru loop to the right and front, pull tight. 
Take B, bring over and behind Y then thru loop to left and front. Repeat. You should have something looking like the last pic.


Step 8: Now repeat step 7, but working with 2R, 2Y and 2B. This is how the knots will go.
Take 2R, bring over and behind 2Y to the right and font, pull tight to make a knot. Bring 2R over and behind 2Y to the left and front, pull tight. 
Take 2Y, bring over and behind B then thru loop to right and front. Repeat.
Take 2R again, but now over and behind 2B to the right and font, pull tight to make a knot. Bring 2R over and behind 2B and thru loop to the left and front, pull tight. 
Take 2B, bring over and behind 2Y then thru loop to right and front. Repeat. 
Yours should look like the first pic.
Repeat steps 7 and 8 until you have long enough knotted pieces so that the gem can be encased (second pic.) 
Now, to close in the gem, continue with our original chevron knotting pattern, which starts back in Step 2.5. Remember, you may have to substitute the color names depending on what thread you end up re-beginning the chevron with, but always knot the thread to the one directly next to it.You will be back to knotting chevrons just like before, which will hold the gem in place (pic 3 and 4).
Keep with the chevron pattern till the ring is long enough to fit around your finger. Once long enough, overhand knot all threads to secure.


Step 9: Finishing. Tie both ends together, cut, and glue this knot.

The finished ring!


If you share/use/post this tutorial, please link back to me. It is much appreciated!


Wednesday, March 21, 2012

ASOS Braided Friendship Bracelets


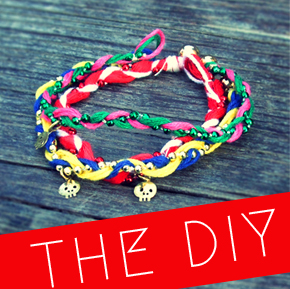
The next tutorial is pretty cool. I love the mix of shiny with matte thread, and these ASOS Retro Skull Friendship Bracelets would be super-cool to make for your friends and yourself! Plus, you can add charms to these (yes, I used a skull, but you don't have to) to customize these. These come together really quick because they are braids, so they are a lot quicker to make than some other friendship bracelets!


Use all different colors to create a rainbow effect! 
Let's get started.


Step 1: Gather materials. Needed are embroidery floss, scissors, a small gold charm (pirate-type skull charms here, cute skulls with bows here, dainty bronze stars hereor dainty silver stars here), a bead and crimp for closure, plastic bead trim (this was leftover from a Christmas project but you can buy this at a craft store) and tape.


Step 2: Start the braid. I used a couple strands of embroidery floss per each color for a thicker braid, and folded the long strands in half so I could make a loop closure at the end. I cut the strands about 4 times what I needed for the length of the bracelet, and this ended up being plenty of string (when you fold them they will be 2X the size of your bracelet). Take your bead trim, place it in between the loop you make with your folded floss. Take a piece of cotton thread or beading floss, and tie all the strands together, making the knot nice and tight right after that first bead in the trim.


Step 3: Glue this knot to hold your start together. Tape your loop at the top of your workspace, and braid your strands together.


Step 4: At the end, repeat what we did at the top (tying with thread, gluing knot) then snip the trim right after the bead which is tied. Thread your crimp onto one floss piece, thread on the bead, then thread back through crimp. Crimp shut. Cut excess, and cut the excess floss that you didn't use. Glue this knot to hold.


Step 5: Add your charm to the middle of the bracelet. 
Finished!

Make them in different colors for your friends!


If you share/use/post this tutorial, please link back to me. It is much appreciated!


Tuesday, December 20, 2011

Gauge Inc BFF Necklace


What kind of friend wouldn't love a handmade necklace?
These necklaces by Brooklyn-based Gauge Inc. are 14K gold and come with a hefty price tag of $100. However, as you can see, they are totally doable for a DIY. And I'm sure your friend will love the handmade version much better!
These necklaces are super easy to make; you literally trace your handwriting with wire. Best part is you can use any color of craft wire to suit your bestie's tastes. Make one for them and one for yourself! Add charms, even, to the bottom of the f's for some sparkle maybe? Go wild!


Let's get started.


Step 1: Gather materials. Needed are pliers, plain craft wire (nothing special here!), a necklace chain and jump rings, a pencil, paper.


Step 2: Draw the form for your pendant. Make it look like this, or as close as you can get. The dimensions of the BFF are about 1.25" long and .75" high. Now, take a long piece of your craft wire, about a foot or so. Start at the loop above the "B". Simply curl the wire with round nose pliers to start. Then, "trace" your BFF with your wire, using your pliers and fingers to hold and bend the wire in place.


Step 3: Continue to trace. I have pictured the steps I took here. Make the wire fit your BFF form as close as possible. I used my fingers a lot to gently bend the wire in the right direction, then used my round nose pliers to get the details and precise form. 


Step 4: Sharpen the "F". I squeezed the bottom of the "F" with a flat pliers to get more of a sharp arc instead of a rounded one (second pic), to match cursive writing better. Then, when you've reached the end of the last "F", cut the wire with a little more than .25" to spare (last pic). Make a finishing loop with this excess.


Step 5: When you've got it finished, flatten the pendant so it's nice and flat and lays properly. Then, attach your jump rings on the loop on the "B" and top of the last "F", and attach these to your necklace chain. Finished.
Surprise your friend/s with these awesome necklaces! 


Dainty and cute!

A close-up.


If you share/use/post this tutorial, please link back to me. It is much appreciated!