Saturday, October 29, 2011

Karen London- "Luxe"-inspired shiny earrings!


From Karen London
I like to get ready for the holidays early; well, my wardrobe at least! And of course, jewelry is the most important part. I found these designer earrings by Karen London on endless.com, an online store filled with designer jewels and more. I loved the chic look of the earrings, and the simplicity and monochromatic color. I found a way to make my own, altered version, using very simple "ingredients". I also made them in a gold instead of silver color scheme, and tapered the length of each dangle. The sequins are super sparkly and eye-catching, and are perfect for upcoming gatherings. Best part, you can choose any color or color combination for your earrings!

My version; I used gold.


My version, on.
Also, I didn't want to use a ton of jump rings for these earrings. The original earrings are connected by two jump rings per sequin. I found a way to make a "garland" of sorts to connect all the sequins instead! Save your jump rings for another project! :)
FYI- please excuse the teal paint on my hands in the pics! I was in the midst of another project when taking them!

Step 1: Gather materials. Needed are glue, sequins (with no holes, I bought these at Michaels), scissors, embroidery floss, two crimp beads, two earwires, and a toothpick. And, as always, pliers.
I made mine in a gold color scheme. The also end up being about 4" long, just like the original designer ones. Feel free to experiment with colors and lengths to make a customized pair for yourself!

Step 2: Make the sequin garland. Take the embroidery floss apart to it's individual strands. Run 'em through a hair straightener to make them nice and straight. Pick out your sequin colors. You will need 18 sequins for the first drop (pair them up so you have nine sets). I used all gold. Dab a spot of glue in the middle of a sequin with your toothpick. Take the string about 2" down from the end, and place right in the center of the sequin. Take your other sequin, and sandwich the string, placing it on top of the below sequin and squish together to adhere.

Step 3: Time to add your second sequin pair. Leave about a half centimeter of string in between each pair of sequins. Again, add a spot of glue to the center of your next sequin. Lay the string in the center, and sandwich. Squish the other sequin on top, making sure you place it exactly on top so there are no edges sticking out anywhere. Continue this process. Make sure the space in between sequins is as exact as can be (.5 cm), to keep the earrings looking clean and professional. It may seem slow at first, but it will go faster as you get used to the process! Continue with your nine sequin pairs. When your pairs are all up, set this garland strand aside. Repeat process to make second dangle (both shown in last pic).

Step 4: Make the second (and third) dangles. For the second dangles, you need 12 sequins all together, so six pairs. Repeat above process to make two six-pair-sequin-long dangles (shown in second pic). Finally, for the last dangle, you need 10 sequins, in 5 pairs. Repeat process to make two five-pair-long dangles. For the earrings, split all your garland into one 9-sequin-long, one 6-sequin-long, and one 5-sequin-long per pair (shown in last pic).
When the sequins are all dry, cut the end of the string right after the last sequin to finish the dangle. Refer to the picture if you need it!

Step 5: Finish the earrings. Take one group of your dangles and add a crimp bead to the top strings. Thread through the loop in your ear wire, and pass back through the crimp. Crimp shut with pliers. Cut strings right after crimp to clean.
Now, time to rock at a holiday party!


Sparkly sequins!


My earrings in different colors. Gold, multi, silver.
Wearing the trio!


If you share/use/post this tutorial, please link back to me. It is much appreciated!


Saturday, October 22, 2011

DIY- Anthropologie "Perched Harmonies" Necklace

Ready for another tutorial?

Anthropologie's Perfect Harmonies Necklace

What a pretty necklace. Not a pretty price! Make your own $68-looking Anthropologie designer necklace at home for barely no money at all. All that are needed are some beads, wire, and wire-working skills (don't worry, nothing too complicated here!). It's surprisingly quick to make, took me less than an hour.
My DIY Anthro Necklace
Get out your pliers; let's make some jewelry!


Step 1: Gather materials. Needed are pliers, thick gold wire (I just used craft wire I found at a hardware store, it's 3mm in diameter), thinner gold wire, a gold necklace chain, clasps for your necklace, two jump rings, 4mm round glass beads-assorted colors. You will also need a hard surface and hammer for making the pendant. I used a regular hammer from my garage (which gave the wire a rustic texture), but it would be a totally smart idea to use a jewelry making hammer found here, because it will give you that smooth shine. Also, you can use a stainless steel bench block found here to hammer on, which will give your piece a totally professional look. Those two tools are great to buy if you want to make more wire jewelry!
I used just plain 4mm glass rounds, as the Anthropologie necklace uses faceted gemstone beads. You can find similar 4mm gemstone rounds , like the ones I used, here.


Step 2: Make the wire pendant. Cut a little less than 3 inches of your thick wire. Go outside to your garage-or, a nice hard and somewhat surface. A sidewalk would even work, if you don't have the bench block.
 Time to hammer. Carefully hold one end of the wire while hammering down, flattening the wire slightly as you go. You don't want it super flat, just slightly. Use even pressure throughout the wire.
When it looks slightly flatter, hammer the ends extra hard to sort of "push" the wire outwards, flattening it a lot. Your wire should look like this when done. See how the ends are hammered more?


Step 3: Make the holes. I positioned a small ice pick with a nice point right the my end of my wire. I tried this with a fine nail at first; it just bent as the wire was stronger than it! So, if you don't have an ice pick you could probably use a tougher nail or a screwdriver. We just need something with a somewhat fine point. Again, I hammered this through both sides of my wire to make holes. Your pendant should look like this when done.


Step 4: Add your beads to the pendant. Use about 10 inches of your thinner gold wire; wrap the end around one end of your hammered wire a couple of times to secure. Then, string the beads on the other end. THE ORDER OF THE BEADS IS CRUCIAL TO GETTING THE LOOK; the Anthro necklace goes: clear yellow, yellow, opaque mint, blue, purple, pink, clear, red, orange, jade, pink, red, blue.
If you don't care about it looking the exact same or don't have the exact colors of the beads (some of my colors were slightly different hues), then just go with what you want. No worries.
Start wrapping the beads onto the pendant. Position a bead right against the front of the wire, pull with your right hand tightly while holding the bead with your left, and take the thin wire under the hammered pendant and up behind the back, then back down across the front. Continue about 3 more times to secure the bead to the pendant before adding another bead. Continue with the other beads to weave on all 12. 
Here are some close-ups so you can see the weaving technique. When you have the beads strung and excess wire, wrap almost up to the hole, trim, and fold the trimmed end across the back to hide. 
Step 5: Add your jump rings to the holes in the pendant. Attach even lengths of your wire to either end, and your clasps to the loose ends of the wire to make a necklace. The Anthro necklace is 17" long, but you can alter the length if you want.

You are finished! If you want to experiment, try different colors of wire like silver, bronze, copper, etc. Just make sure all your findings match your metal color. Also, you could use different colors and styles of beads (crystals, plastic, metal beads, wood, whatever!) to match your personality. 
The Anthro necklace, worn
A close-up


If you share/use/post this tutorial, please link back to me. It is much appreciated!


Thursday, October 20, 2011

Easy-Peasy Tutorial; Topshop-style Necklace!


The Topshop Necklace
Topshop jewelry is found everywhere; celebrities, fashion magazines and the like sport their designs. When I found this necklace on their site, I knew that this would be an easy tutorial to show you guys. It literally takes less than 10 minutes to make this necklace; why not fool everyone into thinking you bought the real thing?!
Plus, it's getting close to Halloween. I thought the skull theme was very appropriate here!
My tutorial's necklace.
Oh, and by the way, you can probably make this with everything you already have on hand!
Let's go!
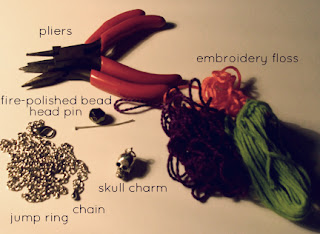
Step :; Gather materials. Needed are a necklace chain (the Topshop necklace uses antique gold metals; I had a silver chain and charm on hand, so that's what I used!), a large jump ring, a small jump ring, pliers, embroidery floss, a skull charm (you can get these basically anywhere online or at a hobby store), a fire-polished Czech glass bead (if you don't have one, use a similar-colored cut glass bead), and a head pin.
Step 2: Thread the glass bead onto the head pin. Attach to chain, loop and close. Then, attach your skull charm to the chain (with a jump ring) and close the ring. Both charms should hang from the chain.
Step 3: Make the tassel. Cut about 7" of three different colored embroidery flosses (I used my favorite colors, you don't have to match the real Topshop colors if you don't want!), thread all onto the large jump ring, and overhand knot to secure to the ring.
Step 4: Thread the large jump ring with tassel onto the chain, to the right of the skull. Trim your tassel to hang just below the jaw of the skull.
FINISHED. Told you it was easy, right!
Go out and fool everyone with your savvy jewelry-making skills!
Your finished necklace. Could fool anyone, no?!


If you share/use/post this tutorial, please link back to me. It is much appreciated!

Thursday, October 13, 2011

Spooky Spider Nails; a Halloween DIY

Halloween is coming.... time for a spooky tutorial!
Here is how to make your own spiderweb nails for Halloween. It's pretty simple, just takes long to clean up. 
Step 1: Gather materials. You need a small dish filled with water (this is my paint mixing dish, so that's why it's so dirty! :) ). Get some toothpicks, black and white nail polish (I used Ulta white and Wet and Wild black). You will also need some nail polish remover for cleanup. 
Step 2: Make you spiderweb pattern. Drip a drip of the black polish into the water. You will see it "disappear" into the water. It's really weird! Now, add a drip of white. This paint should fizzle out a little bit but still hold it's shape. Layer/drip another black and another white on top. 
Step 3: To make the spiderweb look, Take your toothpick and drag gently from the center dot outward, to look like a start of a web. You don't want to break the film formed by the polish on top of the water. 
Step 4: Layer more dots till your spiderweb is as detailed as you want. Continue to pull outward at the same spots to create your spikes. Now, take your nail of choice and gently press down on the part of the pattern you want on your nail. As you can see in the last picture, the film of polish will buckle a little bit. Press down all the way into the water, then take a toothpick and roll the excess film around your finger onto the pick to make sure it doesn't ruin your pattern. Lift out of the water.
This is what your nail will look like! Continue for each nail (layering your polish, dipping, and rolling up the excess with your pick. This pattern was used for my pinky, so I made it a little smaller to not waste the polish.
Here is a close-up of the pinky. Step 5: Clean up. This is how messy it can get (if you use the toothpick to roll-up the excess as explained above, you will be slightly less messy. I didn't obviously and this is how it turned out. So make sure you do it!)
Use your polish remover to remove all excess polish (I used Q-tips. Make sure your nails are all dry before doing this, or they can smear real bad).
 You are ready to rock the look!