Showing posts with label pretty. Show all posts

Tuesday, June 3, 2014

Crystal Waterfall Drops


Bright spring sparkles!


It's a daintier look, inspired by my Candy Shoppe Amulet necklaces. I am digging the looped wire links thing. These earrings are dripping with crystals, just like a waterfall.


I've collected a bunch of Cousin brand crystals, which I love for their uniformity and versatility. Cousin Jewelry Basics crystals I would recommend to anyone, especially because they are a LOT cheaper than paying for Swarovski. They come in a rainbow of colors and sizes. You can find them at all craft stores!


I've paired those crystals (in various shapes: rondelles, rounds, bicones) with Cousin rhinestone pave beads and rose gold fishhook findings from Cousin's Elegance Metals line. The Elegance Metals collection is great because you get that fine jewelry quality without paying full price! You can get Platinum, Stainless Steel, Gold, Rose Gold and other fine metal plated pieces that add a higher-end feel to any piece. Plus, they are great for people who may be sensitive to metals.


I've used a complimentary color scheme here; pinks and teals make each other pop, and the champagne metallic thread adds that luxe touch.


You can get these Cousin materials at Primabead.com, Michaels, JoAnn, Walmart and AC Moore stores.
Let's get started!


Step 1: Gather materials. Needed are:
-Roundnose pliers and wire cutters
-Gold gauge 24 wire (mine from Cousin)
-Various size crystals. I used Cousin Jewelry Basics 8mm crystals,  smaller bacons, 6mm rounds, and rondelles. Pick crystals that suite your tastes!
-Rhinestone beads, 8mm or 6mm. Mine are from Cousin again.
-Metallic embroidery floss


Get out your collection of beads, and start picking your favorites…


Put yours into a 3-stranded arrangement that you like. You can see my arrangement in the top picture. 
Start by making links, much like in my Candy Shoppe Amulet Necklaces out of all the beads EXCEPT  the top bead in each strand. To connect the top bead, first start by linking one end of your wire in the hole on the fishhook. Add your bead, and connect the other side to the second bead in that strand, to connect the two pieces.


Your strands should be coming together. Keep working until all the beads are used and the strands are filled in.


To make the tassel, simply wind the floss around your fingers about 6 times. Carefully tie a small piece of thread at the top, and wrap with wire, cut the ends. Add a jumpring at top.


Attach this jumpring to the last loop of the middle strand. Finish by adding small crystals to the other two strands. 


Make these in any color you want! I went with a more vintage-inspired color palette and mixed metals with rose gold, champagne and regular gold.


These are a bit long if you prefer short earrings, so make as many or as little links as you want to play with the length. 


All images and instructions copyright Allison Beth Cooling. DO NOT post or use these images or text without linking back to me.


Friday, July 12, 2013

Original Tutorial: Sundara Earrings!


My newest tutorial: my Sundara earrings! These remind me of those very ornate earrings you find in India. My mom's friend came back from India with beautiful jewelry and bags, and I was lucky enough to receive a metal cuff bracelet with intricate flower detailing. Sundara means "pretty" in Hindi, and I wanted to name these earrings after this very inspiring culture.


These earrings are not as easy to make as some of my other tutorials, but just take one step at a time; they look a lot harder than they actually are to make!


What's great about these is that like many of my other tutorials, the metal color and bead color can be changed to accommodate any style. I went with a pure silver scheme so that the earrings looked super chic. They have a lot of movement to them, with the inner horseshoe and outer frame, which surely will shine and attract attention!


This is an original design of mine, not a designer knockoff! I hope you all will be happy with it!
Let's get started!


Step 1: Gather materials. Needed are pliers (round nose and long nose), two pearls (appx. 7mm): mine are from Cousin Beads, which you can buy at many craft stores like Michaels, 20g wire, 18g wire, 28g wire, two ear wires, and Sterling Silver 4mm beads. Please use half-hard wire here, not dead soft. I usually only use half-hard wire just because I think it is sturdier.
A tip: the larger the # of wire (ex. 28g), the thinner the wire is. 28g wire is much thinner than 18g wire.


Step 2: Cut two coils of your 18g wire. Wrap these around a nail polish jar, making them into teardrop shapes. It helps to gently flatten the ends of the wires (by grabbing the ends and pulling them slightly away from the direction they curve) with the long nose pliers to make them less circular shaped. Your teardrops should end up looking like this, above. Make sure they are the same size, for same size earrings.


Step 3: Where the ends meet, grab the wire with the pliers (one by one) and bend them straight up. Cut one of the wire ends about 1mm from the bend, and make this into a loop, catching the other wire. Cut the remaining wire about 1mm from this loop. I hammered these frames a bit outside for texture and to work-harden them, if you would like to keep these plain then you can do so. If you would like to file the ends of your wire through the steps for a clean look, you are free to do so. Beginners don't necessarily need to if they don't want to!


Step 4: Now, finish by making a loop on this wire to close. Start wrapping! Take your 28g wire, and cut 2 feet. Starting about 1" from the end of the 28g, and near the loop on your earwire frame, start to wind the wire around the frame. Once you have about 6 wraps tight (if you didn't wrap that extra 1" of wire, you can cut it off flush to the frame), add on a bead. Catch it in a wrap, and continue to wrap tightly to the frame. It helps to hold both the bead and wire in place with one hand, then wrap with the other. Make three wraps now without the bead. Continue this process until the full wire is wrapped, making again 6 plain wraps by the end to finish it off, mirroring your start. 


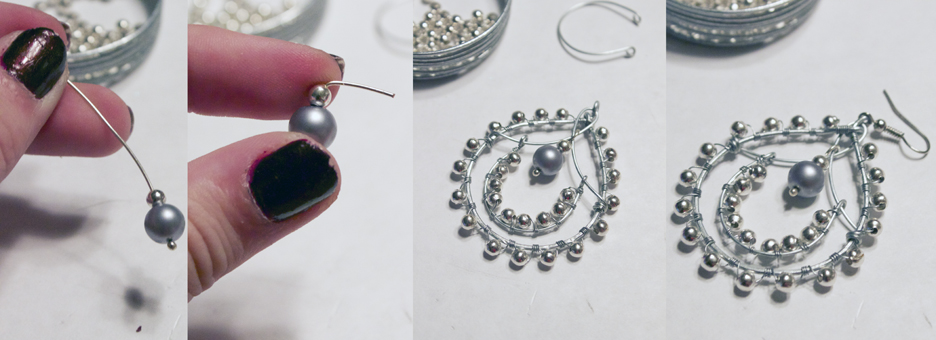
Step 5: With your 20g wire, cut two equal size pieces (5" or so), and thread one piece through the top loop of your ear frame. Gently pull the ends of the wire in opposite directions of each other, making an elongated loop (pic 1). Take the excess ends of the wire, and wrap 2 wraps, making sure 4 metal beads are above each wrap. Cut the wire flush to the frame. They should look like these, above.


Step 6: With your 20g wire, cut two 2" pieces of wire, and use the paintbrush part of the nail polish jar to make teardrops. Loop each end of these frames. Wrap these like in step 4 with beads, but making sure the beads wrap to the INSIDE of the frame this time. Loop each loop on the frame we created in the last step; be careful to not bend any of the wire. It should look like the last picture above.


Step 7: With your head pin, thread on a pearl and metal bead. Cut and loop the end of this, and then place through that inner elongated loop we made in step 5. Attach your ear wire to the very top loop of the earring. 
You are finally finished!
Like I said, this was a more difficult tutorial than most. Take one step at a time! Comment below if anyone has questions!


These earrings are indeed larger, which remind me of the jewelry from India. You can alter the measurements if you need smaller earrings, but big chandeliers make an impact for sure.


Using gemstone beads, or even crystals will give a different look.


These are great for adding interest to outfits; wear with a simple black dress for evening, or summery white blouse and jeans for a casual-cool look.


 Instructions and all photos copyright Allison Beth Cooling. Don't post this tutorial or any of my pictures without crediting me, and don't claim as your own please!

Saturday, October 22, 2011

DIY- Anthropologie "Perched Harmonies" Necklace

Ready for another tutorial?

Anthropologie's Perfect Harmonies Necklace

What a pretty necklace. Not a pretty price! Make your own $68-looking Anthropologie designer necklace at home for barely no money at all. All that are needed are some beads, wire, and wire-working skills (don't worry, nothing too complicated here!). It's surprisingly quick to make, took me less than an hour.
My DIY Anthro Necklace
Get out your pliers; let's make some jewelry!


Step 1: Gather materials. Needed are pliers, thick gold wire (I just used craft wire I found at a hardware store, it's 3mm in diameter), thinner gold wire, a gold necklace chain, clasps for your necklace, two jump rings, 4mm round glass beads-assorted colors. You will also need a hard surface and hammer for making the pendant. I used a regular hammer from my garage (which gave the wire a rustic texture), but it would be a totally smart idea to use a jewelry making hammer found here, because it will give you that smooth shine. Also, you can use a stainless steel bench block found here to hammer on, which will give your piece a totally professional look. Those two tools are great to buy if you want to make more wire jewelry!
I used just plain 4mm glass rounds, as the Anthropologie necklace uses faceted gemstone beads. You can find similar 4mm gemstone rounds , like the ones I used, here.


Step 2: Make the wire pendant. Cut a little less than 3 inches of your thick wire. Go outside to your garage-or, a nice hard and somewhat surface. A sidewalk would even work, if you don't have the bench block.
 Time to hammer. Carefully hold one end of the wire while hammering down, flattening the wire slightly as you go. You don't want it super flat, just slightly. Use even pressure throughout the wire.
When it looks slightly flatter, hammer the ends extra hard to sort of "push" the wire outwards, flattening it a lot. Your wire should look like this when done. See how the ends are hammered more?


Step 3: Make the holes. I positioned a small ice pick with a nice point right the my end of my wire. I tried this with a fine nail at first; it just bent as the wire was stronger than it! So, if you don't have an ice pick you could probably use a tougher nail or a screwdriver. We just need something with a somewhat fine point. Again, I hammered this through both sides of my wire to make holes. Your pendant should look like this when done.


Step 4: Add your beads to the pendant. Use about 10 inches of your thinner gold wire; wrap the end around one end of your hammered wire a couple of times to secure. Then, string the beads on the other end. THE ORDER OF THE BEADS IS CRUCIAL TO GETTING THE LOOK; the Anthro necklace goes: clear yellow, yellow, opaque mint, blue, purple, pink, clear, red, orange, jade, pink, red, blue.
If you don't care about it looking the exact same or don't have the exact colors of the beads (some of my colors were slightly different hues), then just go with what you want. No worries.
Start wrapping the beads onto the pendant. Position a bead right against the front of the wire, pull with your right hand tightly while holding the bead with your left, and take the thin wire under the hammered pendant and up behind the back, then back down across the front. Continue about 3 more times to secure the bead to the pendant before adding another bead. Continue with the other beads to weave on all 12. 
Here are some close-ups so you can see the weaving technique. When you have the beads strung and excess wire, wrap almost up to the hole, trim, and fold the trimmed end across the back to hide. 
Step 5: Add your jump rings to the holes in the pendant. Attach even lengths of your wire to either end, and your clasps to the loose ends of the wire to make a necklace. The Anthro necklace is 17" long, but you can alter the length if you want.

You are finished! If you want to experiment, try different colors of wire like silver, bronze, copper, etc. Just make sure all your findings match your metal color. Also, you could use different colors and styles of beads (crystals, plastic, metal beads, wood, whatever!) to match your personality. 
The Anthro necklace, worn
A close-up


If you share/use/post this tutorial, please link back to me. It is much appreciated!