Showing posts with label post. Show all posts

Thursday, April 18, 2013

Baublebar Deco Stud Earring Tutorial


These cute Baublebar Art Deco Stud Earrings are a great alternative to simple ball studs. Plus, the combination of gold and black is super-chic. 
In this tutorial, I will show you how to make the triangle studs, because they were my favorite shape!
If you want to make the trio, follow all the steps but just shape them differently.
We will be making these from scratch, using my "faux metal" technique with polymer clay. 


Polymer clay is a great medium, possibly my favorite, for making all sorts of different jewelry and crafty things! Plus, it's really cheap too and easy to use....


Great for dressing up or dressing down, people will be surprised when they hear you made them yourself!
Let's get started!


Step 1: Gather materials. Needed are earring posts, Sculpey Polymer Clay, superglue or E-6000 glue, a paint brush, Metallic Gold Acrylic Paint, and black and shimmery gold nail polish.


Step 2: Take your clay (I used yellow because it's the closest to gold). Make two small marbles, and shape these marbles into small little triangles. 


Step 3: Take these triangles, and make the little indented lines like in the real earrings. You can do this gently by dragging a toothpick through; keep it gentle, and smooth with your fingers as you go. Bake these two triangles; I do about 15 minutes in a toaster oven at 125 degrees.


Step 4: Once baked, glue onto your earring posts. Cover with two coats of your acrylic gold, then one coat of your shimmery gold polish for extra shine! When dry, add your stripe of black with your black nail polish. 
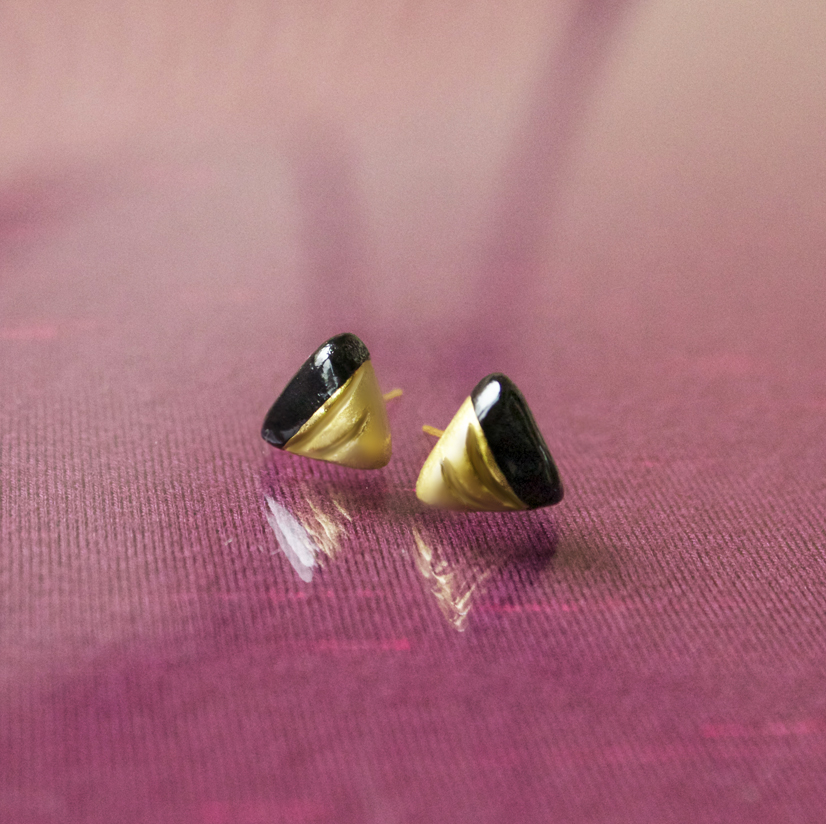


Simple and chic! Make them with silver acrylic paint instead of gold if you are a silver lover!
Maybe try other combinations, like a coral and teal, which is totally in for spring!


If you share/use/post this tutorial, please link back to me. It is much appreciated!
Do not copy or use photos without permission or crediting me please.


Saturday, March 16, 2013

St. Patrick's Day: Pot 'O Gold Earring Tutorial


Top 'o the morning!
In the spirit of St. Patrick's Day, I have created an easy earring tutorial!
These Pot 'O Gold Earrings feature metallic microbeads and gems for sparkle. Microbeads are tiny little hole-less beads that are used for scrapbooking and nail art, but why not use them in jewelry? I actually found these at the dollar store, but you can also find them at craft stores or online even. Martha Stewart Crafts also makes them.


This color scheme is especially for St. Patty's Day, but you can change up the colors to fit any outfit you need. 
Let's get started on the tutorial!


Step 1: Gather materials. Needed are earring posts, Sculpey Polymer Clay , heavy-duty glue like E-6000, Triple Thick Gloss Glaze, Glass Microbeads, and acrylic nail gems (like 3-4mm).


Step 2: Get your clay and make two small marbles. Flatten both marbles down so they have a flat front/back but still have some height, see picture above.


Step 3: take a pen cap or a tool (here I used the end of an X-acto knife) and press an indentation in the middle, making sure not to totally distort your disc shape. Repeat with the other marble.
Bake these two discs; I use a toaster oven for about 15 minutes at like 125 degrees.
The time may vary depending on the brand of clay you use and the oven. I use Sculpey.
Now, once your clay is baked and cooled, put a small dollop of your glue in the indentation; pour your microbeads over to cover the glue, press in gently.


Step 4: Repeat with the other disc. Brush off excess microbeads, to keep them confined just to the indentation you made. While the glue is still somewhat tacky, glue down 3 more crystal flatbacks over the microbeads and press in gently. 


Step 5: Once your front of the earrings are dry, then use the glue and glue earring posts in the middle of the backs. Wait 'till fully dry. 
Now, paint the outside rim of the earrings and the backs with clear glaze (I here used a coat of sheer green glitter nail polish as well as clear glaze to give more sparkle. Feel free to do that with whatever color you have, just make sure the nail polish color is close to your base clay color for consistency.)
DO NOT paint over your microbeads and gems because this will make the gems lose sparkle and make them appear glassy, not what we want here. 
Let them dry.


Cute and clever.


These are very original! Your friends will definitely want you to make them a pair!


All images and text copyright Allison Beth Cooling for Quiet Lion Creations.
Please link back to this tutorial if posting it elsewhere!

Saturday, June 23, 2012

Nugaard Jequibita Leaf Earrings


These Nugaard Jequibita Leaf earrings are very cool. They are unexpected yet chic, with their silver sheen. At $173 though, I think I will try to make them myself!
The best part is that you can make them any size you want them; you just have to find yourself a good leaf!


I used a much smaller leaf to give me smaller earrings. The real deal ones are 2" long! 
It's summer, so go outside and find yourself a nice little leaf and let's get started. 

Summer just got chicer!


Step 1: Gather materials. Needed are two earring posts, clay, a leaf, silver clay and super glue.


Step 2: Make the leaves. Take a marble of clay, and flatten through the thickest setting on a pasta machine. Place your leaf on top, and run it through the machine about 2 clicks thinner. It should be pressed into the clay like this. Gently peel off leaf. Repeat for second earring.
If you don't have a pasta machine, use a rolling pin to flatten the clay!


Step 3: Cut out your leaves with an Xacto, make sure it's a clean cut! 
Now, bake these (I always use a toaster oven at about 125 degrees for like 10 minutes). Once cool, paint with your silver paint. Glue on the posts.


Looks like dipped leaves!


Saturday, September 24, 2011

Chic Metal Earring Tutorial; Oasis-inspired designer jewelry

Oasis Metal Disc Earrings
My newest tutorial; Make your own Oasis metal stud earrings! As seen on ASOS.com, a super-popular fashion site with pieces in many fashion magazines. Super chic and versatile for every new fall outfit. Plus, they are totally easy to make. You aren't limited to silver, copper and gold; with the versatility of nail polish (which we will use to paint our clay base), you can create any color combination. My tutorial shows how to make a metallic taupe pair, by using various shades of opaque and metallic brown nail polish.
Ready? Set? Go!

My version!


Step 1: Gather materials. You need some white opaque acrylic paint, two earring posts, a marble-sized ball of scrap polymer clay (any color works, we will paint over it), super glue, and some nailpolish (colors depend on what metal you want to replicate; I am using Nirvana by Sinful Colors for my opaque brown base coat, then various white and taupe shimmery shades by Sally Hansen for the top coats.) Make sure to get one opaque color and then maybe 1-2 shimmery shades for top coats. Sometimes, mixing shades turns out well too. Layer a dark black, then top with shimmery purple and green for a cool lamé effect. 


Step 2: Make two half-centimeter sized balls of clay. Flatten into a pancake. Drape over a fluted glass (here, I used a champagne glass) with a lot crevices. You could use any piece of glassware with a small pattern. Press down gently, then gently peel off the clay ball. You should have a subtle imprint in the clay. This step is crucial to getting that textured look the Oasis earrings have. Bake these clay pieces at about 150 degrees for 15 min. Your time may be a little different, as I use a small toaster oven.


Step 3: Glue posts to the back (the untextured side) of the clay pieces. Let dry. Paint a thick coat of the white acrylic on the pieces, and stick into a ball of thumb tack to dry. Wait a few hours to make sure it's completely dry. Paint your opaque nail polish shade on top of the white; make sure to get the sides and back of the clay disc as well. Again, stick in thumb tack and let dry a couple of hours.


Step 4: The fun part. Layer your transparent shimmery shades on top. I used one shade of Sally Hansen #4453 (a light shimmery taupe). Then I used two shades of Wet and Wild Beautiful in Bronze. Feel free to experiment with different layers and colors. If you want to give the illusion of metal (like the Oasis earrings) though, only stick with brassy, coppery, silvery, or gold-like shades. 
Make sure you let each coat dry a couple of hours before applying a new coat, or the paint will be gummy and never dry. Then, paint with a coat of clear lacquer or clear nail polish on top for extra shine. Let dry a couple of hours. You are finished!

The finished earrings. Super simple yet chic.


If you share/use/post this tutorial, please link back to me. It is much appreciated