Friday, June 29, 2012

Orly Genger Knot Necklace


This Orly Genger  knot necklace is simple and totally doable for a DIY! You don't need mad skills to make it, either. Just some clay and a chain will do!
AND... you will save yourself $150 DOLLARS. Wow.


I made mine more of a grey-silver scheme because I had a silver chain. You can make your knot any color you want!


Simple and chic.


Step 1: Gather materials. Needed is a necklace chain (preferably a box chain to get the same look), clay, clear gloss and a paint brush.


Step 2: Take a marble of clay and roll it into a thin snake about 2.25" long. Cut the ends nice to make them clean (with an Xacto or tissue blade). Tie this carefully into a knot, not pulling tight to keep an opening in the middle of the knot for the chain.


Steo 3: Bake your clay knot (I did about 125 degrees in my toaster oven for about 15 minutes or so) until it's cured.
Let cool, paint with clear gloss. Insert chain through opening in knot!


Monday, June 25, 2012

Saturday, June 23, 2012

Nugaard Jequibita Leaf Earrings


These Nugaard Jequibita Leaf earrings are very cool. They are unexpected yet chic, with their silver sheen. At $173 though, I think I will try to make them myself!
The best part is that you can make them any size you want them; you just have to find yourself a good leaf!


I used a much smaller leaf to give me smaller earrings. The real deal ones are 2" long! 
It's summer, so go outside and find yourself a nice little leaf and let's get started. 

Summer just got chicer!


Step 1: Gather materials. Needed are two earring posts, clay, a leaf, silver clay and super glue.


Step 2: Make the leaves. Take a marble of clay, and flatten through the thickest setting on a pasta machine. Place your leaf on top, and run it through the machine about 2 clicks thinner. It should be pressed into the clay like this. Gently peel off leaf. Repeat for second earring.
If you don't have a pasta machine, use a rolling pin to flatten the clay!


Step 3: Cut out your leaves with an Xacto, make sure it's a clean cut! 
Now, bake these (I always use a toaster oven at about 125 degrees for like 10 minutes). Once cool, paint with your silver paint. Glue on the posts.


Looks like dipped leaves!


Tuesday, June 19, 2012

Beachy Waves Hair Mist


Summer is here! Time for summer hair. What says summer more than the sunny beach?
The look of effortless waves is the envy of many city dwellers, but it's totally easy to achieve sans-beach! 


Celebrity hairstylists rely on chemical-laden and totally overpriced beach sprays to give their clients "the look". Plus, anyone who buys these sea salt sprays is basically buying 80% water. 
That doesn't work for me, or for my DIY-ers. 
So, why not create a totally natural and totally handmade version yourself?
Silly question, I know.


The DIY version produces the same results, see above.
Yes, your spray will be about 99% water. But that's ok, because we are taking out all the nasty chemicals and other undesirables you really don't want in there anyways.


What's best about the spray is that it won't smell like artificial fragrances; it will smell of fresh herbs.


Much nicer to your nostrils and the environment.
Enough talk; let's begin.


Step 1: Get an old spray bottle (I used a small one, maybe like 4 oz., recycled from a Bath and Body spray). Fill it up with water (distilled). Dump this water into a glass. 
Gather a generous handful of fresh herbs from your garden, if you have one. I used a combination of lavender and spearmint. 
If you don't have a garden, you can use herbal tea bags. Maybe like chamomile or peppermint would be nice? You could also try a combination.
Place the herbs or tea bags into the glass.


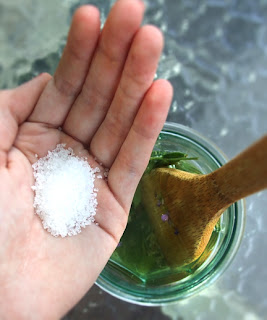
Step 2: The magic ingredient; sea salt. It will mimic the saltiness of the sea, and give your hair that beach texture. Get a handful of sea salt and add this to the glass.


Step 3: Get a wooden spoon. Muddle all these ingredients together; really break up the herbs, and if you have tea bags you might want to break open the bag and dump the herbs into the water to make sure you get the most out of your muddling.
Muddle, muddle, muddle.....


Now, set this glass aside in the sun (maybe on a patio table), cover with a dish o for a couple of hours to really infuse this water with the essential oils and nutrients from the herbs.


Step 4: After this has had time to infuse, strain it through a fine mesh sieve into a measuring cup. Make sure to press down and squeeze the herbs to get all the lingering juice out!


Step 5: Pour this back into your spritz bottle. Make a label if you want and tape it on!
Store in fridge, and make sure you use it up quick as it won't keep like those ones with preservatives in 'em!

*TO USE*

Spritz on your hair, just enough to dampen a little. Scrunch hair for a looser texture, or twist for more ringlet-style curls. 


Beach ready!


Monday, June 18, 2012

Thursday, June 14, 2012

H&M-Inspired Colorblock Nails


So I got the new H&M catalogue and just now got to reading it. I loved the beachy photos and bright colors. One outfit caught my eye...


Super sleek and chic. Great for a manicure!


Sort of a chevron-meets-colorblock idea. Plus neons. Perfect and on-trend for summer. 
Plus, easy!


Step 1: Gather materials. Needed are nail polishes (white, black and two neon colors, use pink and yellow to stay true to the H&M outfit!), tape, scissors and top coat.


Step 2: Paint the nails white. Cut two thin strips of our tape, set up in a "V" pattern on nail as seen above.


Step 3: Paint the inside of the "V" pink, the outsides yellow. Peel off tape as fast as you can so the polish doesn't dry then pull and rip as it sometimes does. Make sure these coats aren't really gloomy, keep them thin so the paint doesn't drool into the white "V". Let dry.


Step 4: Take your paintbrush and paint the outline of the yellow "V" to finish the pattern and add some contrast! Let dry, apply top coat.


Hi-five!


Very eye-catching!
See how easy this was?


Monday, June 11, 2012

Color Monday; Entrada Palette


Color-spiration #2. Entrada. Evoking the rich browns and greens of a lush tropical passageway. 

Thursday, June 7, 2012

Pineapple Mint Virgin Mojito


Yes, my first recipe post.
Excited?
Inspired by the summer coming, I've created a virgin "mojito"-type recipe that's light and refreshing. 
This makes one drink.


Yum.....


I used spearmint from my garden...


Step 1: Gather Materials. Needed are pineapple chunks, a lime slice, some mint leaves, seltzer water, sweetener and ice.


Step 2: Place everything but the water and ice into a glass.
I only used one chunk of pineapple, use more for stronger flavor. There are no "exact" measurements here!


Muddle together with a wooden spoon, nothing fancy needed here! Muddle everything 'till the pineapple is completely mashed with the mint and lime. Now, pour in 6 oz. of seltzer water.


Strain over a fine sieve into a measuring cup.... (I don't like to have things floating in my drinks! :) )


And pour the liquid from the measuring cup back into your original glass (you can quickly rinse out the original glass after straining to make sure it's completely clean, yes I am a little OCD!)
You will have a pale mint green drink. Now, add your sweetener; I used only a teaspoon of raw cane sugar. If you like it sweeter, just sweeten to taste. Again, no exact measurements here!
 Top with ice. And maybe a skewer of mint, pineapple, and a lime slice to top it off!


Delicious!


Add a monkey and umbrella and you're in paradise!