Showing posts with label pearl. Show all posts

Tuesday, October 29, 2013

Metro Pearls Bracelets


These bracelets are simply chic; the champagne color of the wire and gold rings, plus the matte shine of the pearls makes for a very "cocktail hour" type of bracelet! The contrast between the classic pearls and more industrial look of the exposed wire and metal rings makes for a truly unique piece of wrist candy!


All of my materials came from Cousin Corporation; the beading wire and jumprings I used are Beadalon Brand, which are now sold by Cousin! These materials are great and high quality, and are very versatile. In this tutorial, I use jumprings as beads instead of the traditional chainmaille application. 


I named them "Metro Pearls Bracelets" because they feel much more metropolitan to me than traditional. Plus, the channel crystal bead in the center is a more contemporary take on the classic rhinestone! 
Let's get started!


Step 1: Gather materials. Needed are pliers, a clasp, crystal spacers (mine from Cousin), Beadalon Champagne Stringing Wire (mine from Cousin), 6mm or 8mm pearls (mine from Cousin), and Beadalon Artistic Wire jump rings (mine from Cousin) in gold or brass.
These jumprings are great because they are non-tarnish! 


First off, make sure you close all the jumprings; in the pack, they aren't fully closed. Simply close with your pliers by twisting, NOT pulling, so that the ends meet up together.

Step 2: Measure your wrist, now add 2". Now, double that length and cut your Beadalon wire to that length. Fold your wire in half and string on your clasp. String on your crimp through both wires and crimp shut right against the clasp. Now, string on a pearl on each wires, then a jumpring through both wires, creating a group. Keep up with this technique until you reach the center of your bracelet. For the center motif, string on three jumprings through both wires, then your crystal spacer, then three more rings. Then, continue your pattern until your end. To end, simply string on a crimp through both wires, then a jumpring; string back through the crimp, pull tight, and crimp. Cut with your pliers flush so the wire doesn't stick out. 


These are addicting to make! They are so totally fast, and there are no hard techniques involved. They look ultra chic because of the mix of classy pearls and contemporary metal wire, and would be great to give as gifts for any occasion. 


These are great stacking bracelets, because they sit together nicely and can be made with different size pearls. I used 6mm pearls for the champagne and mocha colored bracelets, and 8mm for the dusty grey bracelet.


If you share/use/post this tutorial, you must link back to me please. All photos  
copyright Allison Beth Cooling. Do not use photos without crediting me!


Sunday, September 1, 2013

The Valencia Necklace; Full Tutorial!


This is my first "beadwork" post! I usually do posts that are pretty simple and fast to finish! This will take a bit longer and is a bit more tedious, however, the results are worth it!


This necklace makes a very cool "v" shaped pattern, which can be dressed up with a sheath dress for dinner parties, or dressed down with a tee and jeans for a day shopping. It is quite versatile and can be made with any color/s.


The featured pearls are all from Cousin! I love these pearls because they have a great feel to them; they aren't cheap-feeling, like many other pearls I have used! They are very shiny and have a great almost metallic coating, perfect for using in a bead project!
You can buy Cousin beads at Michaels or JoAnn, or even Amazon


Step 1: Gather materials. Needed are scissors, fishing line, pearls *ALL FROM COUSIN* (6mm light green, 8mm fuchsia pearls, and larger 10mm or 12mm pearls.) I pictured those dark green ones but didn't end up using them, sorry! Also, you will need a clasp, two crimps, two looped headpins, and a end cones or bead caps to finish.


I emptied out all the pearls into a glass, for easy stringing.


Step 2: Cut about 5' of your fishing line. Add on four pearls (the large 10mm ones). Thread the string in your right hand back through the fourth bead, in the opposite direction, to create a cluster. Now, add one bead on your right string and two beads on your left string. Thread the string on your right side back through the second bead on your left string. You will now have two clusters, on top of each other. String three pearls (the 8mm ones) on each right and left string.


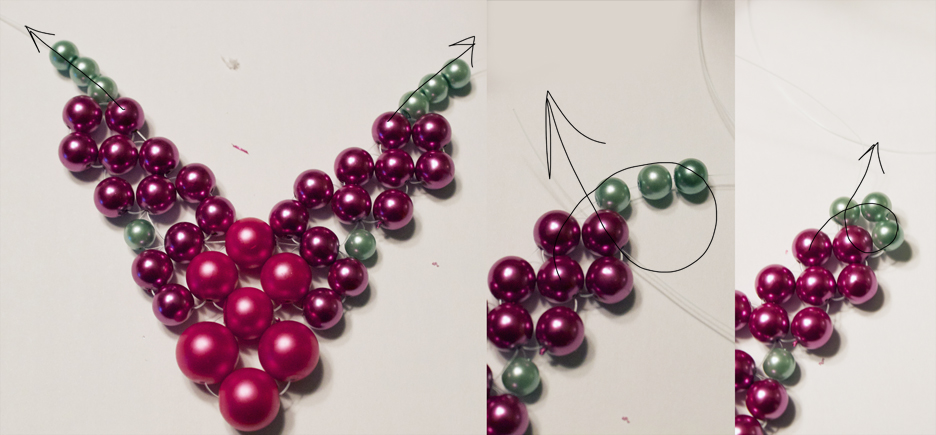
Step 3:  Take each of your strings, and loop them back through the outside bead of the second cluster, then through the top bead in this cluster (if you need help you can follow the arrows which show the pattern of the string). Now, add on three more beads on each right and left string. Now, string back through the top bead in the last cluster you made.


Step 4: Add on one green pearl (the 6mm one) and thread through the outermost beads in each cluster.


Step 5: Thread on three beads on each of your right and left strings. Thread the string back through the bead right above the green pearl. Now, string through the topmost bead in the cluster. 


Step 6: Add on three beads and thread back through the outermost bead in the last cluster. Then, thread back through the first bead you added in this step.


Step 7: Now, add three green pearls. Thread back through the outermost bead in the last cluster and through the first green bead you added in this step.


Step 8: Thread on three green beads, thread through the topmost bead from the last cluster, and back through the first green bead you added in this step.


Step 9: Thread on green pearls, until the necklace is as long as you want!


To make the last green cluster, simply cut about a foot of fishing line. Find the bead about two clusters away from your topmost light pink one (view picture) and tie a knot at one end of the line. Thread through this bead. Add on two green beads, and pass through the bead below that green bead added in step 4 (view picture). Weave through as the picture shows (3 beads) until you are at the top; add a green bead.


Weave through the green bead added in step 4. Weave through the bead left of this green bead (picture) and tie off with a small knot, then cut flush. It helps to add a dab of superglue to adhere. Repeat with the other side of this necklace; the steps will be the same, but directions reversed. If you get confused you can flip the necklace over so the directions will be the same; however, the green bead is woven to sit "on top" of the others. If you flip the necklace over make sure to weave the bead so it sits just like the side you have done before. To finish, add a crimp then a looped headpin, and crimp shut. Take that headpin and weave through the bead cap; loop and finish off with a clasp. Repeat with the other side.


See those two green beads, the sort of sit on top of the necklace?


This pattern is great in all colors, or one color if you want it to be super simple! Try maybe with crystals too for a super-shiny look!


Pattern and all photos copyright Allison Beth Cooling. Please do not use/post without linking back and crediting me! 


Friday, July 12, 2013

Original Tutorial: Sundara Earrings!


My newest tutorial: my Sundara earrings! These remind me of those very ornate earrings you find in India. My mom's friend came back from India with beautiful jewelry and bags, and I was lucky enough to receive a metal cuff bracelet with intricate flower detailing. Sundara means "pretty" in Hindi, and I wanted to name these earrings after this very inspiring culture.


These earrings are not as easy to make as some of my other tutorials, but just take one step at a time; they look a lot harder than they actually are to make!


What's great about these is that like many of my other tutorials, the metal color and bead color can be changed to accommodate any style. I went with a pure silver scheme so that the earrings looked super chic. They have a lot of movement to them, with the inner horseshoe and outer frame, which surely will shine and attract attention!


This is an original design of mine, not a designer knockoff! I hope you all will be happy with it!
Let's get started!


Step 1: Gather materials. Needed are pliers (round nose and long nose), two pearls (appx. 7mm): mine are from Cousin Beads, which you can buy at many craft stores like Michaels, 20g wire, 18g wire, 28g wire, two ear wires, and Sterling Silver 4mm beads. Please use half-hard wire here, not dead soft. I usually only use half-hard wire just because I think it is sturdier.
A tip: the larger the # of wire (ex. 28g), the thinner the wire is. 28g wire is much thinner than 18g wire.


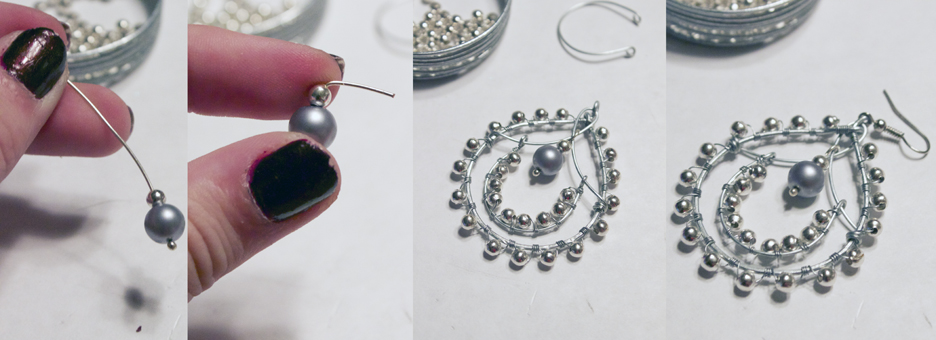
Step 2: Cut two coils of your 18g wire. Wrap these around a nail polish jar, making them into teardrop shapes. It helps to gently flatten the ends of the wires (by grabbing the ends and pulling them slightly away from the direction they curve) with the long nose pliers to make them less circular shaped. Your teardrops should end up looking like this, above. Make sure they are the same size, for same size earrings.


Step 3: Where the ends meet, grab the wire with the pliers (one by one) and bend them straight up. Cut one of the wire ends about 1mm from the bend, and make this into a loop, catching the other wire. Cut the remaining wire about 1mm from this loop. I hammered these frames a bit outside for texture and to work-harden them, if you would like to keep these plain then you can do so. If you would like to file the ends of your wire through the steps for a clean look, you are free to do so. Beginners don't necessarily need to if they don't want to!


Step 4: Now, finish by making a loop on this wire to close. Start wrapping! Take your 28g wire, and cut 2 feet. Starting about 1" from the end of the 28g, and near the loop on your earwire frame, start to wind the wire around the frame. Once you have about 6 wraps tight (if you didn't wrap that extra 1" of wire, you can cut it off flush to the frame), add on a bead. Catch it in a wrap, and continue to wrap tightly to the frame. It helps to hold both the bead and wire in place with one hand, then wrap with the other. Make three wraps now without the bead. Continue this process until the full wire is wrapped, making again 6 plain wraps by the end to finish it off, mirroring your start. 


Step 5: With your 20g wire, cut two equal size pieces (5" or so), and thread one piece through the top loop of your ear frame. Gently pull the ends of the wire in opposite directions of each other, making an elongated loop (pic 1). Take the excess ends of the wire, and wrap 2 wraps, making sure 4 metal beads are above each wrap. Cut the wire flush to the frame. They should look like these, above.


Step 6: With your 20g wire, cut two 2" pieces of wire, and use the paintbrush part of the nail polish jar to make teardrops. Loop each end of these frames. Wrap these like in step 4 with beads, but making sure the beads wrap to the INSIDE of the frame this time. Loop each loop on the frame we created in the last step; be careful to not bend any of the wire. It should look like the last picture above.


Step 7: With your head pin, thread on a pearl and metal bead. Cut and loop the end of this, and then place through that inner elongated loop we made in step 5. Attach your ear wire to the very top loop of the earring. 
You are finally finished!
Like I said, this was a more difficult tutorial than most. Take one step at a time! Comment below if anyone has questions!


These earrings are indeed larger, which remind me of the jewelry from India. You can alter the measurements if you need smaller earrings, but big chandeliers make an impact for sure.


Using gemstone beads, or even crystals will give a different look.


These are great for adding interest to outfits; wear with a simple black dress for evening, or summery white blouse and jeans for a casual-cool look.


 Instructions and all photos copyright Allison Beth Cooling. Don't post this tutorial or any of my pictures without crediting me, and don't claim as your own please!

Tuesday, April 23, 2013

Beginner Pendant Necklace Tutorial


This is a super-easy tutorial for any beginning jewelry maker.
Pros can also follow this one as well, as the necklace comes together really quick and can be customized to make tons of different kinds of necklaces!


You will just need three "ingredients", and you can make this in less than 15 minutes!
I used pearls from Prima Bead for the second necklace, which contrast nicely against the crystals.


These look really dainty and fancy and are perfect for any occasion.
Let's get started!


Step 1: Gather materials. Needed is a necklace chain with a clasp, roundnose pliers, wire (about 22 gauge), and beads; you can use crystals, pearls, anything.


Step 2: Make the loop; start with a length of wire that is about 5 inches or so. About three quarters of an inch from the end, make a sharp 90 degree bend in the wire with the pliers. Place your roundnose right where the bend starts, and loop it around in the opposite direction, creating a nice, even, neat loop. When the wire has looped and met the place where it starts, wind it around the long piece of the wire to close. Don't wind it around more than twice otherwise you will get a big ugly bunch of wire. Cut the wire right flush to finish.


Step 3: It should look like this. Add your beads, and make another loop at the end to close. Look at the pictures if you need help.


It might help, if you have extra wire, to cut the wire shorter first before winding as it can be a little hard to cut the wire flush if it's right up against the beads.


Step 4: Now, measure the middle of your necklace chain: open the middle loop of chain and detach it from the rest of the chain. Add one of the end loops of your bead panel to this loop, and close the loop.
Repeat with the other side of your bead panel, using the other side of your necklace chain to complete and finish off the necklace.


There you have it! Simple.


Layer these for a cool look, and make them in different colors and metals to match all outfits.


All images and text copyright Allison Beth Cooling. Do not use my photos without crediting me, and if using this tutorial please link back!