
My newest tutorial: my Sundara earrings! These remind me of those very ornate earrings you find in India. My mom's friend came back from India with beautiful jewelry and bags, and I was lucky enough to receive a metal cuff bracelet with intricate flower detailing. Sundara means "pretty" in Hindi, and I wanted to name these earrings after this very inspiring culture.


These earrings are not as easy to make as some of my other tutorials, but just take one step at a time; they look a lot harder than they actually are to make!

What's great about these is that like many of my other tutorials, the metal color and bead color can be changed to accommodate any style. I went with a pure silver scheme so that the earrings looked super chic. They have a lot of movement to them, with the inner horseshoe and outer frame, which surely will shine and attract attention!

This is an original design of mine, not a designer knockoff! I hope you all will be happy with it!
Let's get started!

Step 1: Gather materials. Needed are pliers (round nose and long nose), two pearls (appx. 7mm): mine are from Cousin Beads, which you can buy at many craft stores like Michaels, 20g wire, 18g wire, 28g wire, two ear wires, and Sterling Silver 4mm beads . Please use half-hard wire here, not dead soft. I usually only use half-hard wire just because I think it is sturdier.
A tip: the larger the # of wire (ex. 28g), the thinner the wire is. 28g wire is much thinner than 18g wire.

Step 2: Cut two coils of your 18g wire. Wrap these around a nail polish jar, making them into teardrop shapes. It helps to gently flatten the ends of the wires (by grabbing the ends and pulling them slightly away from the direction they curve) with the long nose pliers to make them less circular shaped. Your teardrops should end up looking like this, above. Make sure they are the same size, for same size earrings.

Step 3: Where the ends meet, grab the wire with the pliers (one by one) and bend them straight up. Cut one of the wire ends about 1mm from the bend, and make this into a loop, catching the other wire. Cut the remaining wire about 1mm from this loop. I hammered these frames a bit outside for texture and to work-harden them, if you would like to keep these plain then you can do so. If you would like to file the ends of your wire through the steps for a clean look, you are free to do so. Beginners don't necessarily need to if they don't want to!

Step 4: Now, finish by making a loop on this wire to close. Start wrapping! Take your 28g wire, and cut 2 feet. Starting about 1" from the end of the 28g, and near the loop on your earwire frame, start to wind the wire around the frame. Once you have about 6 wraps tight (if you didn't wrap that extra 1" of wire, you can cut it off flush to the frame), add on a bead. Catch it in a wrap, and continue to wrap tightly to the frame. It helps to hold both the bead and wire in place with one hand, then wrap with the other. Make three wraps now without the bead. Continue this process until the full wire is wrapped, making again 6 plain wraps by the end to finish it off, mirroring your start.

Step 5: With your 20g wire, cut two equal size pieces (5" or so), and thread one piece through the top loop of your ear frame. Gently pull the ends of the wire in opposite directions of each other, making an elongated loop (pic 1). Take the excess ends of the wire, and wrap 2 wraps, making sure 4 metal beads are above each wrap. Cut the wire flush to the frame. They should look like these, above.

Step 6: With your 20g wire, cut two 2" pieces of wire, and use the paintbrush part of the nail polish jar to make teardrops. Loop each end of these frames. Wrap these like in step 4 with beads, but making sure the beads wrap to the INSIDE of the frame this time. Loop each loop on the frame we created in the last step; be careful to not bend any of the wire. It should look like the last picture above.
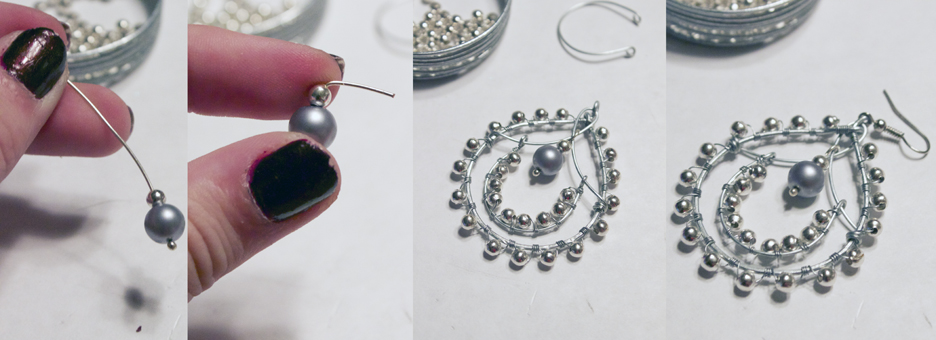
Step 7: With your head pin, thread on a pearl and metal bead. Cut and loop the end of this, and then place through that inner elongated loop we made in step 5. Attach your ear wire to the very top loop of the earring.
You are finally finished!
Like I said, this was a more difficult tutorial than most. Take one step at a time! Comment below if anyone has questions!

These earrings are indeed larger, which remind me of the jewelry from India. You can alter the measurements if you need smaller earrings, but big chandeliers make an impact for sure.

Using gemstone beads, or even crystals will give a different look.

These are great for adding interest to outfits; wear with a simple black dress for evening, or summery white blouse and jeans for a casual-cool look.

Instructions and all photos copyright Allison Beth Cooling. Don't post this tutorial or any of my pictures without crediting me, and don't claim as your own please!
Wow! These are excellent! And your tutorial is well-shot and pretty clear. You don't mention whether to use half-hard or dead-soft, though I'm guessing it's half-hard, nor filing the cut ends of the larger wire, but for people who do wirework, that's a given. I can't wait to make these in gold-tone for my daughters and in silver for me!
ReplyDeleteThese are so cute! I have such a hard time working with wire, especially with earrings. I can never get them to match.
ReplyDelete~Kelsy
http://looseendscraftblog.com
I'm Indian, and I love how they turned out! Amazing job!
ReplyDeleteAnother great one! Can't wait to give these a try! Thanks for sharing!
ReplyDeleteThis is a great tutorial, can't wait to try it. I do have one question - how long is the wire for each of the big loops?
ReplyDeleteamazingly beautiful.
ReplyDeleteI would love to do these as part of my teacher training. Would you please allow me to copy the tutorial and change the layout (it's part of the course) then photocopy the teaching sheets and hand them out to students. They then will be taught how to make the earrings.
ReplyDeleteCredit to your self will be duly noted at the end of the tutorial sheet.
Please could you confirm this. By the way i love your work and have mentioned the quiet lion on many occasions.
Thank you Abbie.
I would like to make theses for my craft fair. Stunning and beautiful. I hope you don't mind. I make my own jewelry and sell everywhere. I will of course give you all the credit. Thank You for your time. Debbie Bridgewater
ReplyDelete