Sunday, July 28, 2013

Dainty Abstract Flower Earrings


Inspired by the Prada runway SP2013 RTW looks, my earrings combine the artistic patterns of Asia, the colors, and abstracted flowers. Miuccia Prada quotes her inspiration for the collection was a merge of "Japanese (style)...and the Sixties" which I thought made for a really cool combination!


Here is the more wearable version, in earring form. These earrings are super lightweight and also are very dainty.  I took heed to to the abstracted flowers and made a wire flower as the focal point. I then used red, a color from the collection, and added some gold accents with the beads and wire. 

You don't have to use the same exact beads here as I did, you can use whatever you have lying around, just make sure the center bead is a disc bead for variety. Also, another important note is to make sure all your wrapped loops have the same amount of loops on top and bottom. This will make sure the earrings have a very clean look!


Step 1: Gather materials. Needed are pliers, 26 gauge wire, ear wires, and beads: two small 4mm red gemstone beads, two golden disc beads (flat bead with hole in the middle, like a doughnut), and then two larger 6mm print beads. You will also need two small gold jumprings.
*mm stands for millimeter.
You can alter which beads you want to use, if you don't have the exact ones I used. The middle bead should always be a disc bead, though, if you want this look.
Pliers were courtesy of Cousin Beads! There are a roundnose, wire cutter and flat nose. These offer great variety to jewelry makers because they are basically the three tools you need!


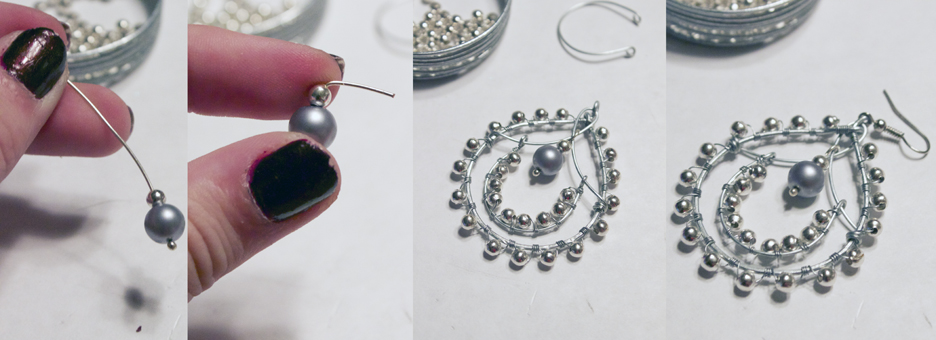
Step 1: Cut about a 3" piece of wire or so, and make a small loop at top, about 3/4" away from the end, wrapping the excess wire to close. It should look like the last picture. You only want about 3 wraps so if you have extra wire, cut it flush. 


Step 2: Add on your smaller 4mm bead. End with another wrapped loop, to finish the link. Cut the wire flush again if needed. Repeat steps 1 and 2 for your second 4mm bead.


Step 3: Repeat steps 1 and 2, but using your larger 6mm bead. You should have all four links, last picture.


Step 4: Now, start making a loop with your wire (about a 3" piece again), however before closing, thread through the loop from your 6mm link through the unclosed loop you are working with. Finish this loop by wire wrapping and cutting flush. Your link is attached to this loop now! 


Step 5: Thread your disc bead through the wire, and bend the wire back up, wrapping it right next to the beginning to close. The disc should be lying flat, instead of sticking out horizontally.


Step 6: Thread another 3" piece of wire through the middle hole of the disc again, wrapping a small amount (1/2" or so) to the wire to hold the disc in place. Start a loop with the longer end, and before closing.....


Thread on the smaller 4mm bead's loop through the unopened loop. Finish off by wrapping and cutting flush (just like in step 4). You should have what we see in the top middle picture!
Now, to make the wire flower, simply weave about a 6" piece of wire in and out of your roundnose pliers, 'till you have what we see in the middle picture. Compress this spring, and use the end of the wire to wrap around the middle, bundling the wire (bottom left). Now, spread out the individual "petals" by gently pulling up or down, until your flower is finished out! Simply attach the loop of the 6mm bead to an earwire, and then attach your jumpring to a petal of the flower, then the loop from the 4mm link to finish!


These earrings are very detailed, which is sure to grab attention!


Mix it up with maybe silver wire or copper wire. The possibilities are endless!


Instructions copyright Allison Beth Cooling. Don't post this tutorial or any of my pictures without crediting me, and don't claim as your own please!


Wednesday, July 24, 2013

Breaking News: Generation Bliss featured on Vanity Fair!

The boutique I work as a graphic designer at, Generation Bliss, is featured on VANITY FAIR's website!! That's BIGTIME. Congrats, Ela!! You deserve it.
Generation Bliss is a women's and men's clothing and accessory boutique in Lemont, IL. The address is 14184 McCarthy Rd, Lemont, IL. You can also buy online at generationbliss.com.
Ela Czupta, the owner, is the best and the clothes she has at her boutique are the coolest; my favorite are the accessories and jewelry.


Read the full article here. To give you a taste of what she has, look below!


Unique Minnow Dress


Monday, July 22, 2013

Men's Jewelry Tutorial: Hemp Surfer Necklace


Last year, I went on a trip to Cali. Too bad I didn't blog about it or anything, like I did while in Miami. I stayed in San Francisco, and traveled down to Half Moon Bay and Santa Cruz AND to Napa Valley!!! Total missed opportunity :(
Lesson learned.
So I will play catch-up.


It was Surf Country. I had never seen anything like it. Windsurfers, surfboarders, swimmers and all. The ocean there was not an aqua color, like in Miami. It was more of a Cornflower Blue, a truer blue.
And with surfing, comes seriously cool, laid-back jewelry. To me at least.
Natural hemp, wood, and glass beads combine with an easy technique to make this surfer-style men's necklace.


The colors can be changed, depending on what beads you have on hand. If you want to make this in a more feminine color scheme for girl surfers (or wannabes) feel free. 
The black beads and glass beads you see are all from Cousin Beads. You can find these at craft stores all over like Michael's and JoAnn Fabrics. I think the contrast between the natural wood and hemp, and then the shiny glass beads makes a seemingly-simple necklace very multi-dimensional.


Ok, enough talk. Let's start pretending we're in Cali (and for readers who are, I envy you).


Step 1: Gather materials. Needed are: scissors, natural hemp cord, a 20mm (millimeter) oval black bead,  10mm wood beads, assorted glass beads (from Cousin, Jewelry Basics card #34713074), and black 5mm beads (from Cousin, Jewelry Basics card #34722032).


Step 2: Cut about a 4 foot length of hemp. With one end of the cord, it helps to dip it in ModPodge and let it dry: this will make the end you will be stringing with strong and easier to string with, it's a simple tip I do for all types of soft cords including embroidery floss if I will be stringing with it.
With one end, fold over a couple inches of the cord, and use this to create a looped knot right at the end. Just tie a knot like you would if you had one string, but make sure to incorporate the two. It should look like the last picture.


Step 3: It helps to have a bead board here; that way, you can lay out your pattern and make sure it will be long enough! If you don't, you can use a bead mat as well to make sure the beads don't roll around everywhere!
To make my pattern, place the oval black bead at the center. My necklace ended up being 17" long. Alternate between the 5mm black beads and 10mm wood beads, adding in a glass bead every two to three beads. You may need to alter this pattern some, depending on how long you want your necklace to turn out! 
You need to make sure these beads' holes are large enough for the hemp, but not too large that they won't be caught by your knots. If you need to make a bead's hole larger, you can use a bead reamer (mine from Cousin). DO NOT use reamers on crystals!


Step 4: Add on your bead and string up right to the end, where your first loop knot is. Make another knot right after this bead, and pull tight. It will catch the bead in place. String on your next bead, and make yet another knot. Just keep repeating this method over and over again until....


Step 5: You finish. After the last bead, add on a glass bead that is large enough to go through the loop knot, can catches sufficiently (doesn't fall through the loop). This will be our closure bead. Just simply catch this bead with a last knot, making sure you leave a very small amount of string (as seen in the second pic) as a place for the loop to sit, when closed (third pic).
You are finished! This is a super-simple pattern that can be changed up to create a bunch of different looks.


Mix contrasting colors for maximum impact; try pink and lime, neon orange and blue, or even lemon yellow and bright purple. I bet it would stand out great against summer-tanned skin, of which I do not have :( .........


This is meant to be more of a choker-style. Make sure to measure your neck before doing this project to make sure of the size you need at the end.


Thank you, Bobby (NOT a surfer, just a brother) for modeling.


Instructions and all photos copyright Allison Beth Cooling. Don't post this tutorial or any of my pictures without crediting me, and don't claim as your own please!


Friday, July 19, 2013

Exciting News! I'm a Cousin Corporation Ambassador


I, along with 4 other jewelry makers, were named Cousin Corporation's Creative Circle Members for 2013-2014! Be sure to check out the other members as well, including the returning 5 members!
As part of the brand ambassador program, we aim to teach and inspire others through jewelry making and designing, using Cousin's great products! 


You will be seeing my blog posts now including these awesome beads and findings and more, all inspired by different places, things, and subjects. 
Get ready for some seriously cool tutorials and projects!
View all Cousin's products at cousin.com. They are a supplies wholesaler, and you can find their products at Michael's, JoAnn Fabrics, other online retailers and more!


Friday, July 12, 2013

Original Tutorial: Sundara Earrings!


My newest tutorial: my Sundara earrings! These remind me of those very ornate earrings you find in India. My mom's friend came back from India with beautiful jewelry and bags, and I was lucky enough to receive a metal cuff bracelet with intricate flower detailing. Sundara means "pretty" in Hindi, and I wanted to name these earrings after this very inspiring culture.


These earrings are not as easy to make as some of my other tutorials, but just take one step at a time; they look a lot harder than they actually are to make!


What's great about these is that like many of my other tutorials, the metal color and bead color can be changed to accommodate any style. I went with a pure silver scheme so that the earrings looked super chic. They have a lot of movement to them, with the inner horseshoe and outer frame, which surely will shine and attract attention!


This is an original design of mine, not a designer knockoff! I hope you all will be happy with it!
Let's get started!


Step 1: Gather materials. Needed are pliers (round nose and long nose), two pearls (appx. 7mm): mine are from Cousin Beads, which you can buy at many craft stores like Michaels, 20g wire, 18g wire, 28g wire, two ear wires, and Sterling Silver 4mm beads. Please use half-hard wire here, not dead soft. I usually only use half-hard wire just because I think it is sturdier.
A tip: the larger the # of wire (ex. 28g), the thinner the wire is. 28g wire is much thinner than 18g wire.


Step 2: Cut two coils of your 18g wire. Wrap these around a nail polish jar, making them into teardrop shapes. It helps to gently flatten the ends of the wires (by grabbing the ends and pulling them slightly away from the direction they curve) with the long nose pliers to make them less circular shaped. Your teardrops should end up looking like this, above. Make sure they are the same size, for same size earrings.


Step 3: Where the ends meet, grab the wire with the pliers (one by one) and bend them straight up. Cut one of the wire ends about 1mm from the bend, and make this into a loop, catching the other wire. Cut the remaining wire about 1mm from this loop. I hammered these frames a bit outside for texture and to work-harden them, if you would like to keep these plain then you can do so. If you would like to file the ends of your wire through the steps for a clean look, you are free to do so. Beginners don't necessarily need to if they don't want to!


Step 4: Now, finish by making a loop on this wire to close. Start wrapping! Take your 28g wire, and cut 2 feet. Starting about 1" from the end of the 28g, and near the loop on your earwire frame, start to wind the wire around the frame. Once you have about 6 wraps tight (if you didn't wrap that extra 1" of wire, you can cut it off flush to the frame), add on a bead. Catch it in a wrap, and continue to wrap tightly to the frame. It helps to hold both the bead and wire in place with one hand, then wrap with the other. Make three wraps now without the bead. Continue this process until the full wire is wrapped, making again 6 plain wraps by the end to finish it off, mirroring your start. 


Step 5: With your 20g wire, cut two equal size pieces (5" or so), and thread one piece through the top loop of your ear frame. Gently pull the ends of the wire in opposite directions of each other, making an elongated loop (pic 1). Take the excess ends of the wire, and wrap 2 wraps, making sure 4 metal beads are above each wrap. Cut the wire flush to the frame. They should look like these, above.


Step 6: With your 20g wire, cut two 2" pieces of wire, and use the paintbrush part of the nail polish jar to make teardrops. Loop each end of these frames. Wrap these like in step 4 with beads, but making sure the beads wrap to the INSIDE of the frame this time. Loop each loop on the frame we created in the last step; be careful to not bend any of the wire. It should look like the last picture above.


Step 7: With your head pin, thread on a pearl and metal bead. Cut and loop the end of this, and then place through that inner elongated loop we made in step 5. Attach your ear wire to the very top loop of the earring. 
You are finally finished!
Like I said, this was a more difficult tutorial than most. Take one step at a time! Comment below if anyone has questions!


These earrings are indeed larger, which remind me of the jewelry from India. You can alter the measurements if you need smaller earrings, but big chandeliers make an impact for sure.


Using gemstone beads, or even crystals will give a different look.


These are great for adding interest to outfits; wear with a simple black dress for evening, or summery white blouse and jeans for a casual-cool look.


 Instructions and all photos copyright Allison Beth Cooling. Don't post this tutorial or any of my pictures without crediting me, and don't claim as your own please!