


Alternative jewelry is grabbing the world by storm; and I am totally joining the bandwagon. As a jewelry designer, I love innovations in how to wear and design jewelry. These hand chains and body chains are a merge of distinct jewelry styles: the hand chain, a bracelet/ring hybrid, and the body chain, a sort of necklace/belt/harness mix! Just like with the Midi Ring craze, I am so stoked, and needed to make a tutorial.
And, as I am an official Ambassador for Cousin Corporation, this entire project (hand + body chain), is made exclusively from Cousin products! Just shows you that you don't have to shell out a ton of cash to make these pieces, and you can make them from materials you can get at any major craft store (i.e. Michaels, JoAnn, Hobby Lobby...).

I will show you my sketches for this project. I usually don't do sketches, because I like to create things as I go. But, I had a strong idea for this project and thought I'd make it more "official"!

I did stray a little from these sketches, by adding a few small tweaks. But, I thought I did pretty good sticking to my original idea here!


These are all views of my "Moodboard"; I usually always create a "Moodboard" when I start any sort of more involved project. I do this for my graphic design as well; I would recommend any other artist to do so: collect images you love from magazines, different pieces you have collected from your travels (here I included a seagull feather and shells I found while in Miami and Florida), and any other unique pieces or ephemera you need to create a certain "mood", or inspiration. This will help guide your project and can offer color palettes, imagery, or even in designers' cases typography, pattern and shape. I included images from photoshoots and advertisements from both fashion magazines and interior design magazines; don't limit yourself. You may find some imagery useful in any kind of magazine! You can see my final projects on the left. I wanted to capture the colors of the Floridian beaches (greens, blues, and silvers of the water and sky) and merge them with the cool, hip vibe of Miami.

Are we finally ready??? Let's get started!

Step 1: Gather materials. There is a longer list than I usually have! Ready?
*Beading wire (Cousin Cord Basics in White)
*An assortment of beads:
-Crystals (I used Crystazzi Crystal 6mm Erinite Bicones and 4mm Confetti Mix)
-Lampworked beads (Cousin Glass Swirl Beads). I used a mix of those two strands of beads and that card with the swirled beads on them.
-Plastic Faux Stone beads (Cousin Blue Crackle). These are those big blue beads you see.
-Plastic metal beads (From the Cousin Class in a Box kit). These are 6mm.
*Chain:
-White 3mm chain (Cousin White Chain)
-Silver 4mm Chain (From Cousin Class in a Box Kit)
-Green 5mm Chain (Cousin Green Oval Chain)
*Elastic Cord (From Cousin Class in a Box Kit)
*Jumprings, Clasp, and Crimps (all from Cousin)

*BODYCHAIN*
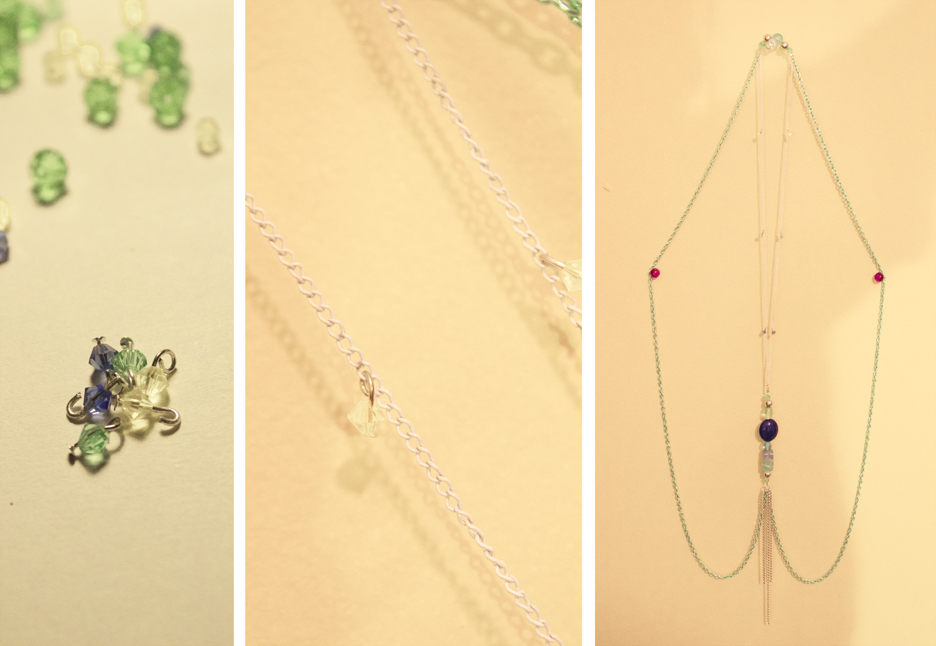
Step 1: Lay out a bead mat (mine from Cousin) or a piece of fabric to keep your beads from rolling away, it helps! Set up a panel of beads that are about 3.5" long. I chose to use a mix of crystal, lampwork and faux stone for a lot of texture. The colors all are blues and greens, to speak to the beach theme! Cut a 5" piece of your beading wire.

Add a crimp and jumpring to one end, and thread the wire back through the jumpring and crimp shut. Add on all your beads in the correct order. Finish off the other side by threading on a crimp, then a jumpring, then thread back through the crimp...And crimp shut, trim the wire flush.

Step 2: Get out your small 3mm chain. Cut a length that is large enough to go over your head comfortably, and that stops below your collarbone. Mine was about 24". Add a jumpring to the top side of your bead panel, and connect this ring to the center of your 3mm chain (at 12" for me).

Step 3: You should have two loose ends of chain. We will make a small mini-panel, just like we did in step 1, but this time, only make it about 1.5" long or so. Use crimps here and jumprings to finish off the panel, just like in Step 1. Be sure to stick with your bead theme here, colors and textures.

Attach each free end of 3mm chain to the jump rings; you will finish and have something that looks like my rightmost picture. Think of it as a really long necklace!

Step 5: With your larger 5mm chain, cut two 28" lengths (measurements may differ slightly, make sure it can go around your arms). Attach one end of each length to the bottom of the large bead panel (the OPPOSITE end of where your 3mm chain is attached!) and the other end to the corresponding side of the mini bead panel.

This is what you should have now! The long necklace just gained armholes!

Step 5: Now, with your silver 4mm chain, cut two 4" pieces and one 6" piece. Attach these to the bottom jumpring of your large bead panel, making sure the 4" pieces are on the outside of the green chain, and the 6" piece lies right in the middle.
Step 6: To finish, add some glitz! Take your Crystazzi crystals (6 of them) and put them on headpins; cut about 1cm from the bead, and loop to close. Attach each of these in even lengths on your 3mm chain, as seen in the picture.
Your bodychain is officially finished!!! To wear, put the 3mm chain "long necklace" over your head, with the bead panel laying on your chest; stick your arms through the 5mm green chain, like a harness. It should sit comfortably and you should be able to move freely without getting caught!

*HANDCHAIN*
Step 1: With your elastic, thread on about 11 or so (enough to go around your middle finger comfortably) 6mm metal beads. Add on a crimp, and crimp shut. Cut the extra elastic.

Step 2: Take your 4mm chain and measure a length that goes from the base of the middle finger to the top of your wrist. Mine was about 3.5" long. ( I just used this chain as a measuring system because it layed flat. I will NOT be using this chain in making the hand chain). With this measured, cut a 5" piece of beading wire. Attach a jumpring to one end, and crimp on with a crimp. Attach this jumpring to the center of your bead ring (the opposite side of your crimp so when you wear the crimp faces underneath and you don't see it). Add your beads to create that 3.5" panel; use a crimp and jumpring on the other side to finish off.

Step 3: Measure your wrist; mine was about 6". You want this to not be very loose, so measure as close as possible. Cut this length of your 5mm chain, and add a clasp to the ends. Right in the center of this chain, add the jumpring from the other side of your bead panel. Now, add one more jumpring in between the beads, about 2" down your bead panel. Cut two lengths of 3" 3mm chain (again, you may need to alter your measurements depending on how big your hand is. A good thing about unsoldered chain is that you can keep adjusting the length! Attach one of the ends to this jumpring.

Step 4" Attach the other end of your chain to the 5mm chain, about 1.25" up from the clasp. To wear, first put your ring on, with the bead panel layin on top top of your hand. The 5mm chain should fall down, and clasp it shut like you would a normal bracelet. You should be able to still move your fingers freely, but it shouldn't be hanging off real loose! If you need to edit your lengths, do so!
This is great for the beach; it can go over your cover-up...

Or on when you are sunbathing!


Instructions and photos (excluding very first image of models wearing other body chains) copyright Allison Beth Cooling. Don't post this tutorial or any of my pictures without crediting me, and don't claim as your own please!
A special thanks to my model, Karlee Dewan
so unique!!!! awesome project. love those cobalt blue beads
ReplyDelete