
This is my first "beadwork" post! I usually do posts that are pretty simple and fast to finish! This will take a bit longer and is a bit more tedious, however, the results are worth it!

This necklace makes a very cool "v" shaped pattern, which can be dressed up with a sheath dress for dinner parties, or dressed down with a tee and jeans for a day shopping. It is quite versatile and can be made with any color/s.

The featured pearls are all from Cousin! I love these pearls because they have a great feel to them; they aren't cheap-feeling, like many other pearls I have used! They are very shiny and have a great almost metallic coating, perfect for using in a bead project!
You can buy Cousin beads at Michaels or JoAnn, or even Amazon.

Step 1: Gather materials. Needed are scissors, fishing line, pearls *ALL FROM COUSIN* (6mm light green, 8mm fuchsia pearls, and larger 10mm or 12mm pearls.) I pictured those dark green ones but didn't end up using them, sorry! Also, you will need a clasp, two crimps, two looped headpins, and a end cones or bead caps to finish.

I emptied out all the pearls into a glass, for easy stringing.

Step 2: Cut about 5' of your fishing line. Add on four pearls (the large 10mm ones). Thread the string in your right hand back through the fourth bead, in the opposite direction, to create a cluster. Now, add one bead on your right string and two beads on your left string. Thread the string on your right side back through the second bead on your left string. You will now have two clusters, on top of each other. String three pearls (the 8mm ones) on each right and left string.

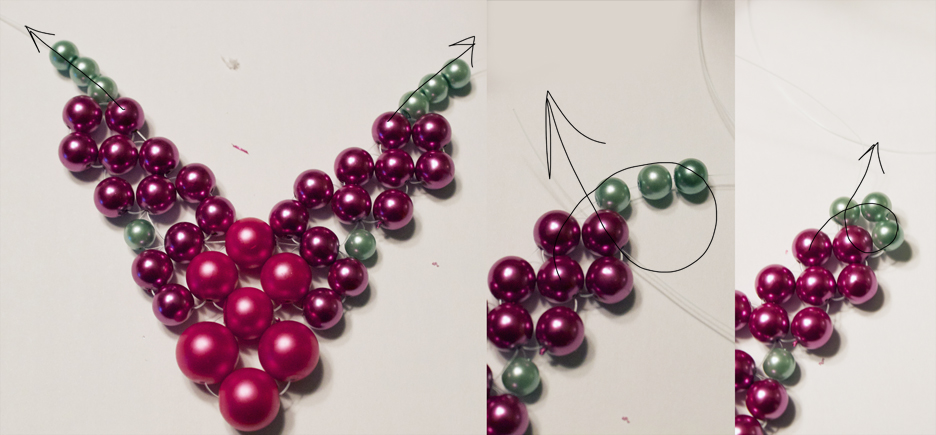
Step 3: Take each of your strings, and loop them back through the outside bead of the second cluster, then through the top bead in this cluster (if you need help you can follow the arrows which show the pattern of the string). Now, add on three more beads on each right and left string. Now, string back through the top bead in the last cluster you made.

Step 4: Add on one green pearl (the 6mm one) and thread through the outermost beads in each cluster.

Step 5: Thread on three beads on each of your right and left strings. Thread the string back through the bead right above the green pearl. Now, string through the topmost bead in the cluster.

Step 6: Add on three beads and thread back through the outermost bead in the last cluster. Then, thread back through the first bead you added in this step.
Step 7: Now, add three green pearls. Thread back through the outermost bead in the last cluster and through the first green bead you added in this step.

Step 8: Thread on three green beads, thread through the topmost bead from the last cluster, and back through the first green bead you added in this step.

Step 9: Thread on green pearls, until the necklace is as long as you want!

To make the last green cluster, simply cut about a foot of fishing line. Find the bead about two clusters away from your topmost light pink one (view picture) and tie a knot at one end of the line. Thread through this bead. Add on two green beads, and pass through the bead below that green bead added in step 4 (view picture). Weave through as the picture shows (3 beads) until you are at the top; add a green bead.

Weave through the green bead added in step 4. Weave through the bead left of this green bead (picture) and tie off with a small knot, then cut flush. It helps to add a dab of superglue to adhere. Repeat with the other side of this necklace; the steps will be the same, but directions reversed. If you get confused you can flip the necklace over so the directions will be the same; however, the green bead is woven to sit "on top" of the others. If you flip the necklace over make sure to weave the bead so it sits just like the side you have done before. To finish, add a crimp then a looped headpin, and crimp shut. Take that headpin and weave through the bead cap; loop and finish off with a clasp. Repeat with the other side.

See those two green beads, the sort of sit on top of the necklace?

This pattern is great in all colors, or one color if you want it to be super simple! Try maybe with crystals too for a super-shiny look!
Pattern and all photos copyright Allison Beth Cooling. Please do not use/post without linking back and crediting me!
stunning! I still think that your photos are so good, they deserve more space!!! make um bigger! :) but seriously, love the necklace!
ReplyDeleteBeautiful and very creative design! I love pink and green together! Gorgeous Allison! <3
ReplyDeleteEu ameeeeei.... você é fantástica .... estou muito agradecida pelo seu post...farei um para presentear minha mãe !
ReplyDeleteum abraço .. S2
I'm having trouble with the Step #3. I've tried different ways to string the beads but they don't lay flat when picked up. A video tutorial would help. Is there a video that I can watch to help me?
ReplyDeleteI can't figure out to get them to look like that either.Did you figure it out?
Delete