Monday, July 28, 2014

Birds of a Feather Manicure


Purples and golds and sparkles.


This nail tutorial is all about elegance; these gold feather decals just add that fine detailed look. Unexpected vitrail-finished crystal flat backs also add a modern vibe. I think I am obsessed with the vitrail look; that multicolored metallic-looking finish that's becoming more popular these days. It's an edgier version of a traditional crystal.


This manicure was made possible with supplies from nail art and beauty superstore Born Pretty. This store has everything and anything you need to update your entire look! From gems, decals and polishes to jewelry, clothing and more, be sure to check them out online.

If you are interested, I've got an exclusive coupon for y'all.
Use the code HXSQ10 on Born Pretty Store to get 10% off your order! With free shipping, you can't beat their selection. The prices are great as well. Most nail art supplies are around $2, which is my kind of price! You can get lost shopping on their site….seriously.
Let's get to the tutorial.


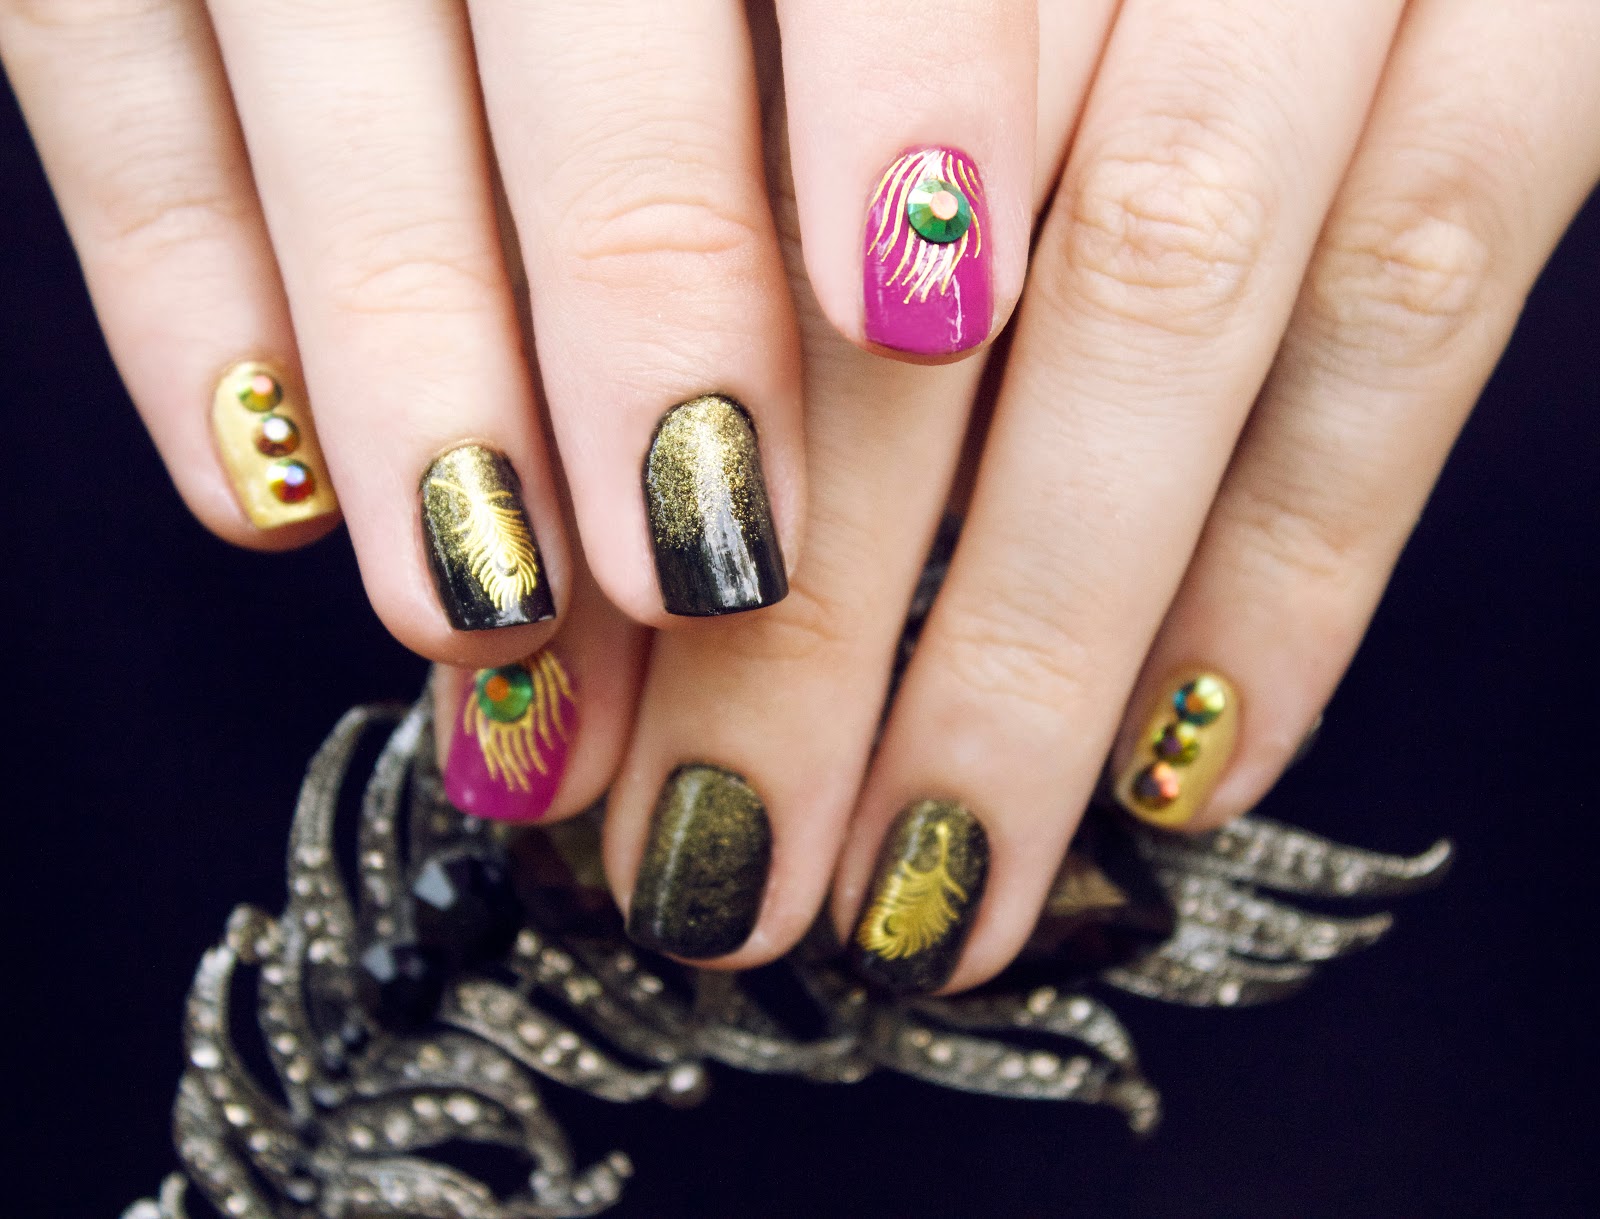
Step 1: Gather materials. I am using Born Pretty Peacock Gold Feather Decals Item Id 13673 and Born Pretty Rhinestone Wheel Id 14724. I also used gold shimmer polish, nail glue, black nail polish, purple nail polish and clear coat. I painted all my nails black except for the index and pinkie (yes, it shows black here, but paint the pinkie gold. I changed my mind!). Paint the pinkie gold and the index purple. 


On your black nails, use Born Pretty Sponges to get a gold gradient. Simply paint the edge of the sponge with a bit of gold and dab at the bottom of your nails to get a gold dusted look. On your index finger, take the large feather decal and apply. These are water decals; for more info on how to use these, view my Royal Teal manicure.
On the ring finger, apply the smaller feather decal.


On the Pinkie, simply use nail glue to apply three Born Pretty gems in a line down your nail. Press down and let dry. I also added one bigger gem to the index finger, placing it on the middle of the feather decal. When everything is dry, simply finish with top coat.


Purple and gold is a classic combination, standing for royalty. The addition of black is my touch, as you all know its my favorite color. If you don't like that gothic touch, you could do a darker purple with gold, omitting the black.


This works great with all nail sizes. As you can see, mine are way shorter than they have been. Sadly my long nails have broke, forcing me to start from scratch. I always think darker colors look better on short nails, hence the palette. You could switch up the colors to fit your style! The peacock feather decals also come in silver, and Born Pretty's rhinestones come in all colors. A baby blue/silver /white combination would be really pretty, or go girly with neutral polish, gold decals and Born Pretty Pearls.
The possibilities are endless!


Sophisticated yet stylish!


I find that these water decals are so easy to use, especially because they can be repositioned while still wet to get the perfect fit. If you were using a sticker, you'd be stuck with where it was placed first. I would recommend water decals to anyone!


All photos copyright Allison Beth Cooling. DO NOT use/post without linking to me and crediting me!

Monday, July 21, 2014

"Daintyfied" Project 2- Infinity Wrap Bracelet


To infinity and beyond! 


This wrap was made from products within Cousin Corporation's new line, "Daintyfied". The line includes charms, chains, and components that can be mixed and matched to create lightweight, delicate jewelry that can be worn everyday! This collection hits Michaels craft stores August 15th, so look out for it! Also, it will be available on Prima Bead.
I used the Infinity charm seen on the far right.


I also used Cousin Jewelry Basics round crystals, gold jump rings, Cousin beaded chain and a gemstone 4mm round bead.


You know my obsession with stacking bracelets. Pair this rosary-style wrap with a chunky bangle and other bright neon beads for a cohesive look!


To make this wrap, simply take Cousin's Beaded Link Chain in a length 3X the size of your wrist, adding 6mm crystals in even spots along your length of chain. You will have to cut the beaded links and add your own link with this chain, then reconnect. 
For help on creating linked beaded chains, view my Crystal Amulet Necklace tutorial.


With the unfinished ends of chain, simply attach a clasp to one side and the Infinity charm to the other. Add a couple of charms to the other end of the infinity (I used one 6mm crystal, one 4mm gemstone and a blue bead from my linked chain). To wear, simply wrap and clasp at the jumpring!


All photos copyright Allison Beth Cooling. Do not post tutorial or pics without linking and crediting me!

Wednesday, July 16, 2014

"Daintyfied" Project 1- Buddha Bangle


Breathe in, breath out. Om. 


This delicate Buddha and dainty Om give a sense of serenity to this simple bangle. This is truly a beginner tutorial, because it takes less than 10 minutes to make, and the materials list is concise. 


I've layered my bangle with some other bracelets for a cool, eclectic look. Get the tutorial on how to make my Sparkle Strands bracelets (green/pink) and Fiesta Bracelet (orange) to complete your own bracelet wardrobe!


This bangle was made from products within Cousin Corporation's new line, "Daintyfied". The line includes charms, chains, and components that can be mixed and matched to create lightweight, delicate jewelry that can be worn everyday! This collection hits Michaels stores August 15th, so look out for it! Also, it will be available on Prima Bead.


I am using the Buddhist charm set and the Bangle Bracelet for this tutorial. I also used 26 gauge Cousin wire and 4mm Cousin Jewelry Basics copper bicones. 


I simply cut a foot piece of wire, and wrapped it around the circular end of the bangle. After about 6 wraps (tight!) I added a bicone, and encased it in a wrap to hold in place. Then, I wrapped about two times with the wire, added another bead, and repeated. I used nine beads total. Wrap six more times with plain wire and cut flush to finish.


I added the Om and Buddha charms to the circle end of the bangle to finish. Voila! 


I decided to only wrap a little bit of crystals to keep the look dainty. Also, asymmetry in jewelry always  looks a little more modern and fresh!


You could easily do this look with any of the Daintyfied charms, and any colored crystals. Try pearls for a classy look, or even gemstone rounds for a bohemian vibe! Super lightweight and great for everyday wear.


You could of course wire wrap the whole bangle if you wanted, the possibilities!


Sparkly and makes a statement!

All photos copyright Allison Beth Cooling- do not use/post images without crediting and linking to me!


Thursday, July 10, 2014

Christmas in July- Cousin 'Tis the Season Part 4


My last installment in my "Christmas in July" promotion are my "Holly Jolly Magnets", using Cousin Tis 'the Season charms as focal cabochons of sorts!


These cute little fridge magnets take the techniques I used in my last Christmas in July post and spin off that idea. My Glitter Deer pin tutorial can be seen here. I used Cousin's larger deer charm for this pin, and used the smaller two charms to make these two magnets. The snowflake charm is also from a 3-pack of gold charms in the 2014 Tis the Season line.


A simple walkthrough of the directions to make these magnets:
1. Take a ball of oven-bake clay (green or red, a little bigger than a quarter) and roll the outside in green or red glitter to match. Make sure the glitter coats the surface, and rub it in.
Simply press a charm into the top of the ball, flattening it and adhering the charm in the clay. 
To make the beaded decorations, take headpins and cut them to about .75". Add a bead, and press into the side of the clay to hide the empty part of the headpin. Your headpin should be stuck in the clay. Add them all around the edges of your cabochon! 
Bake at about 125 degrees for 20 minutes or so.


When cooled, glue a magnet piece on the back.


I also used Cousin pearls and red glass beads, as well as Jewelry Basic crystals here for the side decorations. These are so sparkly and detailed that they are great holiday decorations, or even make some for your friends! You can use any charms here really, and make them in different themes for different occasions.


Great for putting on the fridge to add some glam to your everyday coupons, lists and clippings!
The whole 2014 Tis the Season line is available at all craft stores such as Michaels, JoAnn Fabrics, AC Moore stores and at Primabead.com

All photos copyright Allison Beth Cooling. Do not post/use images without linking to me.

Tuesday, July 8, 2014

Raise.com "Closet Swap"-Summer 2014 Trend


Sun's out, weather's nice, it's finally time for some sweet summer fashion. And with summer fashion comes summer shopping. I stumbled upon a new website called Raise.com where you can buy and sell gift cards to your favorite stores. Have an old gift card to a store you really don't like? Raise.com makes it easy for you to list and sell these cards, and make money to buy new ones to your most beloved places! The gift cards for sale here are all listed at a discounted price, and the gift cards are for all types of store categories, including restaurants, electronics, clothing, pets and more.  I was asked to be a part of Raise.com's "Closet Swap" campaign, highlighting my favorite look for summer while familiarizing you all with the site. I've styled and photographed my favorite type of outfit here, and I've added some tips on how to replicate the look. A special thanks to my model, Karlee D. 


My favorite look this summer is an easy-breezy bohemian look. I'm lovin' an easy piece like a strapless dress in a bold, bright color as the base. Offset that flowy silhouette with edgy strappy heels to ground the outfit, and provide contrast. To finish off, it's all about the right accessories. Layer strands of long necklaces for a totally boho-glam look that won't weight the rest of the outfit down. A gold minimal cuff completes the look by adding shine and a modern vibe. It's like a romantic-modern-bohemian-edgy twist, which seems like too much, but it works. The trick is to keep a solid-color dress to prevent it from looking busy.


These necklaces you can actually make yourself, as they are part of my Crystal Amulet necklace collection. View the tutorial here. What's great about these layering necklaces is that they are lightweight but still pack sparkle and shine factor with the crystals and rhinestones. Gold cuff by Generation Bliss. Also, using these blue and earth toned necklaces keeps the look more sophisticated!


Of course, an almost messy-wavy hairstyle is the way to go. Minimal makeup here with just a bit of eyeliner. It keeps the look from being to overworked and shows that you don't need to spend forever on hair and makeup to have a rockin' summer vibe! I think this look is casual enough to go shopping but also chic enough to attend a summer party! What do you think?!


Photos copyright Allison Beth Cooling. Do not use/post images without crediting me and linking back.


Friday, July 4, 2014

Christmas in July- Cousin 'Tis the Season Part 3


Deck the halls with a statement necklace made with pearls, rhinestones, rose beads and chunky chain!


For Project #3 in the "Christmas in July" theme is my Mrs. Claus Necklace. Cousin's new line of 2014 'Tis the Season products can be found in craft stores like Michael's, JoAnn, AC Moore and more!


I've made simple drop earrings from these rose acrylic beads, and added pearls for an elegant look.


I wove Cousin rhinestone chain into white chunky chain. I simply took the pearls and roses from Cousin's bead strand and added them to headpins, and finished off with top loops.
I attached jump rings to the chain links and added these pearl drops. Finally, I took cream Cousin Jewelry Basics pearls and added to the jump rings as well to fill out the necklace. 


This creates a jubilant piece that adds holiday cheer to any outfit! Mrs. Claus would definitely approve!


All photos copyright Allison Beth Cooling. Do NOT post/use photos without crediting and linking to me.


Wednesday, July 2, 2014

Christmas in July- Cousin 'Tis the Season Part 2


Hello dear.


This little deer is all blinged out, looking just like a Christmas ornament! For my second "Christmas in July" project I've made a holiday-themed pin using clay as my base. 


I took a ball of yellow clay (a little bigger than a quarter but thick) and rolled it in some gold glitter. I took Cousin's deer charm pack from the 'Tis the Season line and cut off the charm loops on either side. I pressed the deer in so that it formed a cabochon of sorts. I then took Cousin's rhinestone chain  and embedded it around the sides of the cabochon. Finally, I took headpins with pearls on them (cut to like .5") and stuck some at the top of the cabochon. To make the bottom dangle, I cut a 1" headpin and bent it into a horseshoe shape and embedded it in the bottom. 


I baked this for about 30 minutes in a toaster oven at 125 degrees. Times may vary based on what oven you are using and the size of the cabochon. Then, when cooled, I added dangles of Cousin pearls, Jewelry Basics crystals and one green statement pearl from their 'Tis the Season rose/pearl strand. I glued a pin backing to the back.


This technique could be used with all different kinds of pendant charms or even just cool things you find- have an interesting shell or sparkly rock or something? Embed them in the glittery clay and make them into pins. Add any color crystal dangles to match your theme. With Fourth of July coming, I could see a start pendant in red glittery clay with blue and crystal dangles!


This is what the new packaging looks like. Be sure to scout it out at your local craft stores!

All photos copyright Allison Beth Cooling. Do not use/post images without getting back.