Wednesday, April 29, 2015

emoji luv necklace +diy

emoji necklace diy

So I'm pretty sure all of us are obsessed with emojis by now. I need like emojis everywhere in my life. As a graphic artist, I totally believe in the idea that images speak louder than words. Hence my love for The Emoji.


So when I was at Target one day, and spotted a package of - what?! - Emoji stickers?! I was super excited. Who knew these existed?! Did you?! Why didn't you tell me?!


So anyways, I totally grabbed a pack and decided to get to work. I knew I wanted to make some sort of kitschy-style statement necklace, because, well, why not? Emojis have attitude, and while I usually don't love super-bright, in-your-face colors, they totally work here.


To turn these stickers into charms, I turned to one of my favorite materials: polymer clay. Backing these stickers with clay, then baking, creates cool components with some serious style. For this necklace, I picked out my very most favorite emojis: the 100, the Skull, The lightning bolt, the Peace Sign, the Lips, the Sly Guy, the Shining Star and the Money Stack. It just so happened that these emojis all shared the colors red, white and yellow. Even better. Color palette, check.


Adding these emoji charms to chunky chain from Cousin Corporation, and mixing with rhinestone pave beads, totally completes the look. It's a little over-the-top, but totally on purpose.


I'll show you exactly how to make your own below. The hardest part might just be finding the emoji stickers. I'm telling you, you need them. I have a list of places that sell them below in Step 1.


Are we ready?! Let's start.


Step 1: Gather materials. Needed are pliers, polymer clay, a tissue blade or Xacto knife for cutting, clear gloss glaze, a paintbrush, pave rhinestone beads, chain, a clasp, headpins, and the pièce de résistance - the Emoji stickers. I got these from Target! You can also get them from Amazon and Urban Outfitters.


Step 2: Choose which emoji sticker you want as your charm. Take a marble-sized piece of clay (I'm using white here for a clean look. I used yellow for some of my other charms. Use whichever colors you like!) and gently roll out (I literally used a sharpie like a rolling pin). Roll till it's about 3mm thick. Make sure it's evenly rolled out like a nice little pancake!


Step 3: Gently peel off your sticker, and stick it right on the pancake. Press down and burnish gently. Start trimming the excess clay away with your tissue blade or Xacto knife.


Step 4: Continue trimming, using your Xacto blade to get right up against the sticker. Smooth out the edges by rubbing gently with your fingers.


Step 5: Carefully make a vertical hole in the clay with a needle. Make sure this hole goes all the way through the charm. I leave this needle (or sometimes I use headpins to make the holes) in the clay as it bakes to make sure the hole stays put.
Repeat the above steps for any other charms you want to make! Go ahead and bake these in a toaster oven at VERY LOW HEAT. I had my dial turned down below the 125 degree mark. You don't want to bake these at a high temp because of the sticker. I baked my charms for about 20 minutes or so. When finished, let them cool fully.


Step 6: Coat all your charms in clear gloss glaze. Let all air dry.


Step 7: Add your charms to headpins and create wrapped loops. Start laying out the orientation of your necklace, and making charms out of the pave rhinestone beads. I stuck with yellow, white and red rhinestone beads to keep the color scheme coordinating.


Step 8: Simply add your charms and rhinestone bead charms evenly across your chain. I used jump rings to attach my charms to the chain links, which made it easier for me to sort of play with the right amount of charms, and where to place them. I alternated my rhinestone beads with my charms. There is no right or wrong way. Play around and see what looks best to you! To finish, add a clasp at the end of the chain.

Are you lovin' this as much as I am? I like the contrast between the fancier sparkle beads, fun icons and industrial-type chain. What's also great is that you can switch up the colors based on the emojis you pick. You could also use gold chain instead of silver if you prefer.


Make a matching bracelet if you want too. Might as well. Go all out.


If you make one of these, I say to with the punk vibe - a rocker-chic outfit of a long black tunic top, leather leggings and combat boots works totally well. I'm gonna leave you with two closing pics to inspire you. If you make a necklace using this tutorial, post pics to your instagram and tag me @quietlioncreations! I'll repost you!


All images copyright Allison Beth Cooling. Do NOT repost without crediting me and linking back to my blog.

Saturday, April 25, 2015

vintage lace headband diy

vintage lace headband diy by quiet lion creations

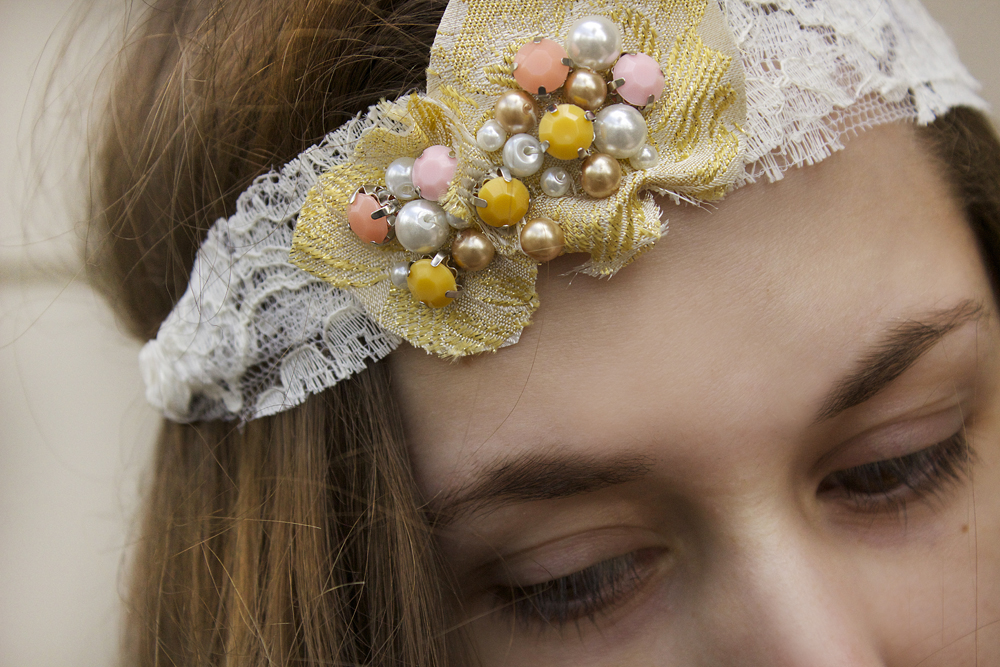
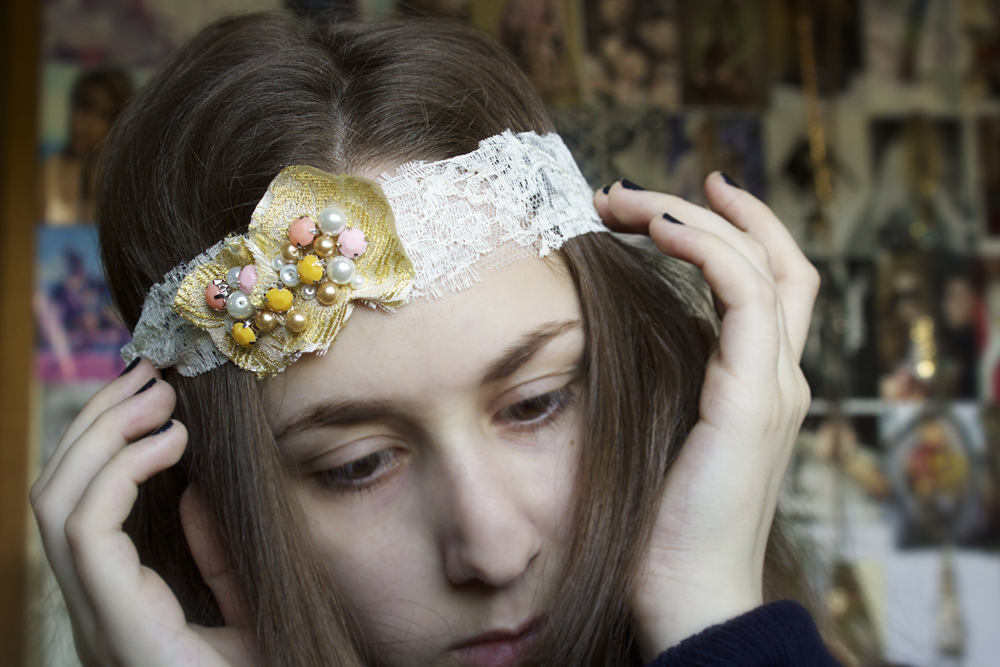
A mix of lace, gilded fabric, pearls, rhinestones and ribbon make for a very vintage-looking accessory! As you may know, I am not a huge fan of sewing. Reason 1: I'm not real good at it. Reason 2: My sewing machine sucks. There may be a correlation there.

vintage lace headband diy by quiet lion creations

Anyways, this tutorial isn't as much sewing as it is embroidery. Simple embroidery. I can deal with that. Plus, most of the materials I used were recycled: lace remnants and vintage fabric, plus vintage satin ribbon as well.

vintage lace headband diy by quiet lion creations

Now, if you know me, I DO NOT like pink, or girly-type things. This one's for you guys. I know all my followers aren't into a hippie/boho vibe, so I've made something completely different here. A feminine hair accessory with plenty of girly glitz. It's called taking one for the team. You can thank me later.

vintage lace headband diy by quiet lion creations vintage lace headband diy by quiet lion creations

I do really like rhinestones, and these bright montees from Pandahall really added a more antique look, because they aren't super sparkly - they have that soft milky look which mimics rhinestones found in older jewelry. Pair that with some taupe and ivory pearls and you've got yourself a totally versatile headband. And, if you haven't already, check out the website Pandahall if you're an avid beader - seriously, I think they have everything that you could ever need.

Enough talking, let's start!


Step 1: Gather materials. Needed are 6mm pearls (mine from Pandahall), 8mm sew-on montee rhinestones (mine from Pandahall), lace scraps, ribbon, brocade fabric, sewing thread and needle.

I used a vintage brocade fabric with foiled flowers, that matched my more neutral-color rhinestones. Also, the flowers provided good sewing spots. If you use more of an abstract patterned fabric, find the coolest (or most interesting) parts to embroider on.


Step 2: Cut a small piece of your vintage fabric. Start sewing on the montees and pearls - I used the middle of the flower as my focal point. I also used a double thickness of sewing thread for sturdiness.


Step 3: Once you feel you have embellished enough (don't go overboard here), cut out your appliqué from the the rest of the fabric. I made two flower appliqués. You could use any number of appliqués, depending on the look you are going for.


Step 4: Cut out two pieces of lace - make sure these are long enough to go around half of your head (the other half of the headband will be ribbon). I cut them about 1.5" wide. I'm doubling up the lace for a sturdier headband. Stack these lace pieces right on top of each other.


Step 5: Start sewing on your appliqués to the lace. Again, use double-strength sewing thread so it holds better. I'd suggest sewing the appliqués a little off-center. Sew these on really good, passing up and down many times until you can feel they are super secure. Tie off thread and cut.


Step 6: Take a length of ribbon that is the entire circumference of your head, and double it. Cut. Repeat. Fold one of these pieces in half, sewing on the end of the lace around this fold. Sew really good to make sure the hold is secure! Cut ribbon off and repeat on other side to finish your headband.

vintage lace headband diy by quiet lion creations

To wear, simply tie ribbon in bow at back of head.
  vintage lace headband diy by quiet lion creations

Again, like most of my tutorials, this is totally customizable. Use any combination of colors and fabrics to reflect your style. You could also ditch the pearls and use Swarovski crystals or something super sparkly for a more luxe look.

vintage lace headband diy by quiet lion creations

Ignore my pale skin here (I actually might be part vampire?!) - you can see that this headband lies really nicely, because of the flexibility of the lace. Earlier I added it to an updo, but you can also go with long waves or even straight hair, using this as more of a head wrap as apposed to a headband.

vintage lace headband diy by quiet lion creations

So, if you're like me and hate sewing, I advise you to try this tutorial- trust me, you will be fine. This would look super-chic styled with an oversized white tee, dark denim skinny jeans and flats. Casual, but still super stylish. Agree?!

All images copyright Allison Beth Cooling for Quiet Lion Creations. Don't repost these photos without linking back to me and crediting me!

Sunday, April 19, 2015

carnivàle sparkle sunglasses +diy


So if you frequent my blog you obviously have already acknowledged my obsession with gems. I've embellished shoes, hats, shirts, nails and more - but never sunglasses. Well, my friends, now is the time.


These faux Prada glasses (find them here) were kind of plain - and I needed a way to dress them up.So after receiving some of this great sapphire rhinestone chain from Pandahall,  I first thought of using it in a jewelry tutorial. But, why not change it up a bit? It's ability to lay flat and bend/turn made it great for gluing on these frames.


I also added Cousin M'bellish flat backs to fill in some spots, and add more glitz. You can grab these or any other flat backs at Michael's, JoAnn, AC Moore and Walmart.


So totally luxe-looking, they definitely stand out - feel free to mix up colors here. I stuck with clear crystals, but using multicolors would make for a total Carnivale-type look!


Step 1: Gather materials. Needed are sunglasses -you can get the SAME ones I used (faux Pradas) here!-, E6000 glue, a toothpick, rhinestone cup chain (mine from Pandahall here) and flatback crystals (mine from Cousin's M'Bellish line here). You could also use Swarovski flat backs, Crystazzi flat backs or other similar styles.


Step 2: Start gluing. It's super simple - with the toothpick, place a small dab of E6000 glue at the edge of the glasses frame (I started at the center of my swirl). Lay the first rhinestone on this glue- then, simply keep adding dabs of glue, and laying your chain down. Because of the shape of my frames, I did this swirl in one separate piece.


I added another piece to fill out the arms of the glasses. Repeat with other side.


Step 3: Embellish. I again glued down crystal flat backs with dabs of glue, adding a fan-like pattern to the edges of my glasses. I trimmed just the top of the lenses with another length of rhinestone chain. I cut all my chain after gluing it, to make sure I wasn't too short or too long with my cuts.


Are you digging them? I'd pair these with denim skinny jeans, a graphic tee and sneakers. Add a crystal bib necklace if you want to go all out!


I love the blue / silver combo here, adding a modernity to otherwise retro-type glasses. A black / gold combo would create a very luxe, more goth vibe. What colors would you choose?!


All photos copyright Allison Beth Cooling. DO NOT post or use photos without linking to me and crediting me.

If you use this tutorial to make your own pair of glasses, post a pic to Instagram and tag me @quietlioncreations - I'll repost you!