Showing posts with label panda hall. Show all posts

Tuesday, July 7, 2015

crystal fairy rings +diy

crystal ring tutorial with Pandahall materials by Allison Beth Cooling of Quiet Lion Creations 
You can almost see the sparkle and twinkle of fairies flying around these glittery treasures! My newest tutorial combines gleaming rhinestone buttons and silver plated crystals to create delightfully dainty stacking rings. This is a beginner tutorial, so everyone can enjoy making these!

crystal ring tutorial by Allison Beth Cooling of Quiet Lion Creations

What I love most is the mix of seemingly simple materials (acrylic rhinestone buttons) and glass, Chinese crystal beads (not Swarovski this time) but the totally luxe look you get when stacking a few of these on top of another. Keeping each a different color also adds contrast. I feel that the primary colors in this scheme add a whimsical vibe; if you're more into a sophisticated look, I say go with neutral color crystals like clear, black, topaz and silver.

crystal ring tutorial by Allison Beth Cooling of Quiet Lion Creations

These are also great for kids. Since this tutorial is so easy - and definitely kid safe - they can have fun making many of their own!
 crystal ring tutorial by Allison Beth Cooling of Quiet Lion Creations
These only take minutes to whip up, and the list of materials is short and sweet. Should we get started?

crystal ring tutorial by Allison Beth Cooling of Quiet Lion Creations   

Step 1: Gather materials. You need stretch cord (I'm using Cousin Brand .8mm stretch cord), crystal buttons (specifically Pandahall 2-hole crystal acrylic buttons), crystal glass beads (specifically Pandahall silver electroplated faceted 4X3mm beads), wire cutters. Flatnose pliers and crimp tubes are optional - you can choose to either crimp your rings shut, or tie a knot and glue. I just tied knots and glued for this tutorial.


Step 2: Start out with a 5" piece of stretch cord. Thread on one crystal bead to the cord, then thread each side through the top of the button, catching the bead.


Step 3: Start stringing on beads on the ends of the cord, creating your ring band. It really couldn't be much easier - just thread on enough beads so that the ring fits on your finger snugly, but not super-tightly.


Step 4: To finish, tie a very tight square knot, cutting off the excess string with your wire cutters and covering the knot in super glue. You could also use your crimp here - I just choose to knot so the band isn't interrupted by the look of a crimp.

crystal ring tutorial by Allison Beth Cooling of Quiet Lion Creations

Of course these are kind of addicting, so I made many more - one in each color, of course! Wear them on all your fingers or as midi rings for a more bohemian-type fashion statement. I could also see these crystal rings working well with larger seed beads if you want less of a "shiny" look. But, why wouldn't you want to flaunt the glitz?! I'll leave you with more inspo pics to finish. Remember, if you follow this tutorial, post a pic of your project on Instagram and tag me @quietlioncreations. I'll repost you!
Peace out!

crystal ring tutorial by Allison Beth Cooling of Quiet Lion Creations

crystal ring tutorial by Allison Beth Cooling of Quiet Lion Creations
crystal ring tutorial by Allison Beth Cooling of Quiet Lion Creations crystal ring tutorial by Allison Beth Cooling of Quiet Lion Creations
crystal ring tutorial by Allison Beth Cooling of Quiet Lion Creations


COPYRIGHT
Because I take all photos for my blog, the images within this post are all copyright Allison Beth Cooling for Quiet Lion Creations. If you'd like permission to use a photo, email me at allison@quietlioncreations.com

Tuesday, June 9, 2015

Crystal Moccasins +DIY


Crystal moccasins? Why not?! These summery accessories are great for music festivals, parades, arcades, picnics, carnivals and more. Wouldn't you agree?


Just some quick sewing and gluing will have your tired moccasins looking supa' fresh in no time. I think the mix of colors here and those cool iridescent rhinestone flat backs mix perfectly.


Seed beads are traditionally what moccasins are embellished with, but you know I need to pull out the sparkle on every chance possible. You could even stud these for a more edgy vibe. That may be my next tutorial….who knows?! Are you ready to start?!


Step 1: Gather materials. Needed are a pair of moccasins, sewing needles, E6000 glue, fishing line, cabochons (Pandahall Tawaian Colorful Flat Back rhinestones), wooden beads (Pandahall Oval Wood Beads), seed beads (Pandahall Opaque Mixed Color Beads).


Step 2: Start by gluing on your flat backs - I tried to fill up as much space as I could, putting them in rows. Let dry.


Step 3: Cut a 2 foot long piece of fishing line, and tie a small knot right at the end. Thread the other end through your sewing needle, and start sewing on wood beads and seed beads. There is no particular pattern. I hate sewing so I just embellished a little bit. If you love to sew, go all out. It's hard to sew through this thick material, so I used flat nose piers to help me grab the needle and pull it. Tie another knot when finished sewing to hold everything in place, then cut off the excess fishing line. I used fishing line because of its strength and it's clear, so you won't see the thread!


Easy peasy. Pick any color combo you want - try shaped rhinestones (teardrops?) for an elegant look, or even spike studs for an edgy look. It's up to you!

All photos copyright Allison Beth Cooling. Do not post or reuse without crediting me and linking to me!

Friday, May 15, 2015

jewel globe pendants


These trinket necklaces remind me of something you'd find in Alice in Wonderland - little curiosities filled with sparkly whatnots, dangling from silvery chains and delightfully whimsical-looking. Crystal chatons, silver and gold flake, pearls, marquise gems and more complete my Jewel Globe necklaces, creating a multidimensional yet still dainty piece.


I like the "fragile" look of these globes (I mean, they are glass, so be careful!) and the fact that they can be totally customized- fill with your fav color materials and combinations of supplies.


I'll show you below exactly where to find all the materials I used in this tutorial, including those glass globe pendants of course. The majority of the beads and jewelry making supplies I used were from supply company Pandahall.


They are great for beginners, as no complex beading skills are required - simply fill your pendant, glue the topper on, and add to chain!


I would totally layer these necklaces with others (even mixing metal colors) for a totally luxe look. That pretty gold teddy bear (Tous look-alike) is a new favorite. Find a similar piece here: Gold Teddy Bear Tous Bracelet

Are we ready to get started?!


Step 1: Gather materials. I used imitation metallic craft flake, Pandahall Rhinestone Brass Chain (specifically their 3mm Silver Tone Rhinestone cup chain), Pandahall Glass chatons (specifically their 4mm Glass Chaton Rhinestones), Pandahall colored chatons (specifically their 4X2mm Cubic Zirconia Pointed Back Cabochons), silver chain, and Round Glass Globe Pendants (similar globes here on Amazon).  You will also need jump rings, a clasp, E6000 glue and pliers.


Step 2: Fill your glass globe with rhinestones. I used a mix of both shapes and added just enough to cover the bottom of the globe.


Step 3: With your pendant filled, gently add in some silver flake (using pliers - this flake is surprisingly "sticky" in a way, meaning it will stick to fingers! It's a little hard to work with). I added maybe 4 flakes or so. I wanted to keep the look dainty. Glue the globe stopper to the top with E6000 glue.


Step 4: To create the rhinestone trim, measure around your globe first and cut the right amount of chain - in my example, 6 rhinestones. Again, use a bead of E6000 glue around the globe top to adhere the chain. To finish the necklace, thread the globe topper through a thin chain and attach a clasp at the ends. I kept my chain long to balance out the larger pendant.


That's all there is to it! The look of luxe but in super simple steps. Create a bunch, all in different color schemes. Experiment with color palettes and mixes of crystals. That's what it's all about!


If you follow this tutorial and create a necklace of your own, post it to Instagram and tag me @quietlioncreations. I'll repost your project!

All photography copyright Allison Beth Cooling. Do not post or reuse without crediting me and linking to me!

Saturday, April 25, 2015

vintage lace headband diy

vintage lace headband diy by quiet lion creations

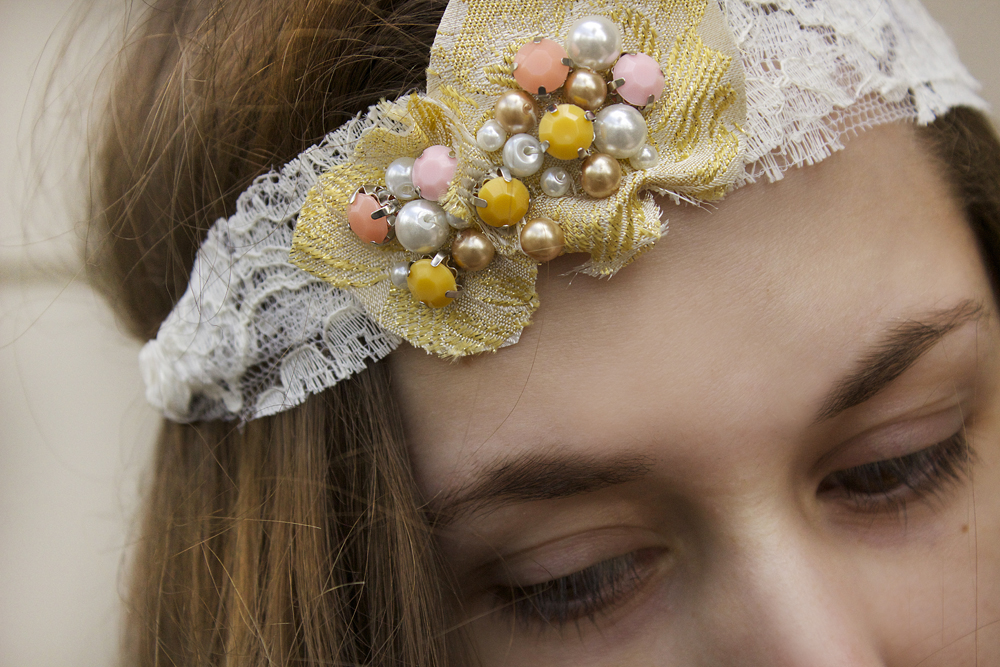
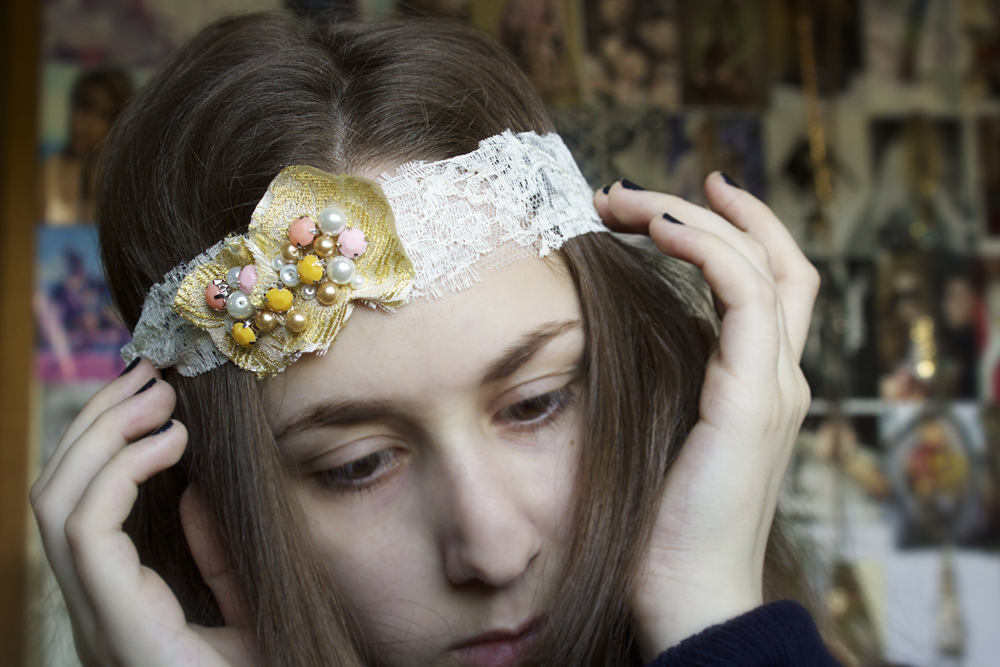
A mix of lace, gilded fabric, pearls, rhinestones and ribbon make for a very vintage-looking accessory! As you may know, I am not a huge fan of sewing. Reason 1: I'm not real good at it. Reason 2: My sewing machine sucks. There may be a correlation there.

vintage lace headband diy by quiet lion creations

Anyways, this tutorial isn't as much sewing as it is embroidery. Simple embroidery. I can deal with that. Plus, most of the materials I used were recycled: lace remnants and vintage fabric, plus vintage satin ribbon as well.

vintage lace headband diy by quiet lion creations

Now, if you know me, I DO NOT like pink, or girly-type things. This one's for you guys. I know all my followers aren't into a hippie/boho vibe, so I've made something completely different here. A feminine hair accessory with plenty of girly glitz. It's called taking one for the team. You can thank me later.

vintage lace headband diy by quiet lion creations vintage lace headband diy by quiet lion creations

I do really like rhinestones, and these bright montees from Pandahall really added a more antique look, because they aren't super sparkly - they have that soft milky look which mimics rhinestones found in older jewelry. Pair that with some taupe and ivory pearls and you've got yourself a totally versatile headband. And, if you haven't already, check out the website Pandahall if you're an avid beader - seriously, I think they have everything that you could ever need.

Enough talking, let's start!


Step 1: Gather materials. Needed are 6mm pearls (mine from Pandahall), 8mm sew-on montee rhinestones (mine from Pandahall), lace scraps, ribbon, brocade fabric, sewing thread and needle.

I used a vintage brocade fabric with foiled flowers, that matched my more neutral-color rhinestones. Also, the flowers provided good sewing spots. If you use more of an abstract patterned fabric, find the coolest (or most interesting) parts to embroider on.


Step 2: Cut a small piece of your vintage fabric. Start sewing on the montees and pearls - I used the middle of the flower as my focal point. I also used a double thickness of sewing thread for sturdiness.


Step 3: Once you feel you have embellished enough (don't go overboard here), cut out your appliqué from the the rest of the fabric. I made two flower appliqués. You could use any number of appliqués, depending on the look you are going for.


Step 4: Cut out two pieces of lace - make sure these are long enough to go around half of your head (the other half of the headband will be ribbon). I cut them about 1.5" wide. I'm doubling up the lace for a sturdier headband. Stack these lace pieces right on top of each other.


Step 5: Start sewing on your appliqués to the lace. Again, use double-strength sewing thread so it holds better. I'd suggest sewing the appliqués a little off-center. Sew these on really good, passing up and down many times until you can feel they are super secure. Tie off thread and cut.


Step 6: Take a length of ribbon that is the entire circumference of your head, and double it. Cut. Repeat. Fold one of these pieces in half, sewing on the end of the lace around this fold. Sew really good to make sure the hold is secure! Cut ribbon off and repeat on other side to finish your headband.

vintage lace headband diy by quiet lion creations

To wear, simply tie ribbon in bow at back of head.
  vintage lace headband diy by quiet lion creations

Again, like most of my tutorials, this is totally customizable. Use any combination of colors and fabrics to reflect your style. You could also ditch the pearls and use Swarovski crystals or something super sparkly for a more luxe look.

vintage lace headband diy by quiet lion creations

Ignore my pale skin here (I actually might be part vampire?!) - you can see that this headband lies really nicely, because of the flexibility of the lace. Earlier I added it to an updo, but you can also go with long waves or even straight hair, using this as more of a head wrap as apposed to a headband.

vintage lace headband diy by quiet lion creations

So, if you're like me and hate sewing, I advise you to try this tutorial- trust me, you will be fine. This would look super-chic styled with an oversized white tee, dark denim skinny jeans and flats. Casual, but still super stylish. Agree?!

All images copyright Allison Beth Cooling for Quiet Lion Creations. Don't repost these photos without linking back to me and crediting me!