Friday, September 27, 2013

Autumn Wood Keychain Charm


This is a simple and quick tutorial for a cool keychain charm. I was inspired by the turn of fall, and these super unique wood-print acrylic beads by Cousin Corporation. I thought mixing them with other textures, but beads of the same color, would make for a nice decoration for my key fob!


This kind of has a tribal-meets-backwoods feel to it, which I like! You can really use any "bead soup" here; feel free to make a combination of beads and colors you prefer!


Just a little something extra to spice up a boring keyring!
Let's get started!


Step 1: Gather materials. Needed are scissors, a key ring, wood beads (I used small 5mm ones), wood print acrylic beads (I used Cousin Flat Gold Beads), hemp cord (I used Cousin Brown Cord) and gemstone beads (I used Cousin Amber Gemstones).


Step 2: Cut a 4' length of your hemp and fold in half; at the center, make a Lark's Head knot (thread the open ends through the top loop and pull tight.


Step 2: String on one wood acrylic bead and make a square knot. Add on one large wood bead, make a double square knot, and one gemstone bead (make another double square knot).
You can reference my tutorial here on how to make those double square knots.  


After your gemstone bead, add on the square acrylic wood bead. To finish, add small 5mm wood beads on each hemp string; make a knot to hold the beads on and then trim the strings.


How easy?! This pattern is great because you can mix and match the beads to suit your style. I used a mix of woodsy beads and gemstones. If brighter colors are for you, feel free to use them!


This color combo and texture combo is super cool, and is pretty gender-neutral. These are great for guys and gals, because we all have keys! Why not make them look cooler?!!


If you share/use/post this tutorial, please link back to me. It is much appreciated! All photos copyright Allison Beth Cooling.


Monday, September 16, 2013

Color Pop Bobby Pins


Fall fashion is in full swing! One of my favorite shows was the Ralph Lauren show at NY fashion week. It started off with an achromatic black and white scheme in simple silhouettes. Then, at the end, it was a huge surprise when a bright green sheath dress walked down the runway, followed by a rainbow of other colors! Totally unexpected, I knew this would be a great inspiration for a tutorial.


My Color Pop Bobby Pins are made from....can you guess....??? Legos! Flat legos work extremely well at creating a cool, minimalistic accessory but with a pop of rainbow, sparkly color! Just like the RL show!  


These are a really cool accessory that people will keep asking about; they would never guess that Legos are used as the base!


The little notches on the Legos are great places for gems to sit, and remind me of models in their dresses strutting down the catwalk! Also, all you really need to know how to do for this tutorial is glue; no hard work here!
Let's get started!


Step 1: Gather materials. Needed are bobby pins, white nail polish, flat legos (about 1.75" long), flatback gems (5 or 4mm), and E-6000 glue. 


Step 2: Use the white nail polish to paint the edges of the lego, all the way around. Make sure to not get any on the top of the lego, just the edges!


Step 3: Get out your flat backs; the order that I used is green, yellow, orange, red, blue, then green again. It's the same order as the actual runway show!


Use a dab of your E-6000 glue and put a dab on top of each lego notch. Add on your gems in the correct order! 


Let all the glue dry.


Step 4: Glue on your bobby pin to the back. I used E-6000 glue because it's a better hold than hot glue. If you want to use hot glue, which is easier, that is fine, but keep in mind the glue may pop off the lego if handled roughly. Let the glue dry.


Instructions and photos (excluding runway photos) copyright Allison Beth Cooling. Do not use without permission and do not claim as your own!


Sunday, September 8, 2013

Delicate Crystal Tassel Bracelets


These dainty bracelets by Orelia are some of my favorites. I love to layer bracelets, and these lend themselves very well to that! They have a cool simplicity but still are unique with that cotton tassel at the clasp. The addition of a small metal bead in center sets them apart from just any other crystal bracelet!


My tutorial will show you how to create bracelets inspired by these designs, and they actually come together super-quick! You can make a ton of these in no time at all. Stick with a solid color crystal and use the same color throughout the bracelet. For the tassel, use a contrasting color for a pop!


I used Cousin Brand crystals, beading wire and metal beads for this project. Follow Cousin on Facebook and Twitter  for cool sweeps and other awesome projects! 
Let's get started.


Step 1: Gather materials. Needed are pliers, beading wire (I used from Cousin), embroidery floss, a jumpring, two crimps, a clasp, and 4mm crystals (I used the grey crystals from Cousin's Jewelry Basics Pearl/Crystal Mix), and finally a 4mm metal decorative bead (I used Cousin's Fluted Silver beads).


Step 2: Cut a length of your beading wire that is the lenght you want your bracelet, plus 2". Add a crimp and clasp to the very end. Start stringing on your crystals. When you get to the center of your bracelet, add on your metal bead. Add on the rest of the crystals to finish out your bracelet. This pack has enough crystals to get one bracelet finished! You can use the pearls to make many other things, such as my Mathias Chaize bracelets!


Step 3: Make a tassel. Take your embroidery floss, and wrap 9 times around your index and middle fingers. Cut the thread at the bottom of the wrap. Gently take off your fingers (do NOT wrap super-tight!)


Step 4: Add a jumpring to catch all the wraps; then, cut a small piece of floss and tie a knot around all the threads, right under the jumpring. Cut flush to the tassel.


Cut off the ends horizontally, creating your tassel! Make sure all the ends are the same length. Add this jumpring onto your bracelet; finish by adding a crimp, then your clasp, and then thread back through the crimp. Pull the wire to tighten, and then crimp shut and cut the excess wire flush.


I kept the scheme sophisticated and cool; neutrals with a pop of red and blue! However, if you like brighter accessories, go Kate Spade on us try a combo of emerald crystals with watermelon-pink floss! Go nautical with a mix of red floss and blue crystals, with a white pearl in the center.
Follow the fall fashion trends with a pastel mix of aurora borealis-coated clear crystals with a pale pink tassel.
Guys could even make these with wood beads, and a metal bead center.
The possibilities are endless!


These literally took me less than 10 minutes to make. These would also be great friendship beads, maybe if you had a heart bead center, or even a metal alphabet bead.


Instructions and photos copyright Allison Beth Cooling. Do not use without permission and do not claim as your own!

Sunday, September 1, 2013

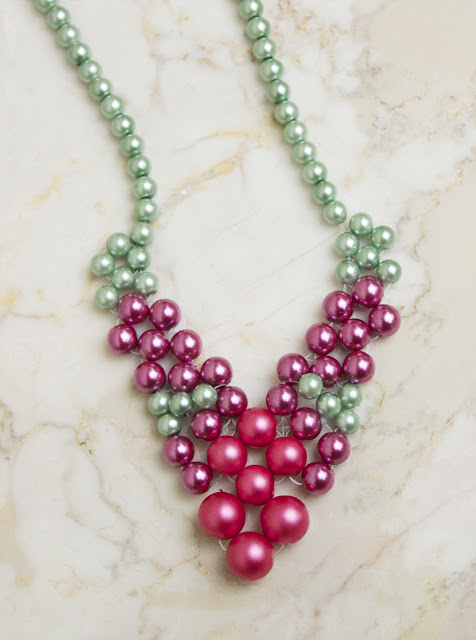
The Valencia Necklace; Full Tutorial!


This is my first "beadwork" post! I usually do posts that are pretty simple and fast to finish! This will take a bit longer and is a bit more tedious, however, the results are worth it!


This necklace makes a very cool "v" shaped pattern, which can be dressed up with a sheath dress for dinner parties, or dressed down with a tee and jeans for a day shopping. It is quite versatile and can be made with any color/s.


The featured pearls are all from Cousin! I love these pearls because they have a great feel to them; they aren't cheap-feeling, like many other pearls I have used! They are very shiny and have a great almost metallic coating, perfect for using in a bead project!
You can buy Cousin beads at Michaels or JoAnn, or even Amazon


Step 1: Gather materials. Needed are scissors, fishing line, pearls *ALL FROM COUSIN* (6mm light green, 8mm fuchsia pearls, and larger 10mm or 12mm pearls.) I pictured those dark green ones but didn't end up using them, sorry! Also, you will need a clasp, two crimps, two looped headpins, and a end cones or bead caps to finish.


I emptied out all the pearls into a glass, for easy stringing.


Step 2: Cut about 5' of your fishing line. Add on four pearls (the large 10mm ones). Thread the string in your right hand back through the fourth bead, in the opposite direction, to create a cluster. Now, add one bead on your right string and two beads on your left string. Thread the string on your right side back through the second bead on your left string. You will now have two clusters, on top of each other. String three pearls (the 8mm ones) on each right and left string.


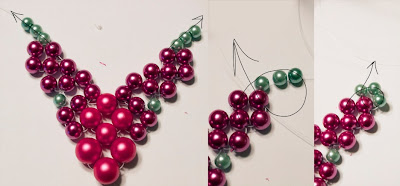
Step 3:  Take each of your strings, and loop them back through the outside bead of the second cluster, then through the top bead in this cluster (if you need help you can follow the arrows which show the pattern of the string). Now, add on three more beads on each right and left string. Now, string back through the top bead in the last cluster you made.


Step 4: Add on one green pearl (the 6mm one) and thread through the outermost beads in each cluster.


Step 5: Thread on three beads on each of your right and left strings. Thread the string back through the bead right above the green pearl. Now, string through the topmost bead in the cluster. 


Step 6: Add on three beads and thread back through the outermost bead in the last cluster. Then, thread back through the first bead you added in this step.


Step 7: Now, add three green pearls. Thread back through the outermost bead in the last cluster and through the first green bead you added in this step.


Step 8: Thread on three green beads, thread through the topmost bead from the last cluster, and back through the first green bead you added in this step.


Step 9: Thread on green pearls, until the necklace is as long as you want!


To make the last green cluster, simply cut about a foot of fishing line. Find the bead about two clusters away from your topmost light pink one (view picture) and tie a knot at one end of the line. Thread through this bead. Add on two green beads, and pass through the bead below that green bead added in step 4 (view picture). Weave through as the picture shows (3 beads) until you are at the top; add a green bead.


Weave through the green bead added in step 4. Weave through the bead left of this green bead (picture) and tie off with a small knot, then cut flush. It helps to add a dab of superglue to adhere. Repeat with the other side of this necklace; the steps will be the same, but directions reversed. If you get confused you can flip the necklace over so the directions will be the same; however, the green bead is woven to sit "on top" of the others. If you flip the necklace over make sure to weave the bead so it sits just like the side you have done before. To finish, add a crimp then a looped headpin, and crimp shut. Take that headpin and weave through the bead cap; loop and finish off with a clasp. Repeat with the other side.


See those two green beads, the sort of sit on top of the necklace?


This pattern is great in all colors, or one color if you want it to be super simple! Try maybe with crystals too for a super-shiny look!


Pattern and all photos copyright Allison Beth Cooling. Please do not use/post without linking back and crediting me!