Tuesday, April 7, 2015

ecuador necklaces +diy

ecuador necklaces

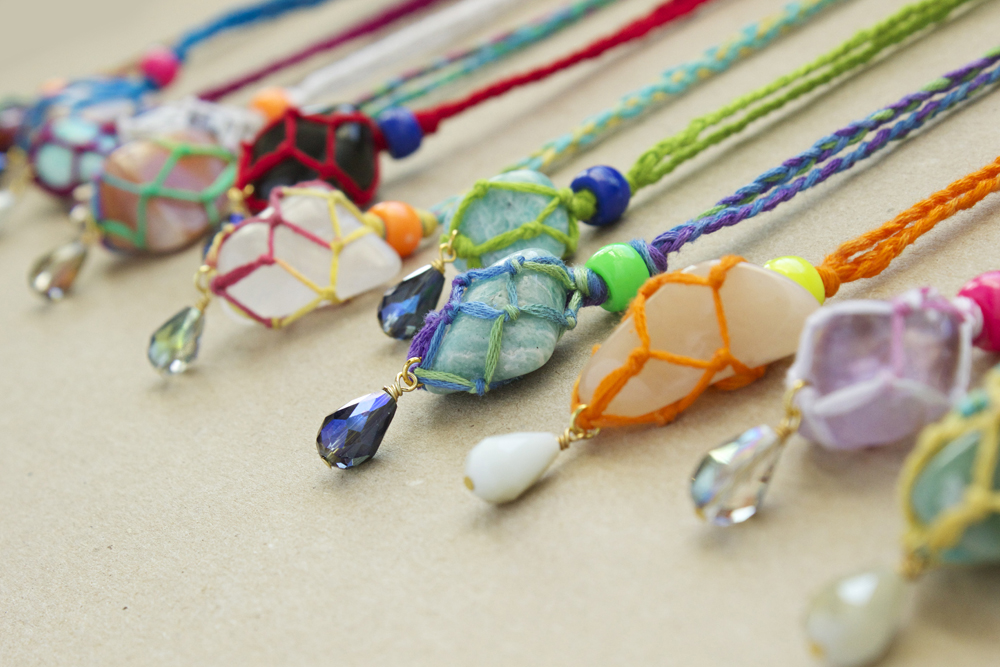
A sea of rainbow colors, polished gemstones, sparkly crystals and overall good vibes.
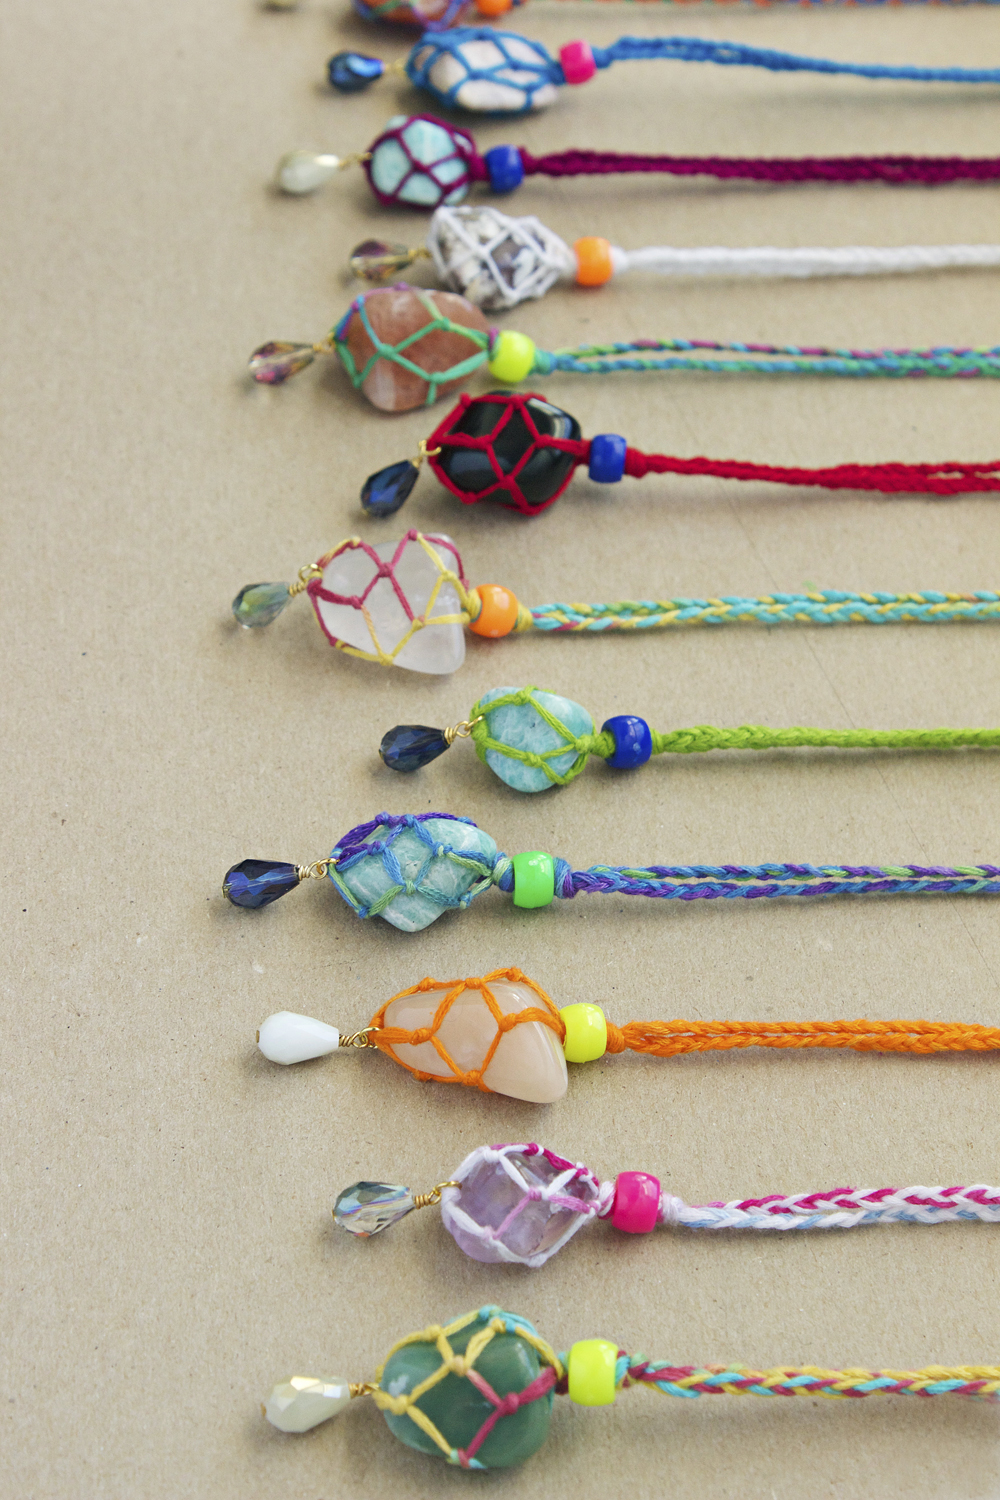
wrapped rainbow gemstone necklaces

This is a project that I've been hiding for a while - a while back I got a request (from my cousin Eric) to make some colorful necklaces for his friend Diego's mom and sister. Diego was an exchange student from Ecuador, and Eric wanted to send Diego back with some presents for the family. Of course, I thought, that's a great excuse for me to make some jewelry (but when do I need an excuse?!)...

wrapped gemstone necklaces with cousin brand products

So I made two necklaces - one with an Apache tear gemstone dangle (quite similar to the black/red necklace you see above) and another Adventure necklace. If I haven't told you before, Eric (along with his dad) tumble their own rocks. They buy large chunks of earth, with the promise of gemstones inside. They think of it as a hobby - I think of the rocks as awesome additions to my jewelry supplies inventory. What's also great about these rocks is because they are hand tumbled with care, as opposed to bought at a store, I feel they have more powers, in a way…..


So back to the story. These two necklaces traveled to Ecuador to meet Diego's sister, Dome, and his mom. Dome wore her's to school, and the class, along with the teacher, loved it. So, why not make a batch for the whole class?! I surely have enough rocks (yes, bins of them)….and thought that spreading the colors, sparkles and good energy overseas was definitely worth it.


So I first got the info - 12 necklaces I'd need to make, 11 for the students and 1 teacher. The class was an all-girls class, so I didn't need to worry about gender-neutral colors. Dome's school is the Unidad Educativa Nuestra Familia in Cuenca, Ecuador. Knowing how long overseas travels are, I made them quickly to make sure they'd arrive in good time.


As a Cousin Corporation of America Ambassador, I called upon Cousin to grant me with some supplies (other than the gemstones and embroidery floss that I already had) and they happily gave me my requested beads and findings.


I even recorded how I had made these gemstone necklaces, just for you all! It's a macrame pouch that holds these rocks in place. Don't worry, they are easier to make than they look. I just whipped up 12 in no time, you can surely make one without trouble.
Look below.


Step 1: Gather materials. You will need embroidery floss, pliers, gemstones - if you don't have a stockpile like I do, you can get a tumbled stone mix from Amazon, pony beads (mine from Cousin), crystal teardrop beads (mine from Cousin Jewelry Basics), jump rings, headpins and scissors.

A special thank you to Cousin for working with me on this project!


I first worked on getting colors pinned down. I made them in all hues, but I demonstrate the steps with white floss so it's easy seen!


Step 2: Cut four equal lengths of embroidery floss. I cut a little more than 4 feet each time and that leaves me with plenty. Tie all four in an overhand knot right in the center of the lengths. Then, divide each side into two pairings of two strings - tie these in knots together.


Now, divide these pairings into individual strings - tie the center two together. Divide these pairings on the lefthand side so you have four separate strings again. Tie each to the one next to it. Look at the picture for help! You should have a little diamond shape.


Do this once again, tying each string to the one next to it like in the last step. It should form into somewhat of a pouch. Stick your gemstone in, then tie a tight knot at the top. I added a bead dangle with a jumpring at the bottom of the pouch. I then knotted on a pony bead for a bright neon pop! To finish, divide the strings into two groups of four- braid each group together and then overhand knot to finish. These will be long necklaces, so no clasp is needed!


I made these mainly in bright colors, knowing kids were the recipients and the fact that they are Ecuadorean, whom as a culture love bold color. I figured the mix of the neon pony bead, elevated a little with the crystal dangle, made for a kid-friendly but still somewhat "fancy" accessory.


Shipping these did take a while, but I was assured by Eric that the necklaces had reached their destination and that the class loved their new bling. Also, if you're wondering, that's a water decal on my nail- they are SO much easier to use than sticker decals! Find a similar pack here.

Here is Dome receiving the necklaces! I had an awesome time picking out the rocks, making the necklaces and packaging them up for shipping. This was my first "overseas" shipment of my jewelry, so I was indeed nervous about them finding their way. Everything went smoothly, fortunately, which makes me eager to do something like this again.

Enjoy!


COPYRIGHT
Because I take all photos for my blog, the images within this post are all copyright Allison Beth Cooling for Quiet Lion Creations. If you'd like permission to use a photo, email me at allison@quietlioncreations.com

Friday, April 3, 2015

amethyst crystal belt


Please - contain your excitement. I know any of my sparkle lovers are going cray right now over this totally luxe, totally glitzy belt. And the best part? You can totally make this. Yep. It's not hard, trust me.


A "river" of amethyst glass crystals, contrasted by vintage-style gold rhinestone spacers and chunky gold chain makes for a totally royal accessory. The technique of just simply stacking these beaded charms next to another between chain, like a crystal sandwich if you will, allows for maximum sparkle and shine.


What's also great is the versatility; you can wear it as a belt, like through your jean loops, you can clasp it over a tunic top or blouse, and you can even wear as a necklace, I'll show you below. This is entirely made from Pandahall materials, which you can buy online (I've got the full list in the tutorial). No, these aren't Swarovski crystals, but they could totally pass as some. Right?!


My birthstone is amethyst, so the deep purple color totally matches my style. You could really use any color crystals, and any color chain. What's great about this chain is that it's aluminum, so it's lightweight. The crystals do get pretty heavy, so using a lighter-weight chain does help. I've also finished with a chain and crystal tassel, because, um why not?


Exhibit A: over a tunic top. Please ignore the somewhat broken hair tie on my wrist, and focus on those sparkles. Adds a totally dressy vibe to an otherwise somewhat casual outfit, right?!
Enough talk, let's begin.


Step 1: Gather materials. Needed are pliers (wire cutters, roundnose for loop making, flatnose), 5X9mm gold aluminum chain by Pandahall, 8X6mm Purple faceted rondelle crystals by Pandahall, 10mm crystal spacers (similar Pandahall ones here), a gold clasp, and either thin gold wire OR eye pins (I have headpins shown here to make one beaded dangle, so technically you'll need one headpin).


Start by making bead charms by adding a crystal, spacer, crystal, spacer and crystal to an eye pin. To make a loop on the other side, bend the eye pin at a 90 degree angle to the last crystal, and cut the wire about a half centimeter away from the crystal. Form a loop (with roundnose pliers) out of that short piece of wire to finish the charm. Keep creating these charms. I ended up with 23 charms.
Now, cut a long piece (measure around your waist and then add about 10" or so) and start attaching one side of each charm to the links (starting in the center then working outwards on both sides) ONE LINK APART. This spacing will keep everything from bunching up.


You should have something that looks like this when you are done adding all charms. Now, with a piece of chain as long as the first one, start attaching the other side of each charm, starting in the center of the chain. You should end up with a long flat panel like you see in the third image.


With the ends, simply cut each chain four links away from the last beaded charm. Then, with a single piece of chain (you can use the rest of a piece you just cut off), group the two loose ends together. Do for other side as well. It should look like the first image. I then made a bead tassel with extra chain and beads, and attached this with a jumpring to one side of the panel. For the two loose ends of the belt, attach a clasp to one side and bead dangle to the other.


** GO BOHEMIAN

So there really is no right or wrong way to wear this belt. You could put it through the loops of distressed jeans, pair it over a long tunic top (as I've done above), or throw it on with something totally hippie like a tie dye shirt. The whole point is its versatility; I've even got pics above of how it looks as a necklace. Because why not?! This would be a great accessory for the music festival season (hello Coachella, Lolla, etc). BTW, if you want to know how to make that arm cuff (on Nikoletta at the right), head over to my Crystal Armband tutorial here.
If you're not into the whole gypsy look, I'd style this with a black tunic top, leather leggings and ankle booties for a more upscale vibe. What's great is that you can make these belts in different colors; try a simple clear crystal plus silver chain for a modern palette. Or, go with black crystals and gunmetal chain for a gothic punch. You could even use gemstone beads (maybe turquoise rounds with copper chain?) for a more earthy, rustic feel. If you do follow this tutorial, be sure to post your creation to Instagram and tag me @quietlioncreations - I'll repost you!


Total luxury without the price tag. I'm thinking that some other cool combinations might be clear crystals and silver chain for a super modern look, turquoise crystals and copper chain for a southwest look, black crystals and gunmetal chain for a slightly goth look, or even use pearls instead of crystals for a vintage vibe.


Exhibit B: as a necklace. Same tunic top. Different look. You dig?


A special thanks to Pandahall for these awesome supplies! You can follow them on Facebook for product updates and more.


Hope you had as much fun making this as I did. And remember, if you follow any of my tutorials, post an image to Instagram and tag me @quietlioncreations - I'll repost you!!
All photos copyright Allison Beth Cooling. DO NOT POST OR REUSE WITHOUT CREDITING and linking to me, thanks!

Wednesday, April 1, 2015

Spring's Spell Lookbook

generation bliss spring lookbook 2015- photography copyright Allison Beth Cooling for generation bliss blue blouse with tassels - photography copyright Allison Beth Cooling for generation bliss lucky clover dress- photography copyright Allison Beth Cooling for generation bliss shakespeare in spring - photography copyright Allison Beth Cooling for generation bliss andrew czupta in generation bliss' jared lang linen shirt - photography copyright Allison Beth Cooling for generation bliss street style - model andrew czupta. copyright allison cooling for generation bliss sfizio italy striped dress- copyright allison cooling for generation bliss ela czupta in filigree shirtdress - copyright allison cooling for generation bliss spring jewelry-  photography copyright Allison Beth Cooling for generation bliss martine clutch - photography copyright Allison Beth Cooling for generation bliss flowers for spring - photography copyright Allison Beth Cooling for generation bliss flowers for spring - photography copyright Allison Beth Cooling for generation bliss filigree dress - photography copyright Allison Beth Cooling for generation bliss grand entrance clutch by generation bliss- photography copyright Allison Beth Cooling for generation bliss spring dresses generation bliss- photography copyright Allison Beth Cooling for generation bliss spring purses- photography copyright Allison Beth Cooling for generation bliss athena dress modeled by olivia czupta- photography copyright Allison Beth Cooling for generation bliss spring rhinestone accessories- photography copyright Allison Beth Cooling for generation bliss spring dresses at generation bliss- photography copyright Allison Beth Cooling for generation bliss generation bliss- photography copyright Allison Beth Cooling for generation bliss generation bliss spring lookbook- photography copyright Allison Beth Cooling for generation bliss

Spring's Spell: feminine, flirty dresses and accessories that fit perfectly into spring's romantic new beginnings. For men, that means tailored pieces with a sharp sense of style. Combining grungy brick, cracked concrete and an "alleyway" landscape made for the perfect backdrop. Contrasting this with fresh spring foliage and flowers, sweet silhouettes and graphic prints completed the "opposites attract" look. All pieces used in shoot are available at generation bliss, or on generationbliss.com. Lookbook shot on-scene in Lemont, Illinois.
Modeled by Ela, Olivia and Andrew Czupta. All photos copyright Allison Beth Cooling for generation bliss.