Wednesday, May 28, 2014

Ice Galaxy Foiled Nails


Just a few shots of my metal-flecked nail design!


I used Born Pretty Store silver metal nail foil. I first did a white gel manicure using Sally Hansen UV set gel polish White Away. Then, I put a thin top clear coat and pressed the foil sheets down in multiple spots on my nails. after you lift up the foil, some sticks to the nail, creating that "flecked" design.


You can find this type of foil and all other colors here.
I specifically used this foil for my manicure here!

Get connected with Born Pretty!


Tuesday, May 20, 2014

Lady Lace- Easy Pedicure


This time, I'm using water decals from BornPrettyStore.com on my toes for a simple and easy pedicure.
Born Pretty has a TON of different beauty products, jewelry, clothing pieces and other great accessories. What I love most is their extensive collection of nail art products!
Their prices are great- you can get nail decal sheets for less than a dollar. That means a lot of bang for your buck!
Using water decals for your toes is so much easier than using stickers. If you are doing your own pedicure, you don't have to place the decal in the exact spot you need at first, the water decal can slide a bit to fit where you need it!


I am using a lace decal here along with a pink and shimmer polish for a vintage-inspired look.
If you love nail art and beauty products, Born Pretty is right up your alley.
Get connected with them!


Step 1: Paint your nails a base coat. Then, paint a sheer shimmer on top of every nail but the big toe!
I used OPI Pink Flamenco base and then a Sinful Colors Purple Diamond for the shimmer.


Step 2: Place the biggest lace decal right on the corner of your big toe. For info on how to use water decals, view my Royal Teal manicure post.
Make sure your nail is wet, along with your fingers, so that the decal can be moved into place! Let everything dry, then finish with top coat!


Thursday, May 15, 2014

Sparkle Strands Bracelets


I'm on a crystal kick.


I had some Cousin brand crystals and wanted to make yet another super-sparkly accessory out of them. If you want an equally sparkly bracelet to match your Crystal Amulet necklace from my last tutorial, these are super quick to whip up. The best part is that you can make them in any color scheme you want, and they require no intense skills to finish. 


All these bracelets consist of is multiple stretch-cord strands grouped together with another strand. I loved the cool electroplated rainbow finish of the Cousin crystals in the bronze-colored bracelet, so I paired those beads with silver and caramel-colored crystals to make a cool, eclectic scheme. I was inspired by the blues and aquamarine tones to make the other bracelet, offsetting the lightness of the colors by black and deep blue crystals.


I've also included Crystazzi crystals, which give that rich color. You can also add pearls or glass beads if you want a difference in texture and material!
Be sure to follow Cousin brand on:


Let's get started!


Step 1: Gather materials.
All that's needed are:
-Crystals. For the bronze bracelet I used a variety of Cousin brand crystals, including the 4mm bronze bicones. Also, I used these cool electroplated crystals from Cousin which were more helix-shaped. 
-Stretch cord. I am using .5mm Cousin brand stretch cord here, you can find this on Amazon and in craft stores.
-Flatnose pliers, mine are again from Cousin.


To make the first bracelet, simply cut a piece of your stretch cord that is 1.5 times the length of your wrist. Simply add your selected crystals and bead until the bracelet is as long as you need it. Add on a crimp bead, and thread the other side of cord back through the crimp, and crimp shut. Cut off the excess.


Continue making these bracelets until you have abut 5-6 strands. To group them all together, simply cut a 6" piece of stretch cord, and thread on enough crystals to go around the bracelet bunch. Add on a crimp, and crimp shut. Cut the excess off. You should have a complete bracelet!


These are great bracelets to throw on with every outfit. They add that glam factor and can be worn by themselves, or paired with other bracelets. 


The ease of these bracelets is that they are on stretch cord, so no need to try to clasp it with your other hand, which is always difficult, right?! Just be careful with the stretch cord, don't make the bracelets too tight because stretch cord sometimes has the tendency to snap if pulled tightly. Keep the bracelets a little loose and you will be all set.


All images and text copyright Allison Beth Cooling. Do not post/use images without linking back to me.

Saturday, May 10, 2014

Candy Shoppe Amulet Necklaces


Sparkle and shine galore! My newest tutorial features delicate wire-looped beads connected into a long, glittering chain! They remind me of little sparkly candies sprinkled about, with all the different shapes, cuts and sizes.


These amulet-style necklaces are perfect for merging a more bohemian style with a super glam, yet slightly dainty look. What's also great is that you can use up all the "bead soup" you have laying around to make a bunch of these layering necklaces.


I've made three necklaces with various color palettes and beads from Cousin brand. I'm especially loving those cool two-toned mirror beads. You can find these supplies at JoAnn Fabrics, Michaels, AC Moore stores, Beverly's Fabrics and even Walmart!
Be sure to follow Cousin on:
for inspiration, projects, news and more!


I made these necklaces pretty long, but you can vary the length simply by making less beaded lungs. Also, you can make a couple in different lengths and wear them together.


This is a perfect beginner tutorial, because all you need to know is how to make wrapped loops. Attaching the pendant on bottom is as simple as adding a jumping, and you are all set! 
Let's get started.


Step 1: Gather materials. Needed are:
-An assortment of beads (crystals, pearls, metal, glass, whichever you like). I am using various strands by Cousin. Make sure that the colors compliment each other!
-Silver Wire, 24 gauge. One roll of Cousin brand (40') can get you 3 necklaces. 
-Pliers (roundnose and wire cutting ones)
-A large pendant bead. My rhinestone one is from Cousin as well as the pendant used on the pink necklace
-Jumprings if using pendants


Step 2: Make the links. Cut about 3" or so, and form a wrapped loop at top with the round nose pliers. Add your bead. Bend the wire at a right angle to the bead, and make another wrapped loop. Cut off the excess. You have your first link.
To save wire, don't cut huge pieces because you will end up just cutting all the excess off, and this is wire you could have used! Keep it to a couple inches, even less for small beads.


Step 3: Repeat. Keep repeating the links, making sure to catch one loop within the last link's loop to connect the chain. Alternate beads. Keep going until it is the length you like, making sure you can fit it over your head to put on.   Simply add your pendant anywhere on the necklace to finish with a jumpring!


The colors here were inspired by this image below I took while in Naples, Florida.


That green/teal/blue/golden look.


I like the ease of these necklaces. You can wear them alone, or layer them up for my favorite bohemian look! Plus, these are great for summer because they are lightweight and less chunky than the previous winter/fall style jewelry.


Even though I used all silver wire here, feel free to use gold, or copper, or gunmetal for different looks. 


Have fun! If you use this tutorial, post the finished product to Instagram and tag with @quietlioncreations --I will regram it! 
Follow me on Instagram @quietlioncreations too!


All photos and instructions copyright Allison Beth Cooling. Do not post/use images without linking back to me.

Saturday, May 3, 2014

Creepy Crawly……Spider Jewelry!


Eek!


Spiders!


My newest endeavor highlights a slightly eerie yet interesting side of jewelry-making!


My first creation: the beaded wrap bracelet. I used the resin to create a larger focal bead using three spider  "helmets"….. 


I was given some tarantula molts from my Mad Scientist cousin Eric. They were from his Biology labs at college. He wanted a way to preserve these little guys for good; so, I thought of embedding them in a resin charm. I sorted through all the various fangs, helmets and other whatnots, I selected the most intact specimens and set them aside. I was worried that they would collapse or disintegrate, but alas, they held up fine!! I did encounter one problem working with the natural material, which I mention later on. I don't know why someone would want to collect spider molts in the first place, but they end up making super-cool and unique jewelry!! I asked Eric to give a little insight as to how and why these spiders molt. Below I have some quips straight from him….you didn't think you'd learn about science on this art blog, did you??!

And here, an explanation of the molts used in the bracelet via Eric: 

"The two small cephalothorax molts for the bracelet came from a species called Hogna helluo, recently re-named Tigrosa helluo. The molts came from two females. The spider is a large species of American wolf-spider, with females having body lengths as long as 21 mm and males having body lengths as long as 12 mm. Being a wolf spider, these are very dedicated mothers, as she will carry her babies (of which she can have 100's at a time) on her abdomen for several days after they hatch as they feed off the yolk. Finally, the bigger cephalothorax molt in the bracelet came from the tarantula Hysterocrates gigas, commonly named the Giant baboon spider or the Cameroon red baboon spider. Kind of cool, it is a dark brown color right before it molts but then turns a jet black color right after a molt. Its leg span can reach about 8 inches, and though scarily voracious when it feeds (often gathering 3 live crickets in its mouth at once), it is relatively shy, and is a burrowing tarantula, preferring to hide in little underbrush alcoves."


Now, resin is NOT SUPPOSED to have ANY bubbles. If there are bubbles in your resin, you are doing something very wrong. It should be crystal clear, like glass.


As you can see, there are MANY bubbles here. I am thinking there are two reasons for this…..
1. I didn't want to fish out all the bubbles because I was afraid of the fragility of the spider specimens. If there were bubbles underneath the helmets, I figured I should just leave them instead of accidentally ripping the helmet.
2. Since the helmets are natural material, bubbles were forming during the resin curing process. Air was trapped in the tissues and leaking out into the rest of the resin, being trapped there forever.


Even with the bubbles, these resin charms are great for preserving these scientific little specimens. 
With this resin charm acting as the focal piece, Cousin brand leather, wire and silver accent beads decorate the wrap.

_________________________________________________________________________________

Now for the necklace!


This charm was made from a larger tarantula helmet. The holes at the top are actually where the tarantula's eyes were!


Can you see the hair??!! It's easiest to see at the bottom of the charm! Yes, the helmet is covered in hair. And there are those eye holes again.

Here is some information from Eric about the particular spider used within this charm:

"The spider molt of the cephalothorax used for the hemp necklace came from a male Mexican Red Knee Tarantula, scientific name Brachypelma smithi. As the name implies it is found in the deciduous tropical forests of the rather hilly southwestern Mexico. This tarantula grows rather slowly and matures pretty late in life. The females can live to be 30 years old, while the males only live to be about 5 (sadly, ours recently passed away in the lab :( ). It molts (sheds its exoskeleton--which consists of various proteins and chitin) in order to grow and replace missing appendages. I don't really know the average number of times, since it varies, but they will molt on multiple occasions during the year depending on its age. This tarantula is extremely docile, which makes it a popular species for the pet trade. "


I made an adjustable hemp necklace out of this charm. 
It's surfer-style meets serious science.
Cousin brand hemp was used and I did a square knot sinnet for that macrame look.
I'd say this is a different style of statement necklace!

That's it for my first spidey-style jewelry adventures. 
What do you think!!??


All photos copyright Allison Beth Cooling. Do not post/use without linking to me!


Wednesday, April 30, 2014

Fiesta Frenzy Bracelets


It's time for a fiesta!


The bright, bold, crazy actually, vibe of these bracelets just screams "party"! For this tutorial, I have used all materials from Goody Beads. They are an online retailer with loads of different "goodies" for beaders and crafters. If you need it, they have it. Shipping was insanely fast as well. I got the beads in two days! Can't beat that.
From stringing materials to charms to crystal, ceramic and enameled beads and more, it's a one-stop-shop for any project. 
Get connected with them for updates, promos and more!


I was inspired by summery stacking bracelets and the colors of a Mexican fiesta to make my versions. Goody Beads' rhinestone chain is a must-have; so sparkly and a great, heavy quality. There are so many finishes and rhinestone colors/sizes to choose from.
I used three different styles: crystal, ab coated and lime green.


I'm also using great silk cord and ribbon, which give the bracelets a luxe look. I used them for braiding and wrapping. Goody Beads' leather is also great for knotting.  You can get all different colors and sizes.


With around $60 of materials I was able to create all of these bracelets, and have materials leftover.
Another favorite material of theirs is their Chinese Knotting Cord. You literally get a huge amount (12 yards) for the $3.50 they charge. Use this cord for your next macrame project to get clean, even knots each time. Plus, the cord is super bright and colorful, and seals easily because you can melt/burn the ends (unlike if you were using hemp for macrame projects). Give the dated art of macrame a color-pop update!


I'm kind of obsessed with Goody's Czech Glass pyramid and spike beads; these are just my style! Plus, they add a bit of edge into the colorful bunch. I am also using embroidery floss I got from my local craft store to make the tassels, because tassels rock.


I've made 10 different style bracelets, but in all, I ended up making 12 bracelets, a whole armful. The macrame knot that I will be using for some of the bracelets will be the square knot; it's so easy! I have included directions here, but if you need extra help I've linked to my other square knot tutorials. 
Some of these bracelets work up quicker than others, especially the dainty initial one. The initial charm is so lightweight yet intricate, perfect for making bracelets. It's always good to mix dainty and chunky, different textures and colors, and different shapes for a cool, contrasted look.
Are we ready??!

Bracelet No. 1
-Simple Knotted Wraps-


I have three wraps here. The tutorial shows you how to make a single wrap (the gold/blue).


Materials:

Gold Jumprings
Gold Clasps
Gold Ribbon Ends
3mm Gold square beads


Step 1: Gather your beads and leather. Start somewhere in the middle of your entire piece of leather. Tie a knot. Add three beads...


Step 2: Tie another knot! Add three beads….repeat. Seriously, EASY!
Keep doing this until you reach your length; I made two that wrapped one time and one that wrapped three times. I can't give you an exact length you'll need for your leather, too many variables. I used the standard length that came from Goody Beads and made this bracelet and another one of a different style. Make sure the leather is at least 3 times the length of your wrist for a single wrap, just to be safe.

To finish, simply add cord ends and a clasp!


_________________________________________________________________


Bracelet No. 2
-Rhinestone and Silk Braided Wrap-


Materials:

Embroidery Floss
Gold clasp or magnetic clasp
Rhinestone Chain


Step 1: Cut a piece of rhinestone chain and silk ribbon that is 1.5 times the length of your wrist. Then, cut that same length in three different embroidery floss colors. Take a small piece of embroidery floss and tie everything together in a knot, catching the last rhinestone link. Cut the excess.


Step 2: Simply braid everything into a strand that is as long as you need your bracelet to be. You might have to cut the rhinestone chain to fit. Tie another knot with a piece of floss at the end. Finish the ends with a magnetic clasp. I secured the ends by tightly wrapping wire around the strands. Leave about an inch of excess string and cut the rest off.


_________________________________________________________________


Bracelet No. 3
-Chunky Rhinestone Wrap-


Materials: 

Gold Clasp or magnetic clasp
Gold Cord ends


Step 1: Cut a length of leather that is 2.5 times the length of your wrist. With a length of silk cord about 3 times the length of your wrist, secure it 1" from the end of the leather by tightly wrapping with wire. Lay the start of the rhinestone chain on the leather and wrap in-between the links with the silk cord. Continue wrapping, everything should be laying flat.


Step 2: When you've reached the desired length, simply finish by wrapping the leather and cord together again with wire. Add cord ends and finish with a magnetic clasp!


_________________________________________________________________
Bracelet No. 4
-Fiesta Wrap-


To make the tassel version, I used bigger rhinestones and green silk fairy ribbon, but the technique was the same. Simply make embroidery floss tassels by wrapping floss 10 times around your two fingers, add a jumpring around the loop. Tie near the top with another piece of floss, cut the excess. Then, cut through the loop to make the tassel.


I made all different colors, then added them with jump rings to the ribbon between the rhinestone links.


_________________________________________________________________


Bracelet No. 5
-Dainty Initial Bracelet-


Materials:

Clasp (optional!)


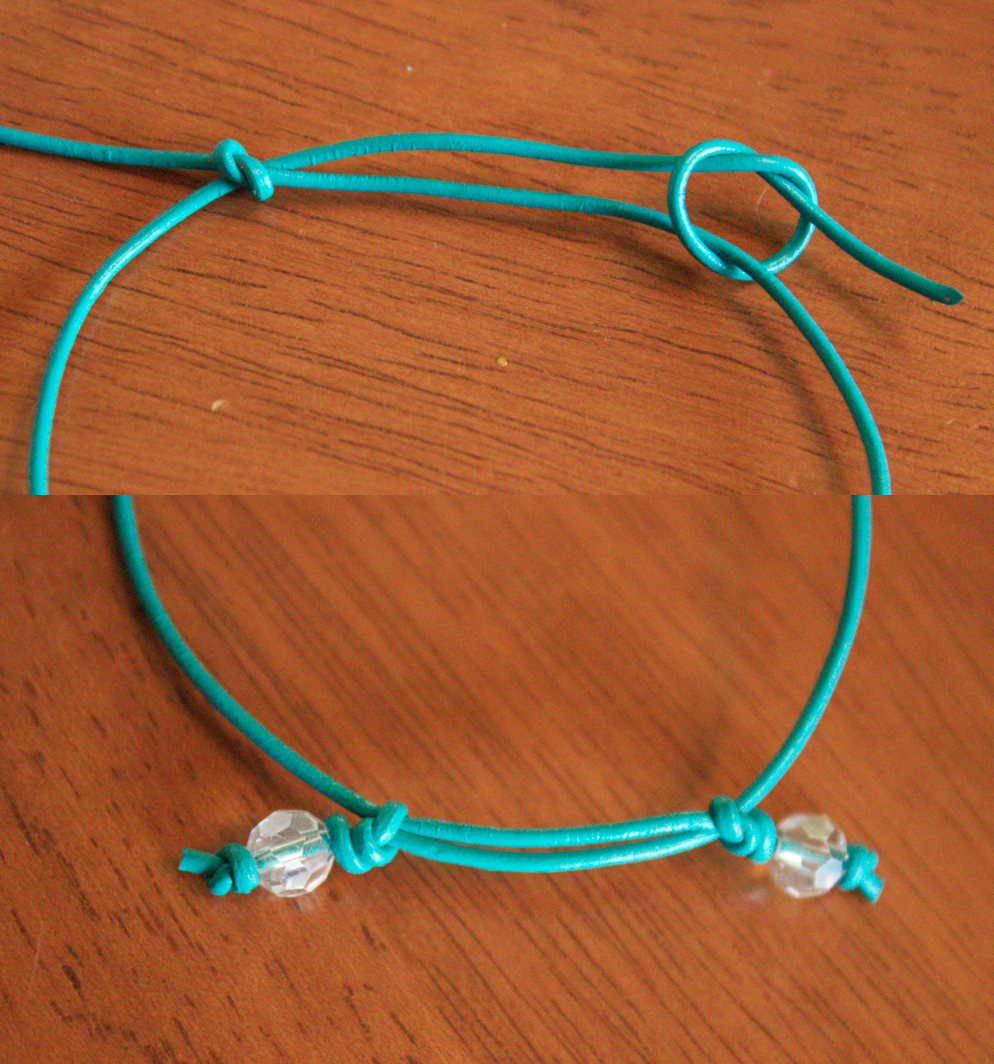
Step 1: Cut a length of leather 2 times the length of your wrist. Add your charm to the middle, and knot it in place. Add three more crystals on the sides, knotting in-between.


To make an adjustable back, simply tie a knot on either side with the opposite side of cord, adding crystals at the end. You can also simply end with a cord end and clasp!

_________________________________________________________________

Bracelet No. 6
-Macrame Spike Bracelet-


Materials:

Beading wire
Gold Clasps


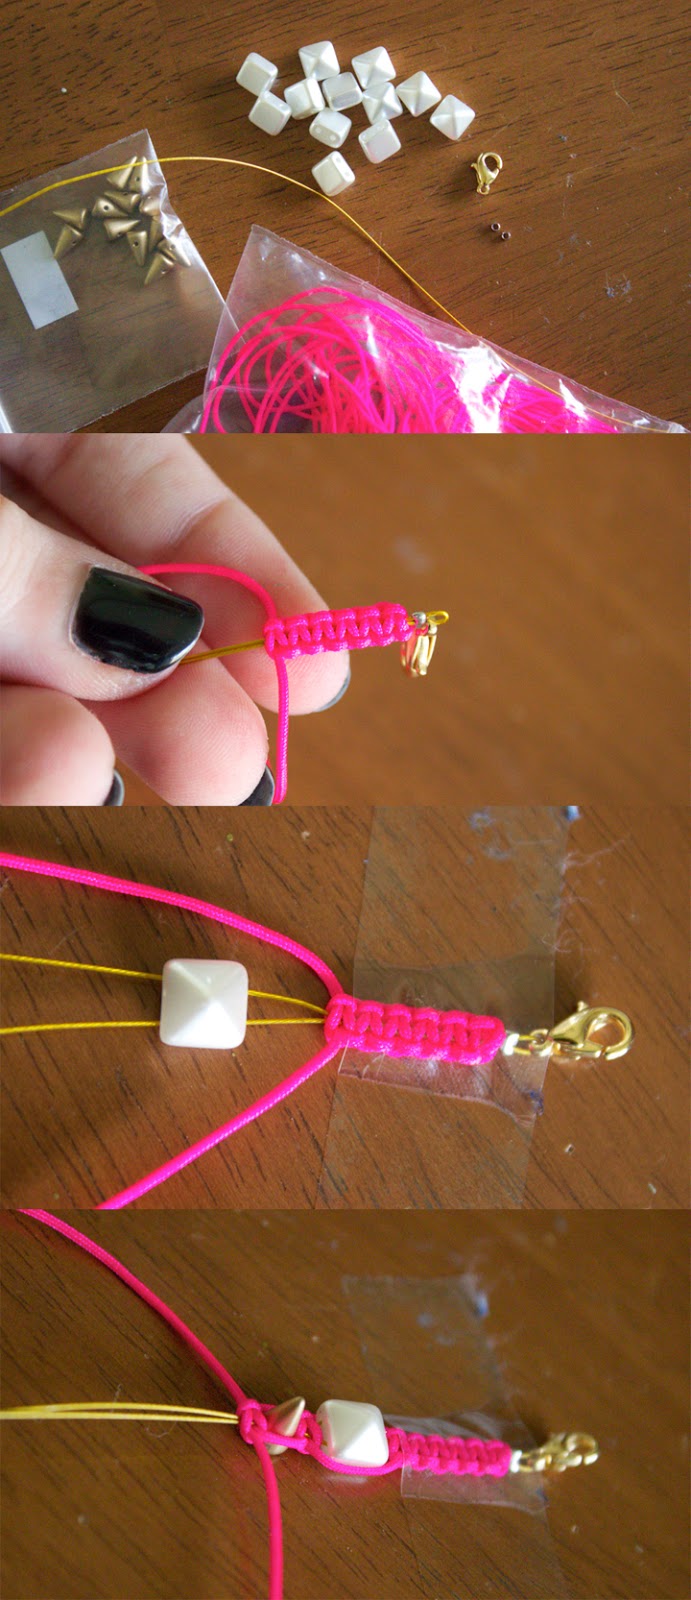
Step 2: Cut a length of beading wire 2.5 times the length of your wrist. Fold in half and secure it to a clasp with a crimp and cut the excess. Start a square knot at the very end with cord that is about 7 times the length of your wrist. For info on how to square-knot macrame, view my tutorial here!
Once you have about 7 knots or so, add a pyramid bead. Knot two knots, adding a spike bead, knot two knots.


Step 3: Continue beading and knotting to the end, knotting about 7 plain knots to finish. Finish by crimping on a jumpring and cutting off the excess wire. Cut off the extra knotting cord and then melt the ends to secure by using a metal knife held under a flame. Press the knife against the end of the cord and they will melt.


Bracelet No. 7
-Macrame Rhinestone Bracelet-


I did the same technique here, but using both the pink and blue cords and beading on cut rhinestones that I had used from the excess of my other projects. 


_________________________________________________________________


Bracelet No. 8
-Knotted Rhinestone Wrap-


Materials:

Embroidery floss
Clasp


Step 1: Cut about 3 times the length of your wrist from two colors (but four strands) of floss and the silk ribbon. Tie in a knot at top. Simply tape down, and take your floss OVER the silk t the right, behind the floss towards the left, and over the beginning of the floss. Pull the knot tight (not super-tight!) with your left hand, keeping it on the left side. Then, take the silk over the floss to the left, behind the floss towards the right and over the beginning of the silk. Pull tight with your right hand. Keep this going….


Step 2: When you reach the middle, add on rhinestones or rhinestone beads  (threaded onto looped headpins) to the silk, and catch in a knot. Then, finish by plain knotting. I added jump rings and clasps at the ends and cut the excess thread.

_________________________________________________________________


Bracelet No. 9


Materials:

Gold Wire
Rhinestone Chain, or Rhinestone/Crystal/Metal Beads
Gold Headpins


Step 1: Starting with one pyramid bead, create wrapped loops on all four sides with wire (24 gauge). Attach the next bead to it by wrapping loops, catching the first bead's loops within. Keep doing this until you have used enough beads to make your desired bracelet length.


Step 2: Add jump rings and a clasp on the unfinished ends. Then, simply decorate the loops with beads, crystals or rhinestones, attaching headpins with the beads on them. You can add as many or as little beads as you want! I used silver beads, crystals and leftover rhinestone chain.

_________________________________________________________________


Bracelet No. 10
-Edgy Macrame Wrap-


Materials:

Clasp/Jumpring


Step 1: Start the square knot sinnet. Cut one piece of cording (yellow) that is 3.5 times the length of your wrist. Cut a piece of (blue) cording that is about 8' long, and fold both of these cords in half. String on a jumpring and tie a knot to secure. Place the yellow cords in the middle. Take the rightmost blue string under the yellow towards the left. Take the leftmost blue string under the excess of the right string, over yellow and behind the right string again. Pull both strings evenly to tighten.
Reverse the directions for the second knot. Pull tight again. 
View the pictures for help!


Once you have a couple of knots, simply add on a metal bead to each blue string and catch them within the knot!
If you need more help with this technique, view this tutorial!


Don't they just look like a fiesta!?
The mix of beads here gives a very detailed look. Goody Beads has got just about every shape and size. I love those brass cubed beads and the gold square beads I used because they have great texture.
Using magnetic clasps here makes them super easy to take on and off. 
These would also be great to make as friendship bracelets. Pick your favorite bracelet style and make them in different colors for your friends! Or, you could make your friend all 10 styles if you are feeling generous!


Wear with minimal other accessories for a statement.
These quirky cat tights and knuckle ring are from Generation Bliss!
Pair with tights or leggings, combat boots and an oversize sweater for a grungy/cute, eclectic vibe.


Or wear with dark denim. Any way you choose, these bracelets are surely going to attract attention!!!
I think that was the longest tutorial ever.
If you make these, post pics to Instagram and tag with #quietlioncreations and @quietlioncreations. I'll repost!


All photos/text copyright Allison Beth Cooling. Do not post/use without linking back to me.