
Text in style with these DIY crystal phone cases - mixing sparkly gems, chains and charm dangles creates killer tech accessories that are totally customizable.

Use any phone case that you currently have - the crystals definitely spruce up the look. Or, if you're like me, create a wardrobe of phone cases that you can switch out depending on your mood.

You can find some really cool phone cases

Gem-Tac works really well here at holding the stones. I made a crystal phone case a while back (featured in my China post), and it lasted me all the way till about a month ago, when the crystals started to come off. I was expecting it to last a month maybe, but it definitely surprised me. On a design like this (where the crystals are placed in a more singular style) you might get a little less life out of it - pack the crystals tightly together to make it last longer, it's got more strength.

I'm not a huge fan of yellow - but I love the mix of this pale yellow with aurora borealis crystals. I added chunkier gems on this case, because the more glitz, the better.

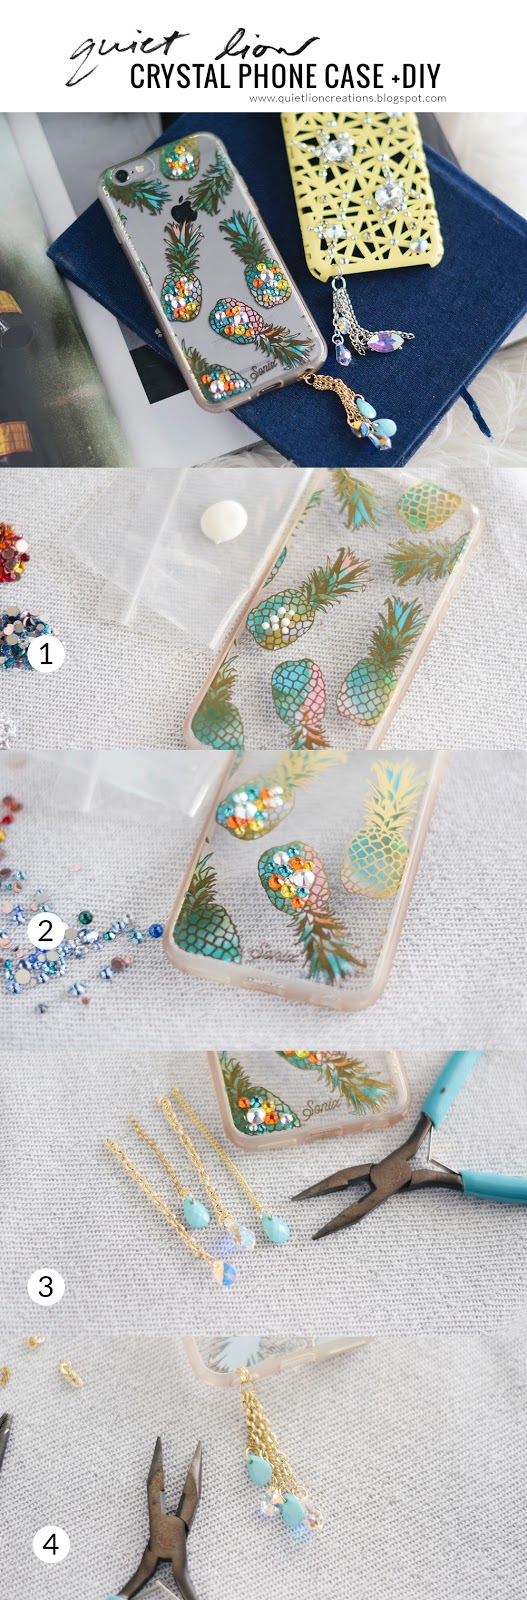
Step 1: Gather materials. Needed are phone cases, mixed flatback crystals (mine from Swarovski)

A toothpick definitely helps for gluing the crystals - place dots of glue on the phone case where you want the flatbacks.

Gently but firmly place the flatbacks on the glue - if it spreads a bit, it's ok, Gem-Tac dries clear.

Add more glue dots to anywhere else you'd like sparkles!

Use a mix of crystal sizes to get a more detailed look. Let the glue fully dry - a good way to tell when it's (mostly) dry is to check and make sure the glue turned clear.

Gather the 6mm and 10mm jump rings, chain and pendants/charms.

Cut the chain in various lengths (1"-3") and add the charms at bottom with 6mm jump rings. Use flatnose pliers (mine by Cousin) to open and close the rings. Use wirecutters to cut the wire (my pliers above have wire cutters built in).

Add all chains to a 6mm jump ring, and close the ring. Add 10mm jump rings at top (2 for strength) and connect to the bottom of the phone case.

For a more glitzy look, use Swarovski rivolis (buy them at Michaels stores!) and glue to the case. It works well if the case has cutouts so you can set the rival in the cutout notch.

Add chain dangles - use silver for a modern look!

Connect to the bottom of the phone case with 10mm silver jump rings.

Tropical colors definitely fit the pineapple theme.

It would also be pretty amazing to cover the case in a crystal mosaic - maybe even create a large pattern (I can see an evil eye, hamsa, or yin yang) design on a plain phone case.


COPYRIGHT
Content within this post is copyright Allison Beth Cooling for Quiet Lion Creations.
If you'd like permission to use a photo, email me at allison@quietlioncreations.com
If you'd like permission to use a photo, email me at allison@quietlioncreations.com
No comments:
Post a Comment